11
EnglIsh
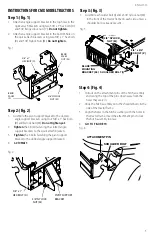
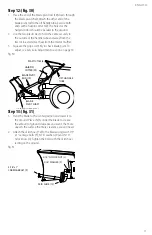
Step 12: (fig. 30)
1. Place the end of the blade pivot rod (19) down through
the blade pivot shaft. Attach the other end of the
blade pivot rod to the lift handle tube. Secure both
ends with a hairpin cotter (W). The holes for the
hairpin cotters should be parallel to the ground.
2. Use the two plastic ties to hold the cable securely to
the outside of the handle tube and away from the
tractor to avoid direct heat from the tractor muffler.
3. Squeeze the grip assembly to check blade pivot. To
adjust, see Service & Adjustments section on page 14.
BLADE PIVOT
ROD (19)
LIFT HANDLE
TUBE
BLADE
PIVOT SHAFT
HAIRPIN
COTTER (W)
HAIRPIN COTTER (W)
PLASTIC TIES (4)
Fig. 30
Step 13: (fig. 31)
1. Pivot the blade to the center position and lower it to
the ground. Place shims under the blade to create
the amount of ground clearance you want. The more
uneven the surface the more clearance you will need.
2. Attach the skid shoes (12) to the blade using two 5/16"
x 1" carriage bolts (F), 5/16" washers (P) and 5/16"
nylock nuts (L). Tighten the bolts with the skid shoes
resting on the ground.
5/16" x 1"
CARRIAGE BOLT (F)
5/16" WASHER (P)
5/16" NYLOCK NUT (L)
SKID SHOE (12)
Fig. 31

