background image


8

UNPACKING 


The machine is properly packaged and 
shipped complete in a crate for safe 
transportation. When unpacking, carefully 
inspect the crate to ensure that nothing has 
been damaged during transit. Open the 
crate and check that the lathe and the parts 
are in good condition. 
 
While doing inventory, if you can not find 
any part, check if the part is already 
installed on the machine. Some of the parts 
come pre-assembled. 


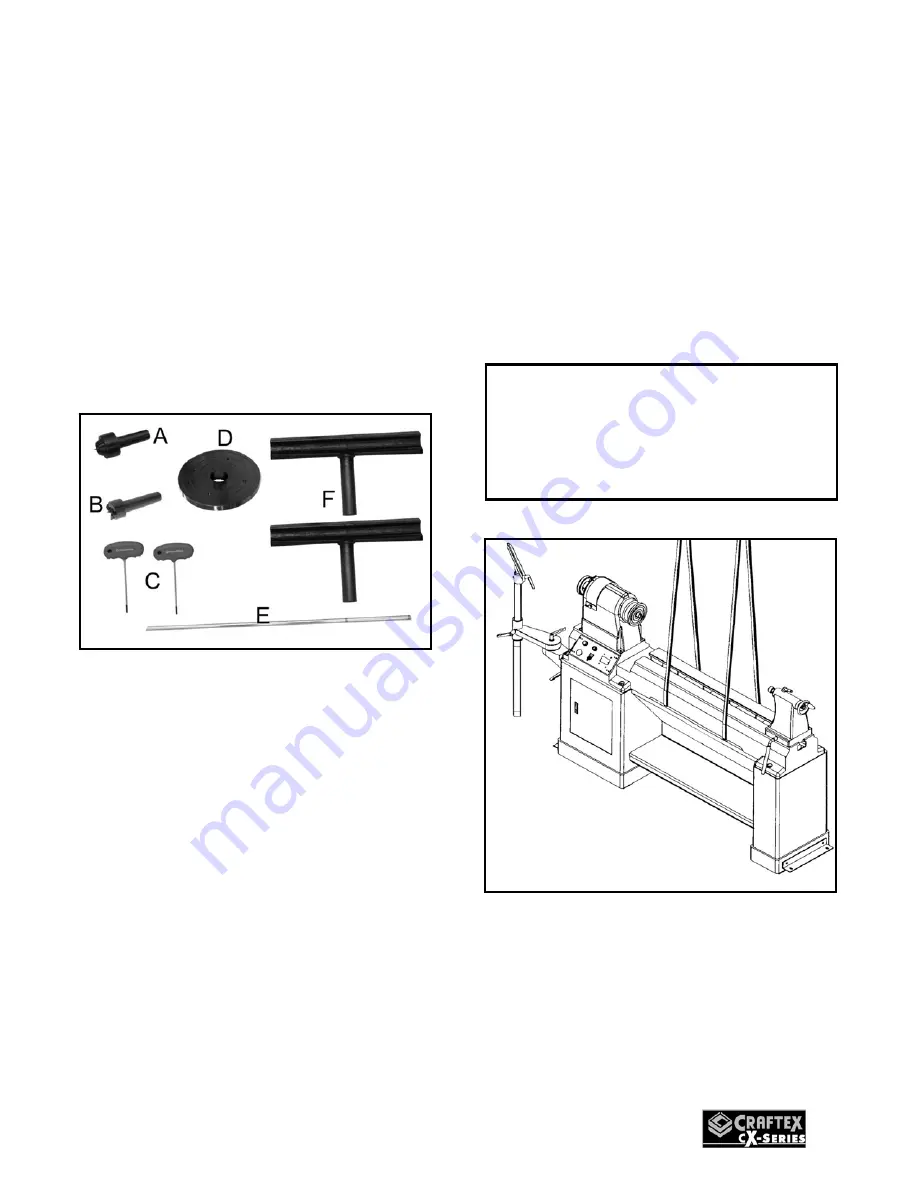
Figure-2 Inventory 


LIST OF CONTENTS                  QTY 


A. 

Tailstock Center ..................................1 

B. 

Headstock Center................................1 

C. 

T-Handle Wrenches ............................2 

D. 

Faceplate ............................................1 

E. 

Knockout Rod......................................1 

F. 

Tool Rests ...........................................2 

G. 

Lathe (No Shown) ...............................1 

SETUP 


Before setting up your machine, you should 
read and understand the instructions given 
in this manual. 
 
The unpainted surfaces of this lathe are 
coated with rust preventive waxy oil and 
you will want to remove this before you 
begin assembly. Use a solvent cleaner that 
will not damage the painted surfaces. 


Figure-3 Lifting straps positioned to lift the 
lathe 
 
 
Figure-3 shows where to position the straps 
to lift the lathe safely. Make sure when 
lifting, the lathe is balance on both sides.


WARNING 

CX800 is a very heavy machine. Do not 
over-exert yourself. Use a fork truck or 
other mechanical devices for safe 
moving. 

Summary of Contents for CX800

Page 1: ...CX800 43 X 20 HEAVY DUTY WOOD LATHE with VARIABLE SPEED User Manual ...

Page 2: ...ving Headstock Center 9 Installing Removing Tailstock Center 9 Installing Removing Faceplate 10 Control Panel 11 Test Run 12 Tailstock 13 Inboard Tool Rest 13 Outboard Tool Rest 14 Spindle Speeds 14 Work piece Inspection 15 Spindle Turning 16 Faceplate Turning 16 Outboard Turning 17 Maintenance 17 Belt Replacement 18 Troubleshooting 21 Parts Breakdown 22 23 Parts List 24 25 Warranty 26 ...

Page 3: ...O NOT use prescription or other drugs that may affect your ability or judgment to safely use your machine DISCONNECT the power source when changing drill bits hollow chisels router bits shaper heads blades knives or making other adjustments or repairs NEVER leave a tool unattended while it is in operation NEVER allow unsupervised or untrained personnel to operate the machine NEVER reach over the t...

Page 4: ...es to a complete stop Start and stop the machine yourself To avoid accidental injuries make sure not to have anybody help you do this Always wear dust mask operation creates a lot of sawdust and or chips Always operate the tools in a well ventilated area and make sure to use a proper dust collection system for optimum dust removal Turn OFF then machine before making any adjustments or servicing Do...

Page 5: ...e and safety procedures should be adhered to Motor 3 HP 220 V 60 Hz 3 Phase Amp 9 Amp Number of Speeds Variable Speed 50 3000 RPM Spindle Taper MT2 Spindle Size 1 1 4 x 8 TPI RH Swing Over Bed 20 Swing Over Tool Rest 16 3 4 Swing Over Gap 24 7 8 Distance Between Centers 43 Spindle Speed Ranges Variable 50 100RPM 100 2000RPM 150 3000RPM Tailstock Taper MT2 Bed Construction Precision Ground Cast Iro...

Page 6: ...6 CX800 HEAVY DUTY WOOD LATHE PHYSICAL FEATURES ...

Page 7: ...ian ensure that the line is properly wired Figure 1 220 Volts outlet for CX800 It is strongly recommended not to use extension cords with your CX800 Always try to position your machine close to the power source so that you do not need to use extension cords When it is necessary to use an extension cord make sure the extension cord does not exceed 50 feet in length and the cord is 12 gauge to preve...

Page 8: ... C T Handle Wrenches 2 D Faceplate 1 E Knockout Rod 1 F Tool Rests 2 G Lathe No Shown 1 SETUP Before setting up your machine you should read and understand the instructions given in this manual The unpainted surfaces of this lathe are coated with rust preventive waxy oil and you will want to remove this before you begin assembly Use a solvent cleaner that will not damage the painted surfaces Figur...

Page 9: ...hand so that it does not fall on the lathe bed when it is knocked out See figure 5 Insert the knockout rod through the opposite end of the headstock and tap the center to remove it See figure 5 Figure 5 Removing headstock center INSTALLING REMOVING TAILSTOCK CENTER The CX800 comes with an MT2 tapered center for the tailstock TO INSTALL THE CENTER Loosen the quill lock lever and rotate the tailstoc...

Page 10: ... other side of the headstock allowing turning work piece more than 20 in diameter TO INSTALL THE FACEPLATE Make sure the switch is in the OFF position the cord is disconnected from the power outlet Pull the spindle lock pin out and rotate it from nine o clock unlocked position to twelve o clock locked position See figure 7 Figure 7 Spindle lock pin Rotate the spindle by hand until the lock pin eng...

Page 11: ...ion of the spindle to clockwise or anticlockwise D SPINDLE SPEED CONTROL KNOB Adjusts the spindle speed from low to high within the range the belt is positioned on the pulleys E SPINDLE RPM DIGITAL READOUT Shows the spindle RPM rotation per minute in digital form WARNING The faceplate must be properly threaded onto the spindle and secured by tightening the four set screws to prevent the work piece...

Page 12: ... or if it vibrates excessively shut the machine OFF immediately and disconnect from the power source Investigate to determine the problem with your machine See page 21 for troubleshooting 6 Push the OFF Emergency Stop Button in it should turn the machine OFF and stop the rotation the spindle 7 Do not re set the switch and push the ON button The machine should not start at this point If the machine...

Page 13: ...in different positions and different angles on the lathe bed The tool rest can also be positioned and secured in different angles and height TO POSITION THE INBOARD TOOL REST ON THE LATHE BED Loosen the tool rest holder lock lever see figure 12 and slide the tool rest holder to the desired position on the lathe bed Tighten the lock lever and secure it in place Loosen the lock lever securing the to...

Page 14: ...djust the tool rest height and position it as required for the operation and tighten the lock lever SPINDLE SPEEDS The CX800 features three speed ranges and these speed ranges are selected by positioning the belt on different grooves of the pulleys See figure 14 Figure 14 CX800 speed range The low speed range is used when turning a work piece where a lot of material must be removed and rough finis...

Page 15: ... INSPECTION The work piece must be inspected before turning Some work pieces are not safe to turn or may require adjustment before they are safe for turning Before turning any wood make sure to inspect it for nails staples small pieces of stone or metal and any other object which is dangerous to come on contact with the chisel If the work piece contains any of these objects and it comes in contact...

Page 16: ...e center comes in contact with the work piece Make sure the live center is aligned with the marked center on the end of the work piece Now loosen the quill lock lever and rotate the tailstock hand wheel pushing the live center into the work piece about 1 4 and re tighten the quill lock lever Position the tool rest approximately 1 8 above the work piece center and 1 4 away from the work piece Befor...

Page 17: ... and wiping with dry piece of cloth 3 Apply a thin layer of oil on the bed slide ways and the unpainted cast iron surface to keep the bed rust free 4 A build up of dust in the motor can cause motor damage Periodic cleaning of the motor is not only recommended but mandatory for normal wood lathe performance WARNING Before starting the lathe rotate the spindle by hand and make sure that there is eno...

Page 18: ... from the power source Loosen the set screws securing the hand wheel shown in figure 18 and remove the hand wheel Figure 18 Securing set screws Loosen the set screws securing the shaft joint as shown in figure 19 and unthread the shaft joint and remove it Figure 19 Removing the shaft joint Loosen the set screws securing the shaft joint adaptor Unthread the shaft joint adaptor and remove it See fig...

Page 19: ...door and loosen the motor lock lever Use the motor height hand wheel to raise the motor up Retighten the lock lever and remove the belt from the motor pulley See figure 24 Figure 24 Removing the belt from motor pulley Remove the belt from the spindle pulley Now with one hand holding the spindle from inside of the headstock tap the spindle using mallet from outboard side towards the tailstock See f...

Page 20: ...pindle and secure it by tightening the set screws on it Align the key way with the key on the shaft joint and reinstall the shaft joint onto the shaft joint adaptor securing it by tightening the set screws Install the hand wheel and secure it by tightening the set screws Make sure the belt is installed on the right grooves on the pulleys and tensioned properly Tighten the lock lever to lock the mo...

Page 21: ...21 ...

Page 22: ...22 ...

Page 23: ...23 ...

Page 24: ...K LEADSCREW 42 SHORT HANDLE 43 ECCENTRIC SPINDLE 44 TAIL STOCK SPINDLE 45 THIMBLE SPINDLE 46 BEARING 47 MOVEABLE THIMBLE HEAD 48 TAIL STOCK ECCENTRIC SHAFT 49 CONTROL PANEL FACEPLATE 50 SCREW CAP 3 16 24 1 2 52 NUT LOCK M12 1 75 53 WASHER FLAT 1 2 54 SLIDE PLATE 55 HANDWHEEL 56 HANDWHEEL HANDLE 57 TOOL REST BASE 58 TOOL REST 59 TUBE 60 L BRACKET 62 TOOL REST LOCK SHAFT 63 INVERTER PWR CORD 64 LIMI...

Page 25: ...HAFT 114 ADJUST HANDLE M12 1 5 80 115 ADJUST HANDLE M12 1 75 20 116 ADJUST HANDLE M12 1 75 25 117 BOLT HEX M8 1 25 30 118 WASHER FLAT 8 5 16 2 THICK 119 NUT LOCK M8 1 25 120 SCREW SET M8 1 25 10 121 SWITCH ASSY 122 BRACKET 124 SWITCH BOX 125 STRAIN RELIEF PG11 126 STRAIN RELIEF PG13 5 127 RING SHAFT 128 RING SHAFT 129 RUBBER HANDLE COVER 130 SCREW SET 5 16 18UNC X 1 4 131 LIMIT SWITCH 132 LIMIT SW...

Page 26: ...r handy All returned merchandise will be subject to a minimum charge of 15 for re stocking and handling with the following qualifications Returns must be pre authorized by us in writing We do not accept collect shipments Items returned for warranty purposes must be insured and shipped pre paid to the nearest warehouse Returns must be accompanied with a copy of your original invoice as proof of pur...

Reviews: