ADVANCED MENU
~
28
~
7.1.5 SNTP
In this menu list, you can set to synchronize your DVR time with the networked computer systems.
Note: Before using this function, please connect your DVR to Internet.
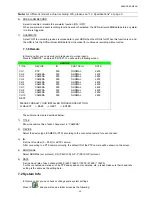
Move to “SNTP”, and press “ENTER” to enter the submenu. You will see the following screen:
DISPLAY
GMT (GMT+08:00)
TAIPEI
NTP SERVER
tock.stdtime.gov.tw
SYNC PERIOD
DAILY
PLEASE CONSULT YOUR INSTALLER FOR ADVANCE SETTING
uv
SELECT
s
BACK
t
NEXT
ENTER
1) GMT
Select your time zone. There are 75 time zones for you to choose.
2) NTP
SERVER
Users can change the default NTP server to another server they’re familiar with.
3) SYNC
PERIOD
Select to synchronize the DVR time everyday (DAILY), or turn this function off (OFF).
7.1.6 Display
In this menu list, you can set up the settings of display.
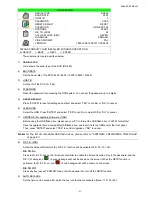
Move to “DISPLAY”, and press “ENTER” to enter the submenu. You will the following screen:
DISPLAY
DE-INTERLACE ON
QUAD DWELL DURATION (SEC)
(Selected Models Only)
03
FULL SCREEN DWELL DURATION (SEC)
03
VGA OUTPUT
1024 x 768
PLEASE CONSULT YOUR INSTALLER FOR ADVANCE SETTING
uv
SELECT
s
BACK
t
NEXT
ENTER
The submenu items are described below:
1) DE-INTERLACE
Select to enable or disable the de-interlace function (ON / OFF).
Note: If you set the recording image size as “FRAME”, please TURN ON de-interlace function.
If you set the recording image size as “CIF”, please TURN OFF the de-interlace function.
2)
QUAD DWELL DURATION (SEC)
(Selected Models Only)
Set the quad dwell duration time (3 / 5 / 10 / 15 seconds).
3)
FULL SCREEN DWELL DURATION (SEC)
Set the full screen dwell duration time (3 / 5 / 10 / 15 seconds).
4) VGA
OUTPUT
Select the VGA output resolution. There are seven options for your choice:
800 x 600 / 1024 x 768 (default) / 1280 x 1024 / 1440 x 900 / 1400 x 1050 / 1680 x 1050 / 1600 x 1200


