CONNECTIONS AND SETUP
-12-
Note: Please DO NOT change the date or time of your DVR after the recording function is activated.
Otherwise, the recorded data will be disordered and you will not be able to find the recorded file
to backup by time search. If users change the date or time accidentally when the recording
function is activated, it’s recommended to clear all HDD data, and start recording again.
Note: For the first time to use the DVR, please charge the DVR for at least 48 hours continuously after the
date & time is set correctly.
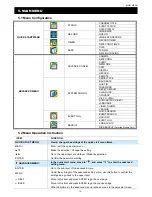
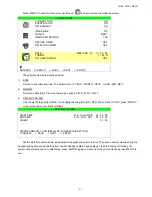
Press “MENU” and enter the password to go to the quick-start menu list. The default admin password is 0000.
Move to the icon
and you can set the date / time / daylight saving in this menu list.
QUICK START
CHANNEL TITLE
ON
EVENT STATUS
ON
DATE DISPLAY
ON
IMAGE SIZE
CIF
QUALITY BEST
IMAGE PER SECOND
120
RECORD TIMER
OFF
DETECTION TIMER
OFF
DATE
2008 / APR / 23 11 : 20 : 45
FORMAT
Y / M / D
DAYLIGHT SAVING
OFF
ADVANCE
uv
SELECT
s
BACK
t
NEXT
ENTER
3.5 Password Setting
Press “MENU” and enter the password to go to the quick-start menu list. Then, move to “ADVANCE” to enter the
advanced setting menu.
In the “ADVANCE” menu, move to “
” (SYSTEM INFO). Select “PASSWORD” and press “ENTER” to enter the
submenu to set the password (four digits).
SYSTEM INFO
SERIAL TYPE
RS485
BAUD RATE
2400
HOST ID
0
PASSWORD XXXX
RESET DEFAULT
RESET
CLEAR HDD
HDD-MASTER-1
UPGRADE START
R.E.T.R. (MIN)
05
AUTO KEYLOCK (SEC)
NEVER
LANGUAGE ENGLISH
VIDEO FORMAT
PAL
VERSION 1083-1028-1009-1013-02-0000
PLEASE CONSULT YOUR INSTALLER FOR ADVANCE SETTING
uv
SELECT
s
BACK
t
NEXT
ENTER


