background image

ROUTER CONFIGURATION

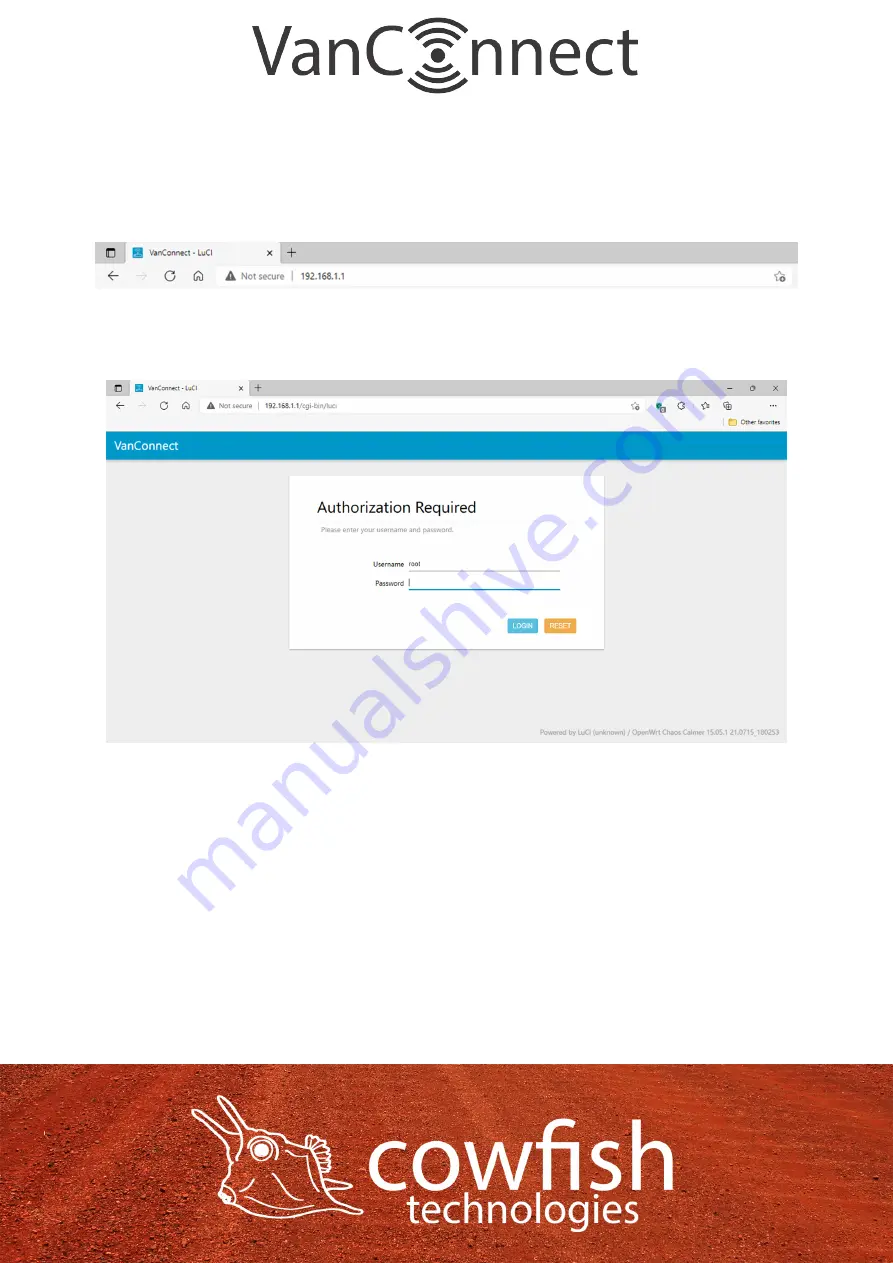
To access the configuration utility, open a web browser such as Internet 
Explorer, Microsoft Edge or Google Chrome and enter the address of the 
router (http://192.168.1.1 by default). 

You will be presented with a login screen. The default login username is 
“root”, and the default login password is “admin”.

Note: If you get a “Page cannot be displayed” error, please refer to the 
Troubleshooting section for assistance.

Once you have successfully logged in, you will see the VanConnect home 
page. On this page you can view information about your Internet connection, 
the wireless/LAN status, your 3G/4G signal strength and system information.

Page 10

Summary of Contents for VanConnect

Page 1: ......

Page 2: ...stered trademarks of Cowfish Technologies Pty Ltd in Australia VanConnect and the VanConnect logo are trademarks or registered trademarks of Cowfish Technologies Pty Ltd in Australia All other company or product names mentioned herein are trademarks or registered trademarks of their respective companies Copyright 2021 Cowfish Technologies Pty Ltd All rights reserved This publication may not be rep...

Page 3: ... CONTENTS 4 INTRODUCTION 5 HARDWARE OVERVIEW 5 INSTALLATION 6 CONNECTING TO THE WIRELESS NETWORK 9 ROUTER CONFIGURATION 10 HOW TO USE AND CONNECT TO VANCONNECT MEDIA STORAGE 17 TROUBLESHOOTING 30 TECHNICAL SPECIFICATIONS 33 PRODUCT WARRANTY 35 Page 3 ...

Page 4: ...ONTENTS Page 4 VanConnect unit Mounting Brackets x2 Power Cable Internal 3G 4G Antennas x2 External Antenna Bracket optional Telstra Starter Kit Internal WiFi Antennas x4 External Antenna optional Ethernet cable ...

Page 5: ... users can connect to the internet transfer data and stream media Simply insert your 3G 4G SIM card and share your 3G 4G Internet connection through a WiFi5 802 11ac wireless network or using any of the four 10 100 Ethernet ports The VanConnect 4G LTE Router can be installed quickly and easily almost anywhere Page 5 ...

Page 6: ...This section will guide you through the router installation process Ensure that your VanConnect 4G LTE Router is disconnected and powered off before performing the steps below Install the router on a wall or on a shelf near a 12V power point Placement of the router is very important Ensure that the internal antennas can be positioned in a vertical position pointing up or down Use the included moun...

Page 7: ...e Caution Always unplug power down the router before installing or removing the SIM card Never insert or remove the SIM card while the router is in use Attach the included internal antennas to the connectors on the the sides of the router screwing them in clockwise Ensure that 3G 4G antennas are connected to the 3G 4G points and that the WiFi antennas are connected to the WiFi 2 4 INT WiFi 2 4 EXT...

Page 8: ...A vertical position is required for optimal signal Connect the power adapter to the DC power socket on the side panel of your VanConnect Plug the other end of the power adapter into a 12V wall outlet Make sure the power button is in the On position 1 The Power LED will light up to indicate that power is being supplied to the router and the router is turned on 2 The LEDs on the front panel will fla...

Page 9: ...s are in the set the wireless password section To find and connect to the WiFi network 1 Make sure that the VanConnect router is powered on and the WiFi status lights are on 2 Check to make sure that WiFi is enabled on your computer or mobile device and search for WiFi networks a Windows computer Click the Internet Access icon which is usually found on the bottom right side of your screen b Mac co...

Page 10: ...h a login screen The default login username is root and the default login password is admin Note If you get a Page cannot be displayed error please refer to the Troubleshooting section for assistance Once you have successfully logged in you will see the VanConnect home page On this page you can view information about your Internet connection the wireless LAN status your 3G 4G signal strength and s...

Page 11: ...you will find a menu Clicking on one of these menu icons will take you to the appropriate configuration section On each page fill out the desired settings and click Apply when you are done or Reset to revert to the old settings Page 11 ...

Page 12: ...our 2 4GHz WiFi network b g n protocol and wifi1 is your 5GHz network ac protocol Click on Edit for wifi0 to set the name of your wireless network SSID ESSID the encryption method and the wireless password The name of your wireless network ESSID is the name that you will see when searching for WiFi networks Note You should not give both WiFi networks the same name as they operate on different band...

Page 13: ...ame under Interface Configuration ᐅ General Change the name to one of your choosing and select Save The next step is to configure your network password and encryption method Go to Interface Configuration ᐅ Wireless Security Page 13 ...

Page 14: ...atibility with any older devices you might have but should only be used if there are some older WPA TKIP wireless clients on the network that do not support WPA2 AES Select the encryption standard that you prefer to use and set your network password at least 8 digits Click Save and Apply If you have changed the ESSID you will have to reconnect to the WiFi network as per the previous section CONNEC...

Page 15: ...ystem ᐅ Administration to change the administrator password Enter a new password and click Save and Apply then choose Exit to return to the login page to verify whether the modification has been successful and then re enter the new password to log in Page 15 ...

Page 16: ...ssues that you are unable to resolve Method 1 After the device is powered on use a toothpick or similar and press the Reset button for at least 6 seconds Wait for the device to restart Method 2 In the configuration utility select System ᐅ Backup Flash Firmware then click the Perform Reset button next you will see a dialog box Really reset all changes Select OK to complete a reset Page 16 ...

Page 17: ...your devices on the network To start ensure that you have a storage device such as a USB drive portable hard drive or SD card connected to the VanConnect The storage device is to be formatted as FAT32 NTFS ext2 ext3 or ext4 for the system to read the device Most USB drives and SD cards will come pre formatted as FAT32 If your drive is not in one of the above formats ensure you do a full format on ...

Page 18: ...nConnect Network shares have been set up on your router for your convenience You do not have to make any alterations to this However if you would like to alter the network share settings navigate to Services ᐅ Network Shares Page 18 ...

Page 19: ...Page 19 Map Network Drives in Windows On you PC open file explorer Navigate to Computer ᐅ Map network drive Select any driver letter that you wish to be associated with your network drive ...

Page 20: ...to the VanConnect WiFi You will be able to view your files add new files delete files and play your media files like photos music and videos over the network You do not have to map a network drive again when you change from one USB device to another Simply remove the USB device from the router when the device is not in use Insert the new USB device and the VanConnect will automatically mount your ...

Page 21: ...how to connect and stream multimedia content over the VanConnect network directly to your TV You will be able to play your files via applications like VLC Kodi and many more pre installed on the VanPlayer Please refer to the VanPlayer manual for the details to connect the VanPlayer to the VanConnect Page 21 ...

Page 22: ...unes or Google play For playing movies and music over the VanConnect network we recommend using VLC VLC media player is a free and open source portable cross platform media player software and streaming media server developed by the VideoLAN project https www videolan org vlc VLC is available for desktop operating systems and mobile platforms such as Android iOS and iPadOS Go to the Apple App Stor...

Page 23: ... iPads Ensure that your iPhone or iPad is connected to your VanConnect WiFi network Open the VLC app and navigate to network Select VANCONNECT under File Servers and then select Connect under Connect to Server Page 23 ...

Page 24: ...find the mapped drives for your USB device and your SD card USB drives are mapped as sda1 SD cards are mapped as mmcblk0p1 VLC will only show sda1 and or mmcblk0p1 if a device USB drive SD card has been connected to the VanConnect Page 24 ...

Page 25: ...For Android phones and tablets Ensure that your Android phone or tablet is connected to your VanConnect WiFi network Open the VLC app and navigate to browse Select VANCONNECT under Local Network Page 25 ...

Page 26: ...find the mapped drives for your USB device and your SD card USB drives are mapped as sda1 SD cards are mapped as mmcblk0p1 VLC will only show sda1 and or mmcblk0p1 if a device USB drive SD card has been connected to the VanConnect Page 26 ...

Page 27: ...admin Try logging in using the default password If you cannot log in with the default user name and password please restore the router to factory settings then log in with the default password What are the APN settings for my provider APN settings at the time of writing this manual are as following Telstra APN telstra wap Vodafone APN live vodafone com Optus APN connect Consult your provider s web...

Page 28: ...he wireless adapter The IP address is displayed in the right pane How do I find my computer s IP address on devices running other operating systems To find the IP address on devices running other operating systems Refer to the user documentation for your operating system or computer Why do need the know the device s MAC address You must know the MAC address for a device when you are doing the foll...

Page 29: ...ess on a Windows 8 device To find the MAC address on a Windows 8 device 1 In the Charms bar click the Search icon 2 Select Command Prompt 3 At the command prompt enter ipconfig all and press the Enter button 4 Write down the physical address for the entry that relates to the wireless network connection It appears as a series of numbers and letters This is the MAC address of your wireless adapter H...

Page 30: ...rn off your device wait 10 seconds and turn your device on Restart your computer Turn off or temporarily disable any security programs or firewalls If possible try using another computer or mobile device to connect to your mobile hotspot If you can then the problem is with the device that cannot connect not the mobile hotspot I cannot access the Internet If you are connected to the WiFi network bu...

Page 31: ...GHz to 5 GHz If the network signal is low consider using external antennas I have forgotten my admin login password If you changed the admin login password and cannot remember the password that you created you must set the router back to factory defaults For information about how to reset to factory default settings see the Factory Reset section The WiFi network name is not in the list of networks...

Page 32: ... create or update the default connection profile To change the default connection profile settings 1 From a computer that is connected to your network launch a web browser 2 Enter http 192 168 1 1 A login page displays 3 Enter the router password The password is case sensitive The dashboard displays 4 Select Network ᐅ Interfaces the interfacces will be displayed 5 Select Edit under the 4G interfac...

Page 33: ...TECHNICAL SPECIFICATIONS Page 33 ...

Page 34: ...Page 34 ...

Page 35: ...o the exclusions and limitations below all parts of the manufacture and assembly of the goods carried out by Cowfish will be free from defects in materials and workmanship for a period of 12 months from the date of purchase Warranty Period This warranty is not transferable to a subsequent customer if the goods are sold by the original customer during the Warranty Period If a defect appears in Cowf...

Page 36: ...ithin 14 days of your goods being returned to Cowfish s nominated warehouse Where goods have been assessed to be repairable under the manufacturers warranty you may be supplied with details of an authorised repairer You may also be provided with an indicative repair and or replacement time which may vary due to reasons beyond our control or the repairer s reasonable control such as part availabili...

Page 37: ...of the goods Goods returned for repair or credit will be assessed and repaired or replaced within a reasonable time Credits will normally be processed within 14 days of your goods being returned to Cowfish s nominated warehouse Where goods have been assessed to be repairable under this warranty you may be supplied with details of an authorised repairer You may also be provided with an indicative r...

Page 38: ...This page has intentionally been left blank Page 38 ...

Reviews: