Covaris AFA ultraCUBE User Manual Download Page 12


AFA ultraCUBE User Manual 


12 


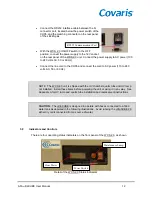
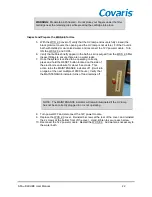
Connect the RS232 interface cable between the D-
connector port, located below the power switch of the 
CH05, and the matching connector on the rear panel 
of the LE220-plus. 


With the WCS 2.0 ON/OFF switch in the OFF 
position, connect the power supply to the 12V socket 
on the rear panel of the WCS 2.0 unit.  Connect the power supply to AC power (100 
to 240 volts AC, 50 or 60 Hz). 


Connect the line cord to the CH05 and connect the cord to AC power (115 to 240 
volts AC, 50 or 60 Hz). 


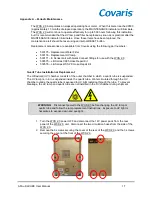
NOTE:  The WCS 2.0 unit is shipped with the UV chamber quartz tube and UV lamp 
not installed.  Install these items before powering the unit or using it in any way.  See 
Appendix A for UV lamp and quartz tube installation and replacement instructions. 


CAUTION:

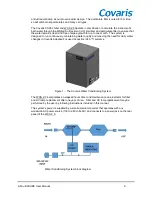
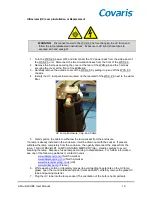
  The ultraCUBE is designed to operate with hoses connected to a filled 

water tank as depicted in the following illustrations.  Avoid running the ultraCUBE 2.0 
either dry or disconnected from a source of water. 


3.0 

Indicators and Controls 

 
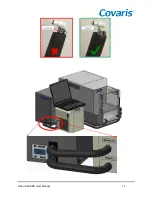
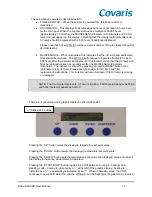
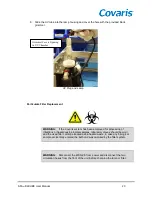
There are four operating status indicators on the front panel of the WCS 2.0, as shown. 


Detail of the WCS 2.0 Status Indicators 


Hour Meter 

Maintenance Lamp 

Power Switch 

RS232 Communications Port 

Summary of Contents for AFA ultraCUBE

Page 1: ...traCUBE User Manual 1 AFA ultraCUBE Water Management System USER MANUAL A system developed for maintaining bath water quality in Covaris AFA instrumentation Product Name AFA ultraCUBE Product Number 5...

Page 2: ...NIVERSAL PRECAUTIONS Universal Precautions should be followed on all specimen samples regardless of whether a sample is known to contain an infectious agent Laboratories handling specimen samples are...

Page 3: ...D YOU HAVE ANY QUESTIONS CONCERNING THIS EQUIPMENT Warranty Services The purchased equipment is covered by a twelve 12 month warranty which includes all the service and support necessary so that the c...

Page 4: ...AFA ultraCUBE User Manual 4 This page intentionally left blank...

Page 5: ...ENTS 1 0 INTRODUCTION 6 2 0 ultraCUBE Installation and Setup 10 3 0 Indicators and Controls 12 4 0 System Operation 14 5 0 Specifications 15 6 0 Service 16 Appendix B User Guidelines and Troubleshooti...

Page 6: ...enience if disregarded CAUTION Equipment damage may occur WARNING Personal injury may occur 1 2 Safety Symbols and Warnings The following symbols are employed in product labeling and in this manual Wh...

Page 7: ...T operate the equipment and contact Covaris immediately 8 If the equipment is used in a manner not specified by the manufacturer the protection provided by the equipment may be impaired Do not remove...

Page 8: ...cally switch between chilling heating mode and standby mode in which water continues to circulate through the WCS to maintain water quality without the energy consumption required for cooling System C...

Page 9: ...continuously maintaining water quality and relieving the need for daily water changes in Covaris Adaptive Focused Acoustics AFA systems Figure 1 The Covaris Water Conditioning System The WCS 2 0 incor...

Page 10: ...ermoCube manual on CD Setup Refer to Appendix A of this manual to install the quartz tube and UV lamp into the WCS 2 0 Place the WCS 2 0 and the CH05 on the bench next to the Ultrasonicator They may b...

Page 11: ...AFA ultraCUBE User Manual 11...

Page 12: ...or 60 Hz NOTE The WCS 2 0 unit is shipped with the UV chamber quartz tube and UV lamp not installed Install these items before powering the unit or using it in any way See Appendix A for UV lamp and...

Page 13: ...ractical after the MAINTENANCE indicator illuminates The indicator is shut off by pressing an internal RESET button once replacement is performed Please see Appendix A for UV lamp and filter replaceme...

Page 14: ...is is normal and the turbulence subsides once the WCS 2 0 fills with water The CH05 and WCS 2 0 system when operating will automatically circulate bath water filter it and retard the growth of algae o...

Page 15: ...gh 33 cm 13 inches deep 28 cm 11 inches wide and 33 cm 13 inches high Weight Approximately 4 5 kilograms 10 lbs Approximately 12 7 kilograms 28 lbs Ambient Temp 19 C to 25 C 66 F to 77 C 0 C to 40 C 3...

Page 16: ...ice covarisinc com CAUTION PREPARING THE WCS 2 0 FOR SHIPMENT PURGE THE WCS 2 0 OF WATER AND REMOVE THE UV LAMP QUARTZ TUBE Please purge the WCS 2 0 of standing water prior to return shipment particul...

Page 17: ...2 0 500575 LE Series CH05 Hose Repair Kit 500576 LE Series WCS 2 0 Hose Repair Kit Quartz Tube Installation or Replacement The Ultraviolet UV chamber consists of the outer chamber in which a quartz tu...

Page 18: ...and draw it out of the UV chamber by gently pulling upward There are two O rings which will likely come out with the tube If the quartz tube is being installed for the first time the two O rings will...

Page 19: ...the water filter UV Lamp Enclosure Cap and Cable 5 Gently pull on the cable to withdraw the lamp socket from the enclosure If a lamp is already installed in the enclosure it will be drawn out with th...

Page 20: ...ocessing of infectious or hazardous biological samples laboratory gloves should be worn and the used filter cartridge treated as biohazard waste in case any biological sample accidentally entered the...

Page 21: ...ideways to release the fitting Repeat for the upper fitting The quick release fittings will seal and prevent water from draining from the cartridge or tubing 3 Pull on the used filter cartridge to rem...

Page 22: ...ensure there are no water leaks 7 Once the system is verified to be operating correctly press and hold the RESET button located on the side of the electronics enclosure for about 5 seconds This action...

Page 23: ...fittings No operation no power No 12V supply to the WCS 2 0 Verify that power pack is plugged into AC wall power and connected to the 12V jack on the rear panel of the WCS 2 0 MAINTENANCE indicator is...

Reviews: