background image

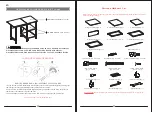
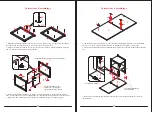
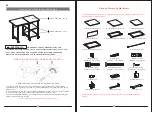
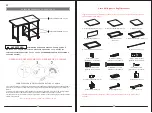
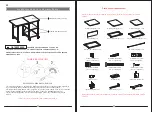
Lista delle parti e degli accessori

A- Grande pannello superiore (x 1)

B- Piccolo pannello superiore (x 1)

C- Ripiano fisso (x 2)

D- Pannello posteriore (x 1)

E- Telaio dell'estremità 

sinistra (x 1)

F- Telaio dell'estremità centrale (x 1)

(1) Serratura a camma 

(Quantità. 8+1 di ricambio)

(2) Bullone a camma 

(Quantità. 8+1 di ricambio)

(3) M6 x 12 mm Bullone 

(Quantità. 4+1 di ricambio)

(4) Bullone M6 x 25 mm

 (Quantità. 2+1 di ricambio)

(5) Bullone M6 x 50 mm 

(Quantità. 4+1 di ricambio)

(6) Vite M4 x 15 mm 

(Quantità. 18+1 di ricambio)

(7) Perno di posizionamento (x1)

(8) Cerniera (x2)

(9) Ruota girevole (x3)

(10) Ruota bloccabile (x3)

Chiave esagonale (x1)

Chiave aperta (x1)

G- Telaio dell'estremità destra (x 1)

H- Barra in metallo (x 2)

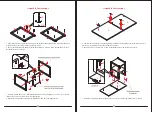
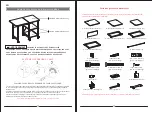
OPERAZIONE DEL SISTEMA DELLA SERRATURA A CAMME

COME FUNZIONA IL SISTEMA DI SERRATURA A CAMMA

Ora sei pronto per montare il sistema di serratura a camma.

C A R I C H I   M A S S I M I   C O N S I G L I A T I


AVVERTENZA

                                                      UTILIZZARE QUESTO PRODOTTO SOLO QUANDO È 
INDICATA LA CAPACITÀ DI CARICO MASSIMA. SE SUPERA LA CAPACITÀ DI 
CARICO MASSIMA SPECIFICATA, IL TAVOLO POTREBBE DIVENTARE INSTABILE E 
CAUSARE LESIONI.

CARICO MASSIMO: 90,7 kg

CARICO MASSIMO: 22,6 kg

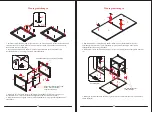
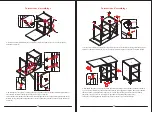
1. Avvitare il bullone a camma negli inserti filettati sul pannello. Collegare entrambi i pannelli insieme; 

Assicurarsi che il bullone a camma entri nel foro preforato all'estremità del pannello per la serratura a 

camma.

2. Inserire la serratura a camma nel grande foro preforato sul pannello. Assicurarsi che la freccia sulla 

faccia della serratura a camma sia rivolta verso l'esterno e punti verso il bullone a camma.

3. Prendere un cacciavite a stella e ruotare la serratura a camma in senso orario per bloccare la serratura 

a camma in posizione.

Leggere completamente le istruzioni e verificare che tutte le parti e gli accessori elencati siano presenti 

prima di iniziare l'assemblaggio.

Strumenti richiesti: Chiave esagonale e chiave aperta (in dotazione) e cacciavite a croce (non in 

dotazione).

IT

26

27

Summary of Contents for 59670831

Page 1: ...FSERLEBNIS GUTE PRODUKTE und EFFIZIENTEN SERVICE zu bieten Avec votre valuation inspirante COSTWAY continuera fournir une EXP RIENCE D ACHAT PRATIQUE des PRODUITS DE QUALIT et un SERVICE EFFICACE Con...

Page 2: ...10 Locking Caster Qty 3 Hex Wrench Qty 1 Open Wrench Qty 1 CAM LOCK SYSTEM OPERATION HOW THE KNOCK DOWN KD ASSEMBLY SYSTEM WORKS You are now ready to assemble the KD unit MAXIMUM RECOMMENDED WEIGHT L...

Page 3: ...ckets as shown 5 Combine the Top Panels A and B together by attaching two Butt Hinges 8 at the joint with six 15 mm Screws 6 per hinge using the pilot holes as a guide 6 Securely screw one Locator Pin...

Page 4: ...or assistance to lift the unit upright and position at the desired location 13 You can collapse the Large Top Panel A to save space To fold the desk lift up the Large Top Panel A a little so that you...

Page 5: ...ER ALS DIE ANGEGEBENEN MAXIMALGEWICHTE IST KANN ZU INSTABILIT T F HREN UND M GLICHE VERLETZUNGEN VERURSACHEN maximale Belastung 90 7 kg maximale Belastung 22 6 kg 1 Schrauben Sie die Nockenschraube in...

Page 6: ...us Schrauben Sie die Nockenschrauben 2 wie gezeigt fest in die Gewindebuchsen 5 Kombinieren Sie die Tischplatten A und B indem Sie zwei Sto scharniere 8 an der Verbindungsstelle mit sechs 15 mm Schrau...

Page 7: ...zuheben und an der gew nschten Stelle zu positionieren 13 Sie k nnen das gro e obere Bedienfeld A reduzieren um Platz zu sparen Um den Schreibtisch zusammenzuklappen heben Sie die gro e obere Abdeckun...

Page 8: ...AVEC LES CHARGES MAXIMALES INDIQU ES L UTILISATION AVEC UNE CHARGE PLUS LOURDE QUE LES CHARGES MAXIMALES INDIQU ES PEUT ENTRA NER UNE INSTABILIT CAUSANT DES BLESSURES VENTUELLES CHARGE MAXIMALE 90 7 k...

Page 9: ...rs le haut Vissez fermement les boulons came 2 dans les douilles filet es comme indiqu 5 Combinez les panneaux sup rieurs A et B ensemble en fixant deux charni res 8 l articulation avec six vis 6 de 1...

Page 10: ...soulever l unit en position verticale et la positionner l endroit souhait 13 Vous pouvez rabattre le grand panneau sup rieur A pour gagner de la place Pour plier le bureau soulevez un peu le grand pa...

Page 11: ...DO PARA SER UTILIZADO NICAMENTE CON LAS CARGAS M XIMAS INDICADAS EL USO CON UNA CARGA M S PESADA QUE LAS CARGAS M XIMAS INDICADAS PUEDE RESULTAR EN INESTABILIDAD CAUSANDO POSIBLES LESIONES CARGA M XIM...

Page 12: ...riba Atornille firmemente los pernos de leva 2 en los encajes roscados como se muestra 5 Combine los paneles superiores A y B juntos fijando dos bisagras 8 a la junta con seis tornillos de 15 mm 6 par...

Page 13: ...tar la unidad en posici n vertical y colocarla en el lugar deseado 13 Puede plegar el panel superior grande A para ahorrar espacio Para doblar el escritorio levante un poco el panel superior grande A...

Page 14: ...ATI AVVERTENZA UTILIZZARE QUESTO PRODOTTO SOLO QUANDO INDICATA LA CAPACIT DI CARICO MASSIMA SE SUPERA LA CAPACIT DI CARICO MASSIMA SPECIFICATA IL TAVOLO POTREBBE DIVENTARE INSTABILE E CAUSARE LESIONI...

Page 15: ...rivolti verso l alto Avvitare saldamente i bulloni a camma 2 nelle prese filettate come mostrato 5 Unire i pannelli superiori A e B fissando due cerniere di testa 8 al giunto con sei viti da 15 mm 6 p...

Page 16: ...to in posizione verticale e posizionarlo nella posizione desiderata 13 Puoi piegare il grande pannello superiore A per risparmiare spazio Per piegare il tavolo sollevare leggermente il pannello superi...

Page 17: ...NIE TEN PRODUKT JEST PRZEZNACZONY DO U YTKOWANIA MAJ C NA UWADZE MAKSYMALNE OBCI ENIA W PRZECIWNYM RAZIE MO E TO SPOWODOWA NIESTABILNO I P NIEJSZE OBRA ENIA CIA A Maksymalny ud wig 90 7 kg Maksymalny...

Page 18: ...twory by y skierowane do g ry Wkr ci mocno ruby mimo rodowe 2 w gwintowane tuleje jak pokazano na rysunku 5 Po cz g rne panele A i B razem mocuj c dwa zawiasy 8 do cze za pomoc sze ciu rub 15 mm 6 dla...

Page 19: ...ro o pomoc w podniesieniu urz dzenia do pozycji pionowej i ustawieniu w danym miejscu 13 Aby zaoszcz dzi miejsce mo na z o y du y panel g rny A Aby z o y biurko unie nieco du y panel g rny A tak aby m...

Reviews: