


- 7 -
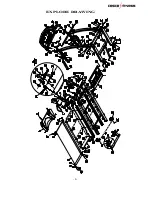
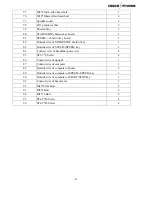
37
Connect sleeve of running platform
2
38
Rectangle plug tube
2
39 Right
upright
1
40 Foam
2
41 Left
upright
1
42
M8*30mm Allen head bolt
1
43 Cross
brace
1
44 Safety
key
1
45 Computer
1
46 ST4.8*16
Screw
11
47
M8*50mm Allen head bolt
2
48 Ø8
Washer
18
49
M8*85mm Allen head bolt
2
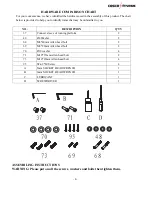
50 M6*30mm
Bolt
6
51 M6*40mm
Bolt
2
52 Ø6
washer
8
53
M6 Nylon nut
8
54 5/32
Bolt
2
55 5/32
no-slip
washer
2
56 ST2.9*8
Screw
2
57
M8*35mm Allen head bolt
1
58
M8 Nylon nut
1
59
M8*20mm Allen head bolt
4
60
Ø8 spring washer
6
61
M8*65mm Allen head bolt
1
62 M8
Bolt
1
63
M8*12mm Allen head bolt
2
64 ST4.2*10
Screw
6
65 ST4.2*15Screw
2
66 ST4.2*15
Screw
8
67 ST4.2*20
Screw
2
68
M8*40mm Allen head bolt
4
69
M8*20mm Allen head bolt
4
70 Ø10
washer
4
71 M10*35mm
Allen
head
bolt
2
72 Ø17
Plastic
washer
4
73 M10*20mm
Allen
head
bolt
4
74
M10 Nylon nut
2
Summary of Contents for SX-1122
Page 1: ...TREADMILL MANUAL SX 1122...
Page 5: ...5 EXPLORE DRAWING...