Cosco Fitness SX-1122 Manual Download Page 18


- 18 -

1. Important: Never use abrasives or solvents to clean the treadmill. To prevent damage to the   

computer, keep liquids away and keep it out of direct sunlight. 

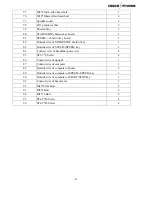
2. Inspect and tighten all parts of the treadmill regularly. Replace any worn parts immediately 

CLEANING: 

Routine cleaning of your treadmill will extend the product’s life. 

1.  

Warning: 

To prevent electrical shock, be sure the power to the treadmill is OFF and the power cord is unplugged from 

the wall electrical outlet before attempting any cleaning or maintenance. 

2. 

Important:

 Never use abrasives or solvents to clean the treadmill. To prevent damage to the computer, keep liquids 

away and keep it out of direct sunlight. 


3.


After each workout: 

Wipe off the console and other treadmill surfaces with a clean, water              dampened soft 

cloth to remove excess perspiration 

4.

  Weekly:

 Use of a treadmill mat is recommended for ease of cleaning. Dirt from your shoes contacts the belt and 

eventually makes it to underneath the treadmill.


Vacuum the underneath treadmill once a week. 

BELT ADJUSTMENT:


Belt adjustment and tension performs two functions: adjustment for tension and centering. The running belt has 

been adjusted properly at the factory. However transportation, uneven flooring or other unpredicted reasons could 

cause the belt to shift off center resulting in the belt rubbing with the plastic side rail or end caps and possibly 

causing damage. To adjust the belt back to it proper position please follows the directions below: 

1.


Walking belt has shifted to the left:


First unplug the power cord from the surge protector. Using the hex key provided, turn the left rear roller 

adjustment bolt 1/4 turn in the clockwise direction. Plug the power cord back into the surge protector and run 

the treadmill at 2.5 mph. You should see the belt start to correct itself, moving back towards the center. Repeat 

the above procedure until the walking belt is centered. It may be necessary to set walking belt tension once you 

have completed this procedure if the belt feels like it is slipping while walking. Refer below to the “Walking 

belt slipping” instructions. 

2.

    Walking belt has shifted to the right: 

First unplug the power cord from the surge protector. Using the hex key provided, turn the right rear roller 

adjustment bolt 1/4 turn in the clockwise direction. Plug the power cord back into the surge protector and run 

the treadmill at 2.5 mph. You should see the belt start to correct itself, moving back towards the center. Repeat 

the above procedure until the walking belt is centered. It may be necessary to set walking belt tension once you 

have completed this procedure if the belt feels like it is slipping while walking. Refer below to the “Walking belt 

slipping” instructions. 

3. 

  Walking belt is slipping:


First unplug the power cord from the surge protector. Using the hex key provided, turn both the left and right 

rear roller adjustment bolts the same distance, usually a 1/4 turn in the clockwise direction. Plug the power cord 

back into the surge protector and run the treadmill at 2.5 mph. You should now walk on the belt to determine if 

the belt is still slipping. Repeat the above procedure until the walking belt is not slipping. The tension should be 

just tight enough not to slip.         

  WARNING! Do not over tighten rollers! This will cause premature roller bearing failure!     

Summary of Contents for SX-1122

Page 1: ...TREADMILL MANUAL SX 1122...

Page 2: ...itness equipment Do some warm up exercise before use you ll get twice the result with half the effort Such as follows extend the neck up and down twist the waist left and right level push forwards upr...

Page 3: ...l clear 3 The treadmill running mat will not stop immediately if any object becomes caught in the mat or rollers IN EMERGENCY Pull the safety key cord to remove safety key 4 Always check the treadmill...

Page 4: ...should be taken when mounting and dismounting the unit 15 Do not place any liquids on any part of the treadmill 16 To prevent shock keep all electric components such as the motor cord and switch away...

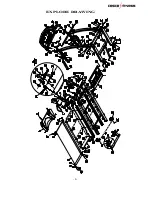
Page 5: ...5 EXPLORE DRAWING...

Page 6: ...ol board of motor 1 15 Transformer 1 16 Power wire 1 17 Power wire cushion 1 18 Fuse 1 19 Power key 1 20 Adjust cap of motor 1 21 Running platform 1 22 Ferric block of side rail 2 23 Rubber washer of...

Page 7: ...t 2 52 6 washer 8 53 M6 Nylon nut 8 54 5 32 Bolt 2 55 5 32 no slip washer 2 56 ST2 9 8 Screw 2 57 M8 35mm Allen head bolt 1 58 M8 Nylon nut 1 59 M8 20mm Allen head bolt 4 60 8 spring washer 6 61 M8 65...

Page 8: ...cut key 1 83 Outside wire of SPEED SPEED key 1 84 Connect wire of handlebar pulse wire 2 85 ST2 3 6 Screw 4 86 Control wire of upright 1 87 Control wire of computer 1 88 Outside wire of computer of pu...

Page 9: ...n n o C 7 3 2 r e h s a W 8 8 4 2 t l o b d a e h n e l l A m m 0 4 8 M 8 6 2 t l o b d a e h n e l l A m m 0 2 8 M 9 6 4 r e h s a w 0 1 0 7 2 t l o b d a e h n e l l A m m 5 3 0 1 M 1 7 4 t l o b d...

Page 10: ...e You should unscrewing the M10 20 Allen head bolt as above picture before assembling STEP1 Then fix the Running platform on the base frame with M10 35mm Allen head bolt 71 and Connect sleeve of runni...

Page 11: ...he control wire of base frame 91 2 Then fix the uprights on the base frame with M10 20mm Allen head bolt 73 and 10 washer 70 M8 40mm Allen head bolt 68 and 8 Washer 48 STEP3 1 Connect the cross brace...

Page 12: ...pulse Control wire of upright 86 and Control wire of computer 87 Outside wire of SPEED SPEED key 83 and Outside wire of computer of SPEED SPEED key 89 Connect wire of handlebar pulse wire 84 and Outsi...

Page 13: ...Strike the damper 2 Hold on to the top end covers as shown by the arrow on top left and pull down the treadmill slowly on the ground and fix the knob nut To fold up the treadmill To fold up treadmill...

Page 14: ...key the MANUAL LED will bright and the time window will flash Press SPEED SPEED key to adjust the setting value Press START key the motor will run after the countdown of 3 seconds The initial speed i...

Page 15: ...PROG1 PROG2 PROG3 PROG4 PROG5 PROG6 be displayed in turn Press MODE key all the setting value will be cleared it will display a initial value and flash in the setting window SPEED In the running stat...

Page 16: ...ed The Display Range The initial data during Normal Mode The initial data of Count Down Mode The range of data during Count Down Mode The Range of the Data TIME mm ss 0 00 20 00 8 00 99 00 Every time1...

Page 17: ...n panel and controller Check that the lines between panel and controller are connected or not Replace the connection lines Replace the device Replace the panel Replace the adapter Er2 Error on motor M...

Page 18: ...urge protector Using the hex key provided turn the left rear roller adjustment bolt 1 4 turn in the clockwise direction Plug the power cord back into the surge protector and run the treadmill at 2 5 m...

Page 19: ...8300 available at most stores TO APPLY LUBRICANT TO THE WALKING BELT 1 Position the walking belt so that the seam is located on top and in center of the walking board 2 Insert the spray nozzle into th...

Reviews: