9
7.5 LCD Display
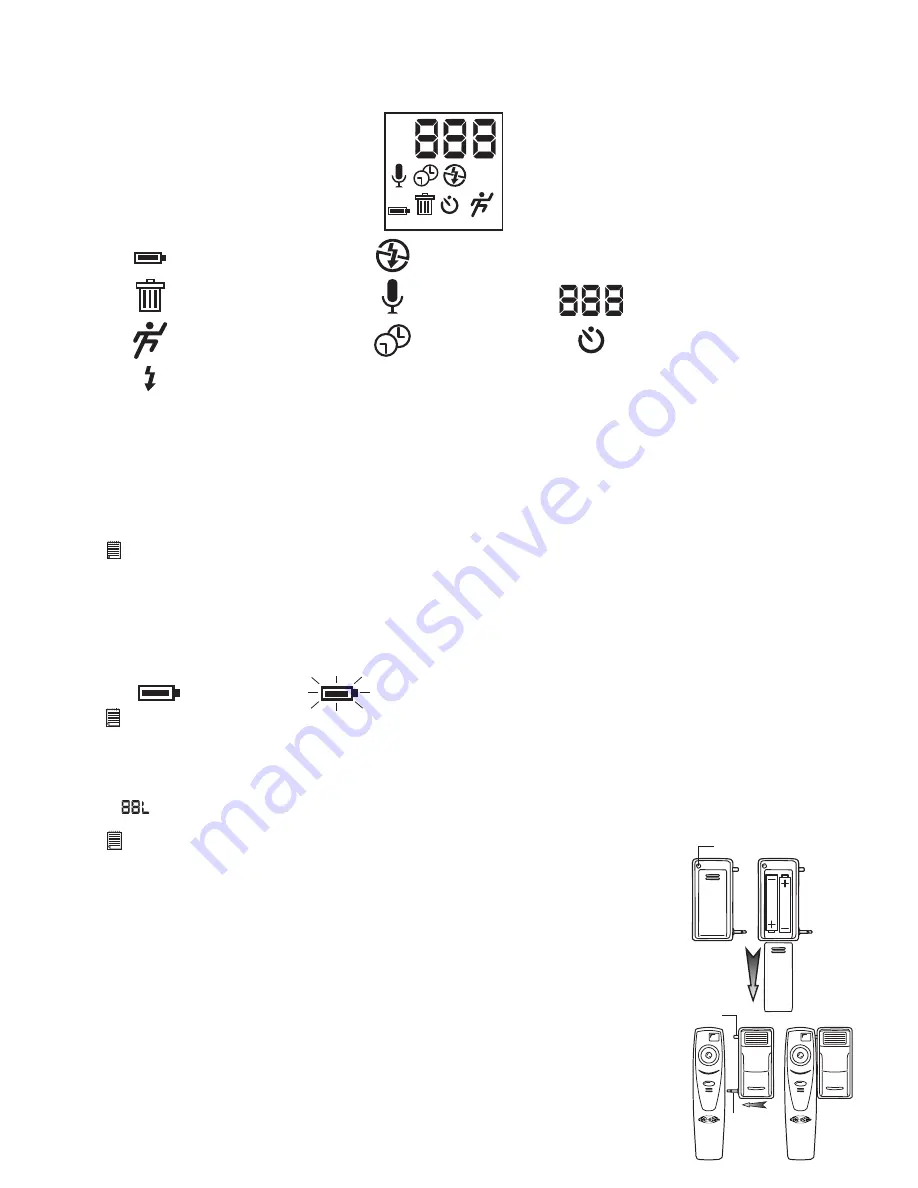
By default, the icon LCD screen displays the number of images remaining that can be taken before the
Stylus 1800
's
memory is full. It is also used in conjunction with the Mode Button to display various
Stylus 1800
mode settings, battery
status and approximate memory capacity.
7.6 Power
7.6.1 Stand-by Mode
After a period of 30 seconds inactivity, the
Stylus 1800
will switch to Stand-by Mode automatically and the LCD will go
blank. All images taken will not be lost as they are stored in the
Stylus 1800
's memory. Simply press the Mode Button to
reactivate your
Stylus 1800
.
Important Notes:
• It is important to note that any images stored in your
Stylus 1800
's memory will be lost if the battery is totally drained or removed and the
backup battery is removed (and the USB cable is not connected to your
Stylus 1800
and to your powered on PC or Mac). Please make sure
your wanted images are uploaded to your PC or Mac via the USB cable before changing or installing batteries.
• If you cannot reactivate your
Stylus 1800
by pressing the Mode Button, this means your battery power is low. You must upload stored
images to your computer and replace with fresh batteries.
7.6.2 Main Battery
When your
Stylus 1800
has full power, the Battery indicator on the LCD display will be fully shown. When power is low,
the icon will flash then the LCD will go blank. This indicates that the batteries are weak and need to be replaced.
Important Notes:
• When the low battery power segment is displayed, you must upload any stored images within 6 hours. Do not replace your battery before
you have downloaded or saved your images to your PC or Mac.
• After the LCD go blank and you cannot activate your
Stylus 1800
by pressing the Mode Button, you must upload stored images and
replace the batteries.
7.6.3 Backup Battery
If is displayed on your LCD this means the backup battery power is low or the backup battery is missing.
Important Note:
Upload any images stored in your
Stylus 1800
to your computer before removing the backup battery.
7.7
Cool-iCam
Flash Bar (Optional Accessory)
How to replace battery in
Cool-iCam
Flash Bar
Remove the battery compartment cover from the flash bar and insert
2 AAA batteries (supplied) into the battery compartment. Ensure you
have inserted the batteries using the correct polarity (+) (-) by following
the diagram inside the battery compartment.
Replace the cover.
Connecting the
Cool-iCam
Flash Bar to
Stylus 1800
Carefully connect the Flash Bar to the side of the
Stylus 1800
ensuring
the power connection is fitted all the way in, and the locating plug is
fitted into the plug hole near the top of the
Stylus 1800
.
Battery indicator
Delete All
Continuous Mode
Auto Flash On
Auto Flash OFF
Audio Recording
Time Lapse Mode
High Resolution
Low Resolution
No. of images remaining / LCD message
(details will be available under separate sections.)
Self-Timer
Full Battery Power
Low Battery Power
HIGH
LOW
HIGH
LOW
A
A
A
A
A
A
Power LED
Locating Plug
Power
Connection


