background image

17

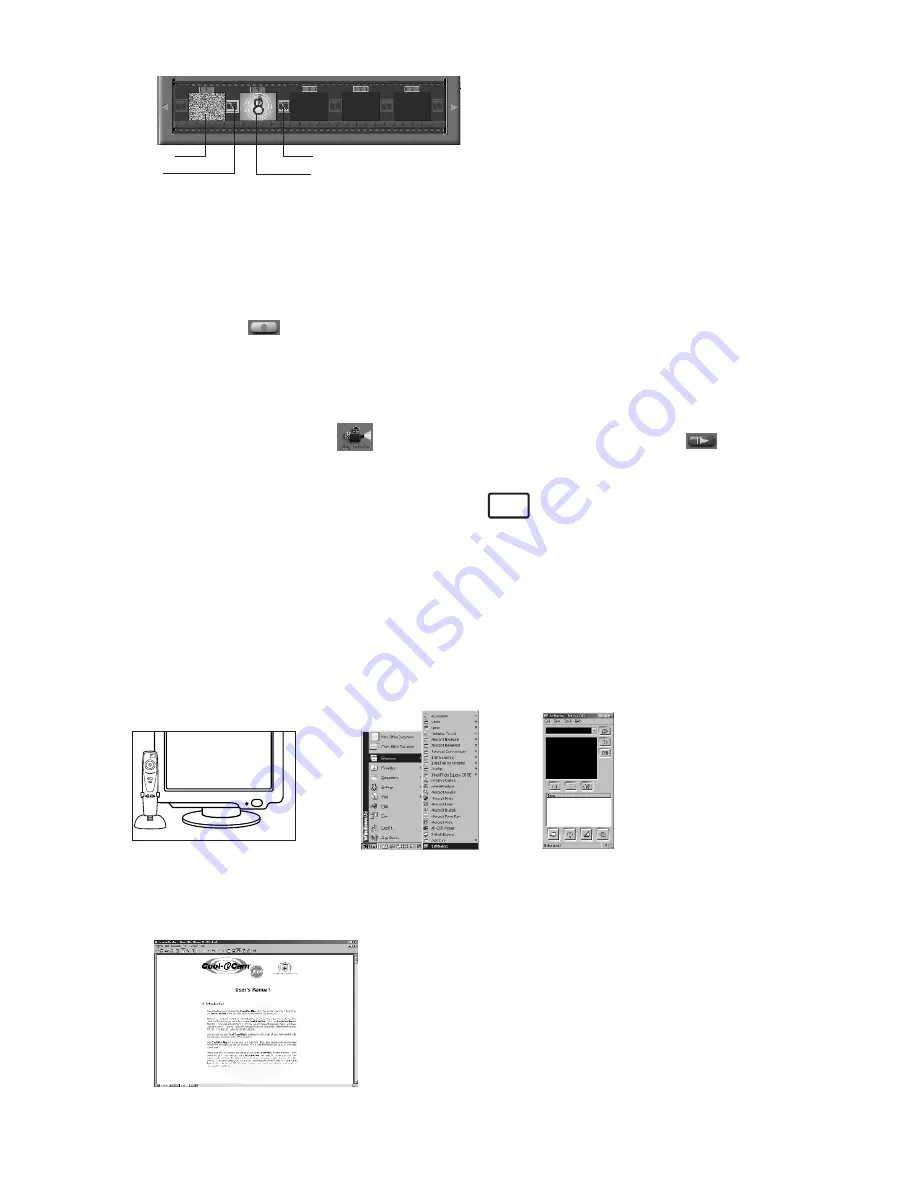
Step 5 Double click on the next right large frame and repeat step 3 using a video template and double click template 5. 

Countdown.avi. Repeat step 4.

Adding an existing video.

Step 6 To add a video you have already made double click on the next large frame in the story board to the right. Click 

on the "Get" icon and select a  video you had made and filed in the folder called "album" click on Get, with the 
selector click on the down arrow and select desktop and then double click on "Album" folder and select a file 
ending with .mov (video file) the video will appear in the video templates. Double click on the video and it will 
appear just like other video templates in the storyboard.  Now go to step 10.
Alternatively you can produce a live video.
Ensure your 

Stylus 1800

 is connected to the computer via the USB cable. Click on the capture icon.

Step 7 And press the         record icon. Wait for the video link to go live and now you're recording, press the ESC key on 

your keyboard to end the video.  

Step 8 Press the "Save" icon and name your file, and then press "save". Video impression will ask you where you want to 

place your video. Select "video template".

Step 9 Select the "album" icon and your video clip you have just produced will appear in the video templates. Double  

click on your video, your video will now drop into the storyboard.  
Running the video.

Step 10 Select the "play movie" icon           which will assemble your video together. Press the         play icon to watch 

your completed video. Watch to see how the special effects merge between the frames on the story board. Now 
you try to make your own and also try the audio template.

11.5 How to use Microsoft® NetMeeting™

1. Connect your 

Stylus 1800

 to the USB cable on one end.

2. Connect your USB cable to an available USB port on your PC on the other end.
3. Put your 

Stylus 1800

 next to your PC monitor or another flat surface.

4. Connect your microphone (not included) to your audio card's external microphone connector.
5. Double click the “NetMeeting” icon on the desktop or select the “NetMeeting” icon from the Windows Start Menu.
6. Type in the IP address, e-mail address, computer name or telephone number for the person you want to call and press 

the “Place Call” button.
To find your own IP address, go to “Start” and click “Run”.  Type in “winipcfg” and click “OK”, IP configuration window 
will appear and you can see your IP address.

7. If you need further help on how to use Microsoft® NetMeeting™, select the “Help” under the manual bar and choose 

the topic you need.  Or you can visit the following website:  http://www.microsoft.com/windows/netmeeting


11.6 How to use Adobe® Acrobat® Reader

Adobe® Acrobat® Reader enables you to view document in .pdf format.
For more details go to www.adobe.com/acrobat. 

PC

Storyboard

Static.avi

Countdown.avi

1. Fire

1. Fire

Summary of Contents for CIC-250

Page 1: ...nnection and microphone not supplied you can chat face to face with friends and colleagues conferencing in real time Stylus 1800 comes with Time Lapse Photography You can set your Stylus 1800 to operate on its own throughout the day at predetermined intervals and take a series of images With this technique you can make for example high speed video clips of changing cloud and weather formations wat...

Page 2: ...tored Images Movie Clips Audio Clips 11 8 8 Changing the Image Resolution 11 8 9 Time Lapse Mode 11 8 10 Flash Light Mode Optional accessory 12 9 Connecting your Stylus 1800 to your Computer 12 10 Uploading Images Audio Clips to Your Computer 12 For Windows Users 10 1 Running the Digital Camera Manager 12 10 2 Quick Reference 12 10 3 Uploading Images and Audio Clips 13 10 4 Creating Uploading Movi...

Page 3: ...installing your Digital Camera Manager does not delete your album folders and therefore all images transferred into your default or created albums will be preserved You will be able to access these folders on your system desktop PC PC MAC 2001 TCG EN FL Versi on 1 0501 Part No OM83 7054 Us er s Ma nu al 1 Int rod uct ion Cong ratula tions on purch asing the Stylu s 1800 Using the lates t innov ati...

Page 4: ...ideo and image files making desktop video presentations for home business and the Web Visit http www arcsoft com for all your FAQ s tips and technical support see Section 12 for more details 5 2 1 How to Install ArcSoft Software 1 Reinsert the CD ROM disc into the CD ROM drive and close the CD ROM drawer 2 An installation wizard will automatically launch 3 Click the ArcSoft Software icon 4 Select ...

Page 5: ...ancement 5 5 1 How to Install Digital Camera Driver without enhancement 1 Insert the CD ROM disc into the CD ROM drive and close the CD ROM drawer 2 Double click the CD ROM icon Digital Camera 3 Double click the Digital Camera Installer icon 4 Click Continue 5 Please disconnect all USB camera before continuing 6 Choose a folder to install STV0680 Capture Plug in file and click Choose to confirm Lo...

Page 6: ...he CD ROM drive and close the CD ROM drawer 2 Double click the CD ROM icon Digital Camera 3 Double click the VideoImp 1 5 installer icon in English folder 4 Follow the instructions presented on the screen to complete the installation 5 7 How to Install CU SeeMe CU SeeMe started the craze for videochat on the Internet and it s still the most popular full featured software for seeing hearing and sha...

Page 7: ...oss of any images currently stored in your Stylus 1800 1 Press and slide the battery door downwards as shown on the diagram below Remove the 2 AAA alkaline batteries from the battery compartment 2 Remove the button cell CR2032 from the backup battery compartment and insert a fresh one back 3 Insert the 2 AAA alkaline batteries back into the battery compartment Make sure you follow the correct pola...

Page 8: ... be used to switch between Normal Resolution and Economy Resolution settings see page 19 7 1 7 Time Lapse Photography To start the time lapse photography press the Shutter Button once when the Stylus 1800 is in the Time Lapse Mode Select the duration of time lapse and press shutter button once to confirm see page 19 7 1 8 Flash Optional Accessory The Shutter Button is used to confirm Flash Mode se...

Page 9: ...he batteries are weak and need to be replaced Important Notes When the low battery power segment is displayed you must upload any stored images within 6 hours Do not replace your battery before you have downloaded or saved your images to your PC or Mac After the LCD go blank and you cannot activate your Stylus 1800 by pressing the Mode Button you must upload stored images and replace the batteries...

Page 10: ...is full the LCD will display By pressing the Mode Button you can cycle through additional features as displayed on the LCD When a given mode is displayed it can be accessed by pressing the Shutter Button If an option is not confirmed within 5 seconds the display will revert to show the number of available images that can be taken 8 3 Audio Recording Mode To create an audio clip 1 Press the Mode Bu...

Page 11: ...memory is cleared Please make sure you upload your wanted images before clearing your Stylus 1800 s memory 8 8 Changing the Image Resolution Image resolution can be changed whenever you need 1 Cycle through the Mode options by pressing the Mode Button 2 Press the Shutter Button once to change to the alternative resolution For Example Changing from Normal Resolution Mode to Low Resolution Mode Pres...

Page 12: ...ash Mode may not activate the Flash Bar always wait for the LED lights up it indicates the Flash Light is ready for use 9 Connecting your Stylus 1800 to Your Computer The USB cable allows you to upload images from the Stylus 1800 to your PC or Mac One end of the cable connects to the USB port on the side of the Stylus 1800 and the other end connects to your PC s or Mac s USB port When your Stylus ...

Page 13: ...and put in the selected album select the image or audio clip by clicking the image or audio clip once and click the Save Image Button The selected image or audio clip will appear on the right panel and it will be saved to the album you created and or highlighted 7 TO SAVE ALL IMAGES AND AUDIO CLIPS To save all images and audio clips taken and put in the album select all the images and audio clips ...

Page 14: ...amera Manager Make sure your Stylus 1800 is connected to your PC via USB and run the Digital Camera Manager Warning Live Video Mode will erase all images stored in your Stylus 1800 Make sure you upload all wanted images before you switch the Digital Camera Manager to Live Video Mode You can now start to create your live movie clips by following these steps 1 Switch the interface to Live Video Mode...

Page 15: ...otoStudio 2000 icon from the ArcSoft Camera Suite program group on the Windows Start Menu You can now start to download your stored images from your Stylus 1800 by the following steps 2 Go to File and select Select Source Select STV0680 Camera as source 3 Go to File and select Acquire The capture interface will show up To capture image s highlight the wanted image s and click Capture 4 For further...

Page 16: ... icon from the ArcSoft Camera Suite program group on the Windows Start Menu 2 Choose the Page Layout The selected page layout will on shown 3 Click Get Photo and then Acquire Select STV0680 Camera as source The capture interface will show up To capture 1 image select the wanted image and click Capture 4 The captured images will be shown on the photo library panel Select the image you want and clic...

Page 17: ...your video will now drop into the storyboard Running the video Step 10 Select the play movie icon which will assemble your video together Press the play icon to watch your completed video Watch to see how the special effects merge between the frames on the story board Now you try to make your own and also try the audio template 11 5 How to use Microsoft NetMeeting 1 Connect your Stylus 1800 to the...

Page 18: ...ouble click on Get Photo 1 and click Add Find the image you want which you have already saved in your hard disk and click Open The selected images will be shown on the left hand side Click OK 4 The selected image will shown within the mask on the selected template You can resize rotate or reposition the image by using the function icons show in the right hand side or reposition the image using you...

Page 19: ...now you re recording press the ESC key on your keyboard to end the video Step 8 Press the Save icon and name your file and then press save Video impression will ask you where you want to place your video Select video template Step 9 Select the album icon and your video clip you have just produced will appear in the video templates Double click on your video your video will now drop into the storyb...

Page 20: ... Beijing Tel 8610 6849 1368 Fax 8610 6849 1367 E mail china arcsoft com For Oceania ArcSoft Australian Support Center Baulkham Hills New South Wales Tel 61 2 9899 5888 Fax 61 2 9899 5728 E mail support supportgroup com au Visit www arcsoft com or go to Start Programs ArcSoft Camera Suite Web Services for tips technical support and frequently asked questions FAQ s For North America ArcSoft HQ Suppo...

Page 21: ...us 1800 s memory ensure you are connected to a PC which is turned on via the USB cable which will then draw power from the PC whilst you insert fresh batteries or make sure there is sufficient power on the backup battery This means there is insufficient power to upload images to your computer is displayed Replace or insert a CR2032 battery means your backup battery has low power or is missing No C...

Page 22: ...mera CD in CD ROM drive Please also refer to the help files User Guides that accompany the enclosed applications For further information and support please visit our website http www cool icam com My Stylus 1800 LCD displays If you need to change batteries and retain the images in your Stylus 1800 s memory ensure you are connected to a Mac which is turned on via the USB cable which will then draw ...

Page 23: ...erence 16 Technical Specifications Memory 8Mbyte SDRAM Image Performance for Video on Web cam 9fps frame per second for Normal Resolution 352 x 288 pixels 16fps for Low Resolution 176 x 144 pixels Still Image Resolution High Resolution 640 x 480 pixels software enhanced to 1 3 Megapixel PC format only Low Resolution 320 x 240 pixels software enhanced to 640 x 480 pixels PC format only Storable Ima...

Page 24: ... to Part 15 of the FCC Rules These limits are designed to provide reasonable protection against harmful interference in a residential installation This equipment generates uses and can radiate radio frequency energy and if not installed and used in accordance with the instructions may cause harmful interference to radio communications However there is no guarantee that interference will not occur ...

Reviews: