


DeX Operations Manual V. 2.1
Page 6
cleared immediately by tapping the Clear All Tags button that appears just below the
airplane icon while any text boxes are activated.
Double tapping (tapping the same item twice in rapid succession) will bring up the
complete details for the selected items on
information screens
. These show specifics;
such as radio frequencies, remarks, raw textual METAR/TAF information, runway
data, and Taxi Express™ GPS enabled taxiway diagrams. Information screens also
allow the user to use the feature as a waypoint in a flight plan. In rough air try tapping
three or four times in rapid succession on a feature to call up the information screen.
Special screen areas
The map screen also contains features that are always displayed and are always located
in the same fixed position for easy reference regardless of user configuration.
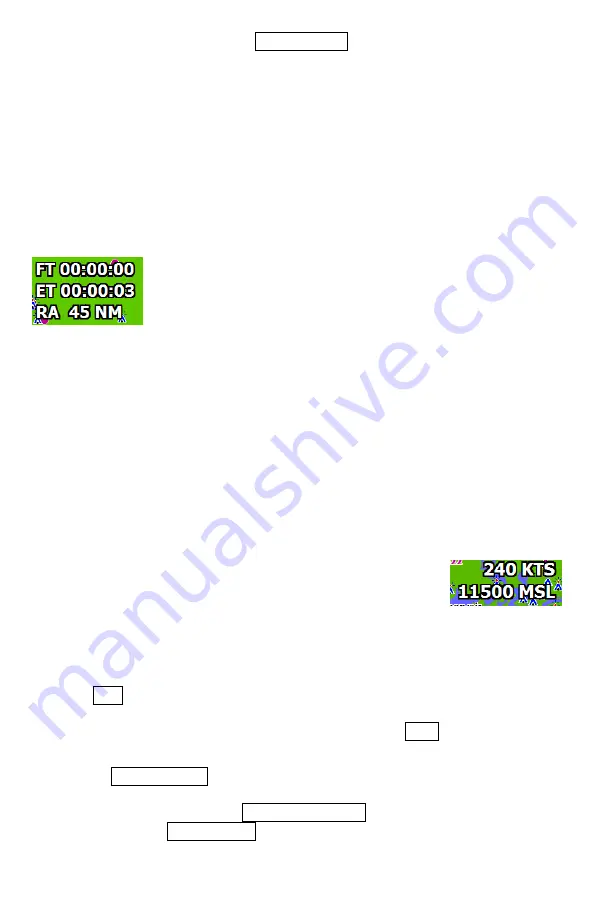
Starting in the top left, you’ll find the
Flight Timer area
. This
area can be used to display 3 different timers.
FT
or Flight Timer
can begin at your designated taxi/runway speed, as set in Aircraft
Settings and keeps track of the time aloft.
ET
or Elapsed Timer is a
‘stopwatch' type function, which can be handy on approach.
Double tapping on the
ET
(elapsed time) and then tapping YES to the Clear Elapsed
Time message that comes up will clear the
ET
.
ZT
or Zulu Time can also be displayed
making second-guessing your time conversion from local to Zulu time a thing of the
past. Zulu time is calculated automatically using the internal NMEA GPS clock. To use
this area, simply double-tap on the FT area to change modes until the desired timer is
selected.
The last line on the top left map screen area is the Range Indicator. The example shown
illustrates a 45 nautical mile range. This distance is measured from the aircraft position
on the map screen to the top arc of the compass rose. The Range value shown can be set
to auto-hide in the View Settings screen.
In the upper right corner of the screen you’ll find the
GPS status / Groundspeed area
.
This area will display “
NO SAT
” if the internal GPS hasn’t
acquired at least 3 satellites sufficient to provide a 3D position on
the map screen. Once the GPS acquires your position, this area
will display your ground speed and GPS altitude in feet above mean sea level (MSL).
GPS acquisition time usually takes 45 seconds to 1 minute with a clear view of the sky,
but can take 2-3 minutes if the unit has been transported 60 or more miles while
powered OFF.
Tapping KTS will quickly change the map from nautical-mile to statute-mile
measurements. This results in ground speed being displayed in miles per hour or ‘MPH’
and map distances are shown in statute miles (SM). Tapping MPH will change back to
nautical mile measurements.
Tapping the altitude readout will recall the strength of satellite lock currently held by
the internal GPS. ‘3D 10SAT’ for example can be interpreted as: 3 dimensional lock
tracking 10 satellites. Tapping the GPS Signal strength again will revert to showing the
Altitude. Tapping the Range readout will temporarily display a zoom adjustment panel
with preset ranges and a dynamic finger slide gesture area.


