


DeX Operations Manual V. 2.1
Page 11
Reverse
: This function will reverse the order of the flight plan for use on the return trip.
Direct XXX
: Pressing this button zeros cross track error and gives a Direct-To to the
next waypoint, whose identifier is listed on the button without canceling the rest of the
Flight Plan.
Done
: Closes the flight plan screen and returns to the map with any changes made in
this screen implemented on the map.
Load:
Calls up a screen containing previously created and saved flight plans. If the
desired flight plan shows on the screen, tap the filename and then tap OK.
Clear
: This will remove the current flight plan from the screen. This will not delete the
stored flight plan from the memory.
Save
: After creating a flight plan on the
DeX, enter this screen and type a
unique filename in the “save as” box of
this screen. For instance to save a flight
plan from PTS to MCI you might type
“PTS2MCI” in the SAVE AS box and
tap the Save button.
Delete
: This will permanently remove
the stored flight plan from the DeX
memory.
Done
: Closes the flight plan screen and
returns to the map with any changes
made in this screen implemented on the
map.
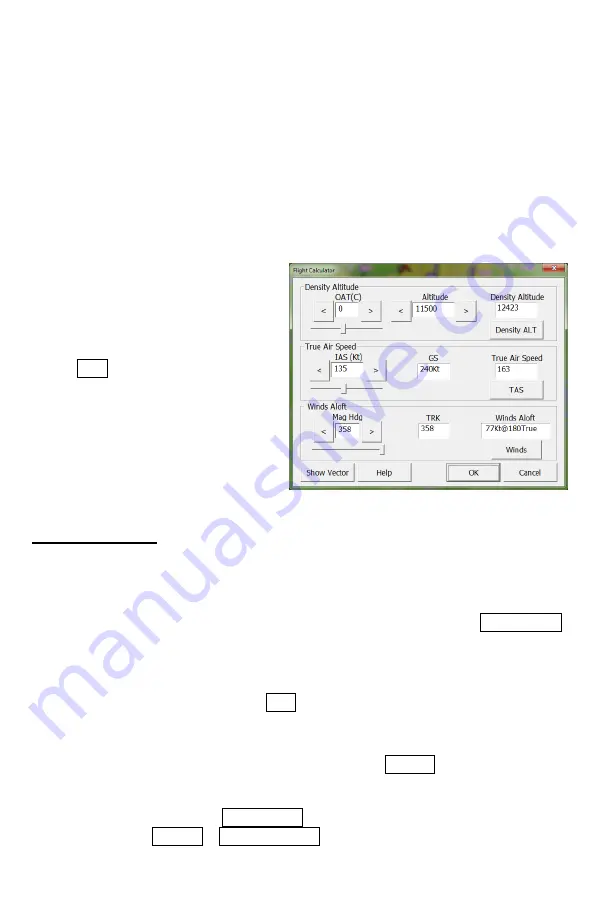
Flight Calculator
Density Altitude
: To figure the Density Altitude, type in the Outside Air Temperature
in Celsius (OAT). Use the slide bar underneath the text box to get close and then fine-
tune it with the arrows on either side of the text box. When a temperature is entered, the
deviation from ISA is computed and saved. If you re-enter this screen later in the flight,
the temperature value will be remembered and filled in for you. Tap the Density ALT
button, and it will be displayed in the gray box above the button.
True Airspeed
: Enter the Indicated Air Speed (IAS) in the text box in knots. Use the
slide bar underneath the text box for a general number, and fine-tune it with the arrows
on either side of the text box Tap the TAS button, and it will be displayed in the gray
box above the button.
Winds Aloft
: Enter the Magnetic heading of the aircraft in the box shown. The GPS
reported ground track is shown in the Track box. Tapping WINDS will cause the actual
winds aloft to be calculated and displayed. This step assumes that the altitude,
temperature, and airspeed have already been computed. To have a visual reminder of
the wind data just entered, tap Show Vector. To hide the wind vector, go to the Flight
Plan screen and tap WINDS > HIDE VECTOR.


