


Using the compass OUTDOOR (manual calibration)
If the compass is used outdoors, then press the „RELEASE“ key (2). Take the compass off the „mounting
bracket“ (19) sideways .
If you use the compass for the first time outside of your vehicle (e.g. hike; outdoor), it is necessary to perform
a „manual calibration“, as described below.
If the „manual calibration“ has been made once, it is not necessary to perform another „manual calibration“
when using the compass outdoors.
If you are not sure whether the accuracy of the compass is correct, you can perform a new „manual calibra-
tion“.
Step 1:
Press the „MODE“ key (8) to start the compass mode (see picture on the
right)
Step 2:
Press the „SNOOZE/LIGHT“ key (12) and „COMPASS ON/OFF“ key (6)
simultaneously and hold both keys for 2 seconds until a beep sounds
twice.
The °-display (e.g. 290°), the sky direction display (e.g. NW; = North-West)
and the CAL writing blink.
Step 3:
Press the „SNOOZE/LIGHT“ key (12) to start the manual calibration.
Step 4:
Turn the compass horizontally 180° and then press the „SNOOZE/LIGHT“
(key 12) to complete the calibration.
The calibration is now complete. The „numerical degree display“ (5) (e.g.
290°) and the „sky direction display“ (11) are now permanently displayed
and the „CAL“ symbol (4) disappears.
☞
Should the writing „signal disturb“ (= external interference) appear on the display,
change your location and perform the above described „manual calibration“ again.
Selecting the mode
Press the „MODE“ key (8) to select one of the different modes:
Modes: Compass > Time > Chronograph > Calendar display > Compass
Settings
Press the „MODE“ key (8) until the time setting (time display) appears.
Press and hold the „SET“ key (14) for 2 seconds to call the settings up.
In the settings, you can select one of the the following modes by using the „SET“ key (14).
1. Alarm setting
2. Time setting
3. Year setting
4. Month/Day setting
5. 12/24-hour display setting
To set the desired value in the corresponding setting mode, use the „START/STOP/+“ (3) and the „CLEAR/-“
(9) keys.
Magnetic Variation (Declination)
• As with all other conventional magnetic compasses, the compass indicates
the direction of the magnetic North Pole (A).
However its position differs from the geographic North Pole (B). However,
maps always show directions and positions based on the geographic North
Pole.
The angular difference between the magnetic North Pole (A) and the geo-
graphic North Pole (B) is called the magnetic variation (declination) (C).
• Depending on the location on the Earth, this angle is indicated in west or
east values (Degree/Minutes).
• For users, who need the compass for specific purposes, the magnetic devi-
ation can be entered as a correction value in the wrist-watch.
• On many topographic maps, the direction for magnetic north is indicated in
addition to the direction of geographic north and can be used in the com-
pass as a correction value.
• You can also try to obtain the exact values from the Internet.
• By entering the correction value, the compass can calculate and automat-
ically display the correct value.
☞
In magnetic deviation, however, there are values for western and eastern declination!
Example 1: Western declination 23° (in the table on the next page „23 W“, uncorrected display 323°, cor-
rected display 300° The western declination „W“ is always subtracted.
323° - 23° = 300°
Example 2: Eastern declination 22° (in the table on the next page „22 E“), uncorrected display 278°, correct-
ed display 300° The eastern declination „E“ is always subtracted.
278° + 22° = 300°
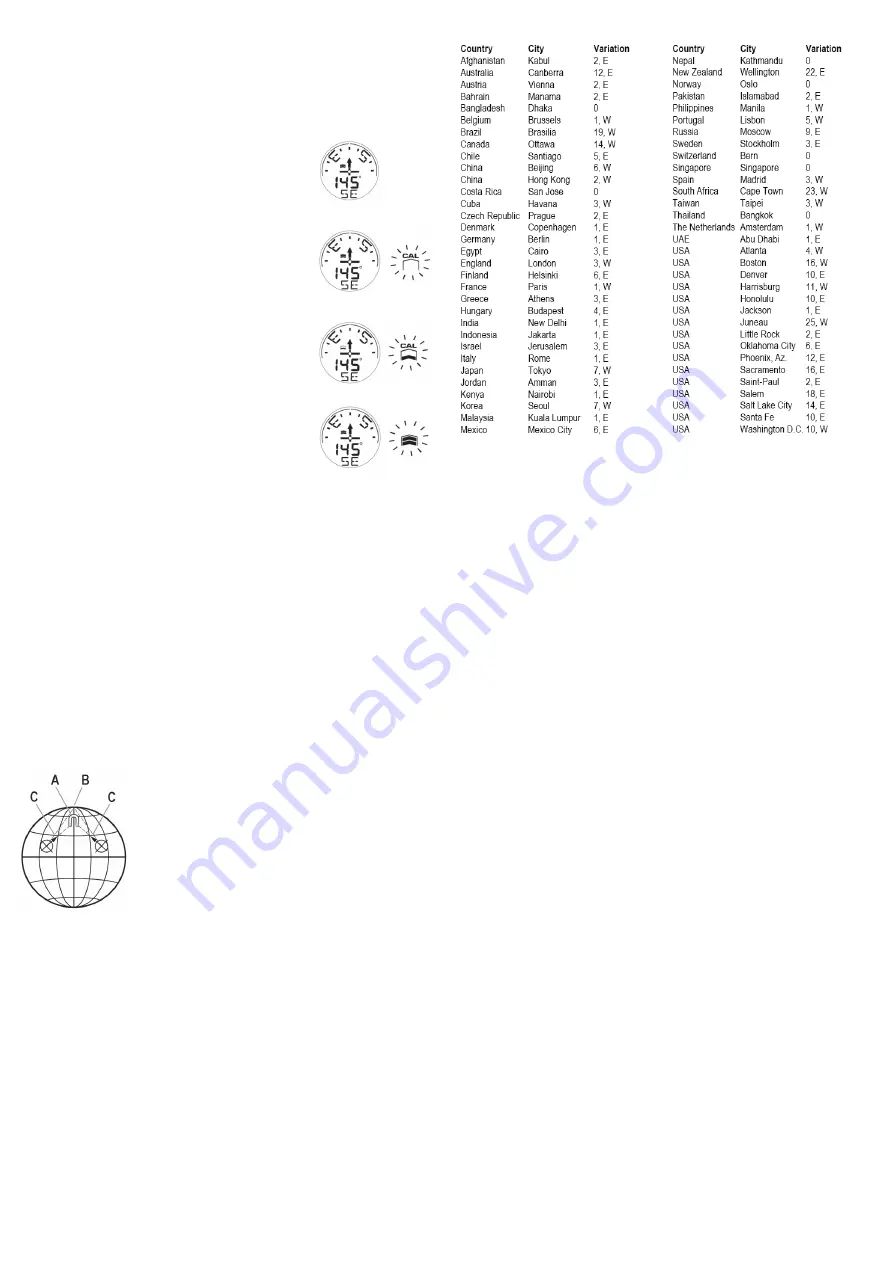
Correction values of the declination for some major cities:
Setting the declination
• Call the compass view mode up by using the „COMPASS ON/OFF“ key (6).
• Press the „RESET“ key (15) to open the calibration mode .
• Press the „COMPASS ON/OFF“ key (6) and the „SNOOZE/LIGHT“ key (12) simultaneously until TRUE
NORTH appears on the display.
• Set the declination with the „START/STOP +“ (3) and „CLEAR./-“ (9) keys.
• Press the „COMPASS ON/OFF“ key (6) and complete the calibration.
Signal Disturb
• The „numerical degree display“ is not displayed in the event of very strong external influences and when the
words „SIGNAL DISTURB“ flash on the display.
• Due to strong magnetic influences, three bars - - - are displayed instead of the „numerical degree display“
and the words „SIGNAL DISTURB“ flash on the display as long as external magnetic influences persist.
• Magnetic interference can be caused by electronic devices or other magnetic sources.
• The „numerical degree display“ is displayed normally again, as soon as the external interference no longer
occurs.
Stop watch
• Press the „MODE“ key (8) to call the stop watch mode up (the writing CHRONO is displayed).
• Press the „START/STOP-“ (key (3) to start or stop the stopwatch.
• Press the „CLEAR/-“ key (9), to reset the stopwatch to 0.
Display lighting
• Press the „SNOOZE/LIGHT“ key (12) to activate the display background light (blue).
Flashlight function
• Press the „FLASH LIGHT“ key (7) to activate the integrated rear LED.
Switching the compass on/off
• Press and hold the „COMPASS ON/OFF“ key to switch the compass on or off.
Maintenance and cleaning
This product is maintenance-free. To clean the outer casing of the components, a dry, soft and clean cloth is
sufficient. Never use aggressive cleaning agents.
Activating the alarm time
For programming, act as follows:
After the alarm time is set (see paragraph setting mode) this must be activated via the alarm button at the back
(16):
Pressing 1x: alarm on
Pressing 2x: alarm and snoozer on
Pressing 3x: alarm off
In the display the alarm and snoozer symbols are shown behind the time.
If the alarm is activated, the SNOOZE / LIGHT (12) (snooze function) can prolong the wake up-time by 5 min.
Display lighting
After pressing the SNOOZE / LIGHT button (12) the background lighting is activated for 3 seconds


