background image


b.

 Plugging in the

 X-Rev Storage Center


1.


Plug in the dual voltage power adapter: 

Make sure the 

X-Rev Storage Center

 is turned OFF. Connect the DC plug end of power 

adapter to 12V/5V DC-IN DIN jack on the back of the 

Storage Center

,


connect the other end 

into an power outlet or power strip. 
 

                    External power adapter pin out specification: 
 

2.


Plug in the USB cable


The 

X-Rev Storage Center

 includes an USB hub to enable the use for a hard drive, a media 

card reader and two external USB ports. The USB hub and card reader will only operate 
through the USB connection and will be disabled if only the eSATA connection is present. 


3.


Plug in high speed ESATA port

The 

X-Rev Storage Center

 supports USB2.0 and high-speed eSATA interfaces for host 

connectivity. When both are connected, the eSATA interface will have priority in accessing the 
hard drive to enhance the speed of the hard drive access.


4.


Media Card Application:


The 

X-Rev Storage Center

 provides four media slots in front side for different types of media 

memory cards application. You must load each media card in the correct slot as indicated on 
the printing of the front panel. Do not attempt to insert the cards in reverse directions or by 
excessive force. This may damage your media memory cards or card slot. 
 

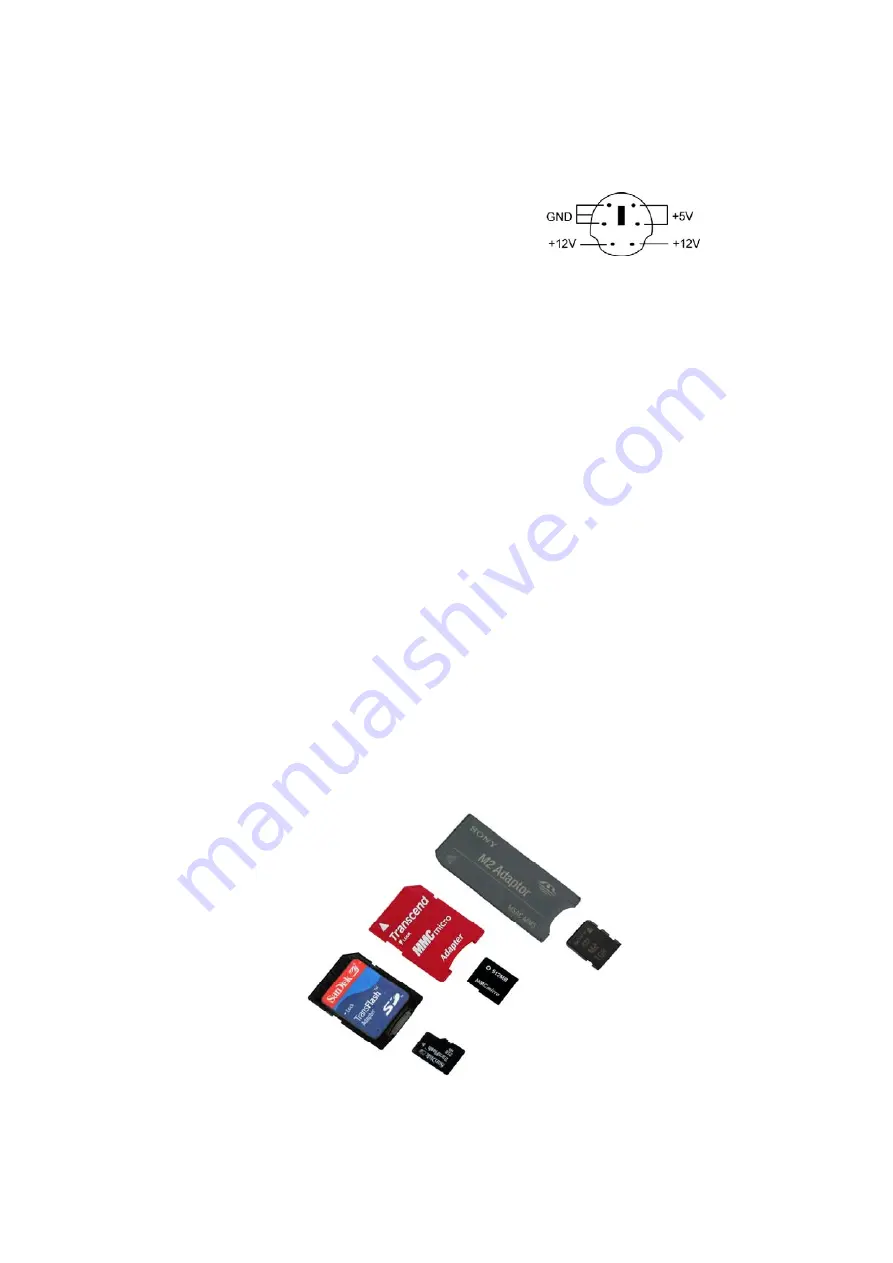
Some mini types of media cards need to use an adaptor before inserting:   

The following list of mini card formats is not supported for direct access. Users will need to 
use an adaptor as indicated in the photo for X-Rev to accept them.


This adaptor may be 

included as a package with the mini memory card purchased. Please contact your local 
memory card dealer to purchase a mini card adapter if one is not available. 

 
SD slot: To access micro SD (T-flash) or MMC Micro media cards need an adaptor. 
MS slot: To access MS micro (M2) media card need an adaptor.


Summary of Contents for X-Rev Storage Center

Page 1: ...3 3 5 5 U US SB B S SA AT TA A C CO OM MB BO O E EN NC CL LO OS SU UR RE E F FO OR R S SA AT TA A H HA AR RD D D DR RI IV VE E U US SE ER R M MA AN NU UA AL L...

Page 2: ...d 4 a Install 3 5 inch SATA hard drive 3 b Plugging in the X Rev Storage Center 7 Button Manager Utility Installation 8 Button Manager Utility Description 12 a User Interface Description 12 b Adding A...

Page 3: ...herals and media cards all in a storage center Product features Supports one 3 5 SATA interface hard disk drive installation Supports one SATA hard drive application up to 500GB Supports one multi car...

Page 4: ...ic charge that may have accumulated inside your body To avoid damage to your hard drive please handle with much care Do not shake or drop your hard drive All electronic components have a limited lifet...

Page 5: ...ce down the carrier with the hard drive locked in It should be placed in the position that is further away from the SATA connector See the diagram below that the sliding hole on the carrier should fit...

Page 6: ...sly removed screws to secure the drive carrier 6 Reinstall the X Rev aluminum cover and tighten by previously removed screws 7 Stand the X Rev Storage Center in an upright position Upon cable connecti...

Page 7: ...riority in accessing the hard drive to enhance the speed of the hard drive access 4 Media Card Application The X Rev Storage Center provides four media slots in front side for different types of media...

Page 8: ...a from the hard disk in the X Rev to a specified location in the hard drive in the PC by pressing the one touch button Please follow below steps to complete the Button Manager Utility installation Ple...

Page 9: ...3 Choose the Button Manager Application and click Next to continue 4 Click Install button to begin the installation...

Page 10: ...5 Click Finish button to exit the software installation 6 Choose Yes I want to restart my computer now and click OK button to restart your computer...

Page 11: ...7 After restarting your computer the user will find an icon on the status bar of the windows on the bottom right 8 Click on the icon and choose Automatic Backup...

Page 12: ...clicking on the Automatic Backup a backup task window will pop out for user to configure the preset path for file copy Button Manager Utility Description a User Interface Description 1 2 3 5 6 9 4 7...

Page 13: ...disk drives information 5 ADD To add a new task in list 6 NEW Create a new backup task file 7 DELETE Deletes the chosen task 8 MODIFY Modifies the chosen task 9 EXECUTE Execute current task list 10 EX...

Page 14: ...tory columns by clicking the browse button and check the necessary Attributes and Task Direction Source Directory assign Source Directory location Destination Directory assign backup Destination Direc...

Page 15: ...or click Save button to save as a iniBackup backup file then press Exit to finish task setting 1 2 4 If you quit the Button Manager utility from the windows and would like to modify or add a new task...

Page 16: ...pes of SATA connector in your computer One is a SATA type A connector for internal ports This usually connects to internal SATA hard drives by a standard SATA cable All internal connections are Type A...

Page 17: ...adaptor Hard Drive Interface SATA Hard Drive Capacity 3 5 80 120 160 200 250 500GB etc Hard Drive From Factor 3 5 1 inch high Data transfer rate 1 SATAI up to 1 5G 150MB s 2 SATA II up to 3G 300MB s 3...

Reviews: