background image

- 10 -

4

4

4

4....6

6

6

6 Setting

Setting

Setting

Setting the

the

the

the regular

regular

regular

regular time

time

time

time signal

signal

signal

signal (0-99Seconds)

(0-99Seconds)

(0-99Seconds)

(0-99Seconds)

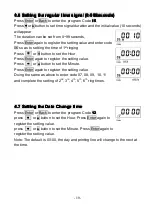
Press Enter or Back to enter the program Code

0

0

0

05

5

5

5

,

Press

+

+

+

+

or

button to set time signal duration and the initial value (10 seconds)

will appear.

The duration can be set from 0~99 seconds,

Press Enter again to register the setting value and enter code

06 so as to setting the time of 1

st

ringing

Press

+

+

+

+

or

button to set the Hour.

Press Enter again to register the setting value.

Press

+

+

+

+

or

button to set the Minute.

Press Enter again to register the setting value.

Doing the same as above to enter code 07, 08, 09, 10, 11

and complete the setting of 2

nd

, 3

rd

, 4

th

, 5

th

, 6

th

ring times.

4

4

4

4....7

7

7

7 Setting

Setting

Setting

Setting the

the

the

the Da

Da

Da

Date

te

te

te Change

Change

Change

Change time

time

time

time

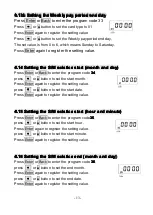
Press Enter or Back to enter the program Code

12

12

12

12

,

press

+

+

+

+

or

button to set the Hour. Press Enter again to

register the setting value.

press

+

+

+

+

or

button to set the Minute. Press Enter again to

register the setting value.

Note: The default is 00:00, the day and printing line will change to the next at

the time.

Summary of Contents for S-990

Page 1: ...Electronic Electronic Electronic Electronic Time Time Time Time Recorder Recorder Recorder Recorder ANALOGUE LCD Instruction Instruction Instruction Instruction Manual Manual Manual Manual...

Page 2: ...8 Setting the shifting time 11 4 9 Setting the 2 colors printing time 11 4 10 Setting the extension time signal 11 4 11 Adjusting printing position 12 4 12 Detecting front back of time cards 12 4 13 S...

Page 3: ...ct life please read this manual thoroughly Models Functions LCD Analogue LCD Display Clock Face Two color printing Time Signal Perpetual calendar Back up battery Auto In Out adjustment External Signal...

Page 4: ...d check its contents to ensure that the time recorder unit and all accessories as shown below are included 1 1 1 1 2 2 2 2 Pa Pa Pa Parts rts rts rts identification identification identification ident...

Page 5: ...t key Increase the set value by 1 Decrease the set value by 1 Enter Save the set value enter the next step Back Backspace the set value Clear Cancel the set value Program switch Normal Programming Bat...

Page 6: ...codes codes selection selection selection selection 00 04 00 04 00 04 00 04 Setting the time Year Month Date Hour Minute 05 11 05 11 05 11 05 11 Setting the regular time signal 12 12 12 12 Setting the...

Page 7: ...shifting to 1st column 1 1 1 14 4 4 4 Setting the time of shifting to 2nd column 15 15 15 15 Setting the time of shifting to 3rd column 16 16 16 16 Setting the time of shifting to 4th column 17 17 17...

Page 8: ...ting setting setting 1 Power Supply 1 Stable power source is highly recommended 2 Please check the correct voltage power cord before use 2 Top Cover Remove the top cover prior to set program or change...

Page 9: ...utton to set the month Press Enter again to register the setting value 4 4 4 4 3 3 3 3 Setting Setting Setting Setting the the the the da da da date te te te Press Enter or Back to enter the program C...

Page 10: ...tton to set the Hour Press Enter again to register the setting value Press or button to set the Minute Press Enter again to register the setting value Doing the same as above to enter code 07 08 09 10...

Page 11: ...to set the Hour Press Enter again to register the setting value Press or button to set the Minute Press Enter again to register the setting value Doing the same as above to enter code 20 21 22 23 24 a...

Page 12: ...y only only only when when when when you you you you use use use use specific specific specific specific time time time time cards cards cards cards monthly monthly monthly monthly pay pay pay pay car...

Page 13: ...ter again to register the setting value press or button to set the start date Press Enter again to register the setting value 4 1 4 1 4 1 4 15 5 5 5 Setting Setting Setting Setting the the the the S W...

Page 14: ...es Causes Causes Corrective Corrective Corrective Corrective Measures Measures Measures Measures The time recorder does not accept time card 1 Power failure 2 The time card is damaged 3 The power cord...

Page 15: ...ing them steady in the position use the handle to take out the cartridge 3 Correctly insert a new cartridge between the ribbon guide and the printer head Push the cartridge head until it clicks into p...

Page 16: ...urchased the the the the time time time time recorder recorder recorder recorder E1E1 Wrong E1E1 Wrong E1E1 Wrong E1E1 Wrong position position position position of of of of Up Up Up Up Down Down Down...

Reviews: