background image

45


Serial Interface 

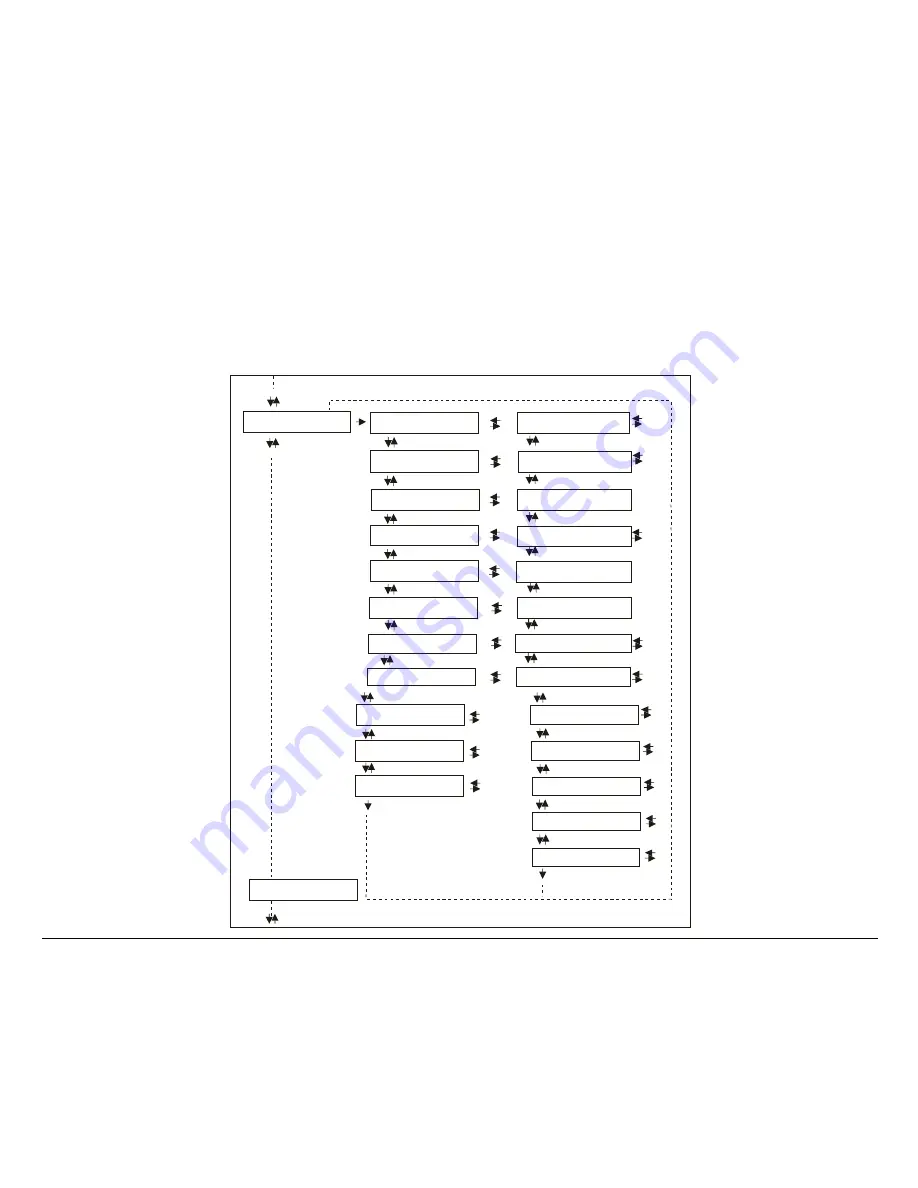
This menu defines the use of the serial interface and is structured according to the interface 
specific parameters. 

Serial Interface Parameters 

S erial  I/F   N o

B au d  9 60 0

D ata  Bits 8

P arity  N on e

H an d sh ak e D T R

S erial  I/F   ...

B au d ...

D ata  Bits 7

P arity  ...

H an d sh ak e X on /X of

S erial Inte rfa ce

C on n ec tio n  L oc al

D ed ic.  B uffe r  2K

E m u l.  E P S O N

Fu n ction s

C on n ec t. R e m o te

D ed ic.  B uffe r  ...

E m u l. IB M  ...

C ha r. S e t...

20  C P I IB M  ...

C ha r. S e t ...

 N ation   ...

A uto  L F   ...

A uto  L F  ...

A uto   C R   ...

N ation  ...


Summary of Contents for 9078 plus HD

Page 1: ...9 90 07 78 8 p pl lu us s 9 90 07 78 8D D p pl lu us s U Us se er r M Ma an nu ua al l Rev 001...

Page 2: ...l consumables with original packaging identified by its holographic label In this way a proper use of the printer at quality level stated in the product characteristics can be assured All typical usag...

Page 3: ...one or more of the following measures Reorient or relocate the receiving antenna Increase the separation between the equipment and receiver Connect the equipment to an outlet on a circuit different f...

Page 4: ...u uc ct t m ma ay y c ca au us se e r ra ad di io o i in nt te er rf fe er re en nc ce e i in n w wh hi ic ch h c ca as se e t th he e u us se er r m ma ay y b be e r re eq qu ui ir re ed d t to o t t...

Page 5: ...ine harmonics EN 61000 3 3 1995 Power line flicker EN55024 1998 Immunity Characteristics EN61000 4 2 1995 E S D EN61000 4 3 1995 Radiated Susceptibility EN61000 4 4 1995 E F T EN61000 4 5 1995 Surge E...

Page 6: ...e place because they should be reinstalled if you decide to remove any printer accessory The following areas of the printer should be covered for safety reasons Rear Tractor Area Cover Tractor Fixing...

Page 7: ...r On Configuration 33 Entering the Power On Configuration 33 Program Setup 65 Entering the Program Setup 65 How to Select the Paper Path 89 How to Use the Tear Off Function 90 Selection of the Paper S...

Page 8: ...hich handles cut sheets multicopies and envelopes accepts up to two additional paper bins and includes paper stacker Optional color kit Optional cutter Usage of all specific features by means of the S...

Page 9: ...P Pr ri in nt te er r Together with the Installation Guide and the CD ROM with the User Manual the following items are included in the box Notify any damage to your supplier Upper Push Tractor 9078D p...

Page 10: ...3 P Pr ri in nt te er r P Pa ar rt ts s F Fr ro on nt t V Vi ie ew w 9078 plus model Push Tractor Cover Operator Panel Paper Knob Power Switch Paper Guides Cut Sheet Support...

Page 11: ...4 9078D plus model Push Tractors Cover Operator Panel Paper Knob Power Switch...

Page 12: ...5 R Re ea ar r V Vi ie ew w ASF Area Cover Power Cable Connector Rear Tractor Installation Area Covers Paper Knob Top Cover Rear Tractor Area Cover Interface Connectors Rear Paper Slot...

Page 13: ...d stable Your printer must not be exposed to direct sunlight extreme heat cold dust or humidity see Printer Specifications later You need an AC power outlet compatible with the plug of the printer s p...

Page 14: ...nt te er r A As ss se em mb bl ly y R Re em mo ov va al l o of f t th he e S Sh hi ip pm me en nt t L Lo oc ck ks s Open all the printer covers and make sure that you remove all the shipment locks fro...

Page 15: ...kit is installed or not Make sure that you are using only Compuprint original consumables 1 Make sure that the printer is turned off 2 Find the ribbon cartridge among the accessories Ribbon guide Ten...

Page 16: ...9 3 Open the top cover using the small handles on either side of the top cover 4 Turn the printer on The print carriage prepares for ribbon cartridge installation...

Page 17: ...take up slack in the ribbon Ribbon Tension Knob To avoid damage to the ribbon do not turn the winding knob in the wrong direction 6 Align the cartridge pins with the locking grooves on the left and ri...

Page 18: ...cular to the print head Make sure that the ribbon is inserted correctly between the print head and the print head mask O K N O If the color kit option is installed on your printer insert the white pla...

Page 19: ...until it clips into place at all four locking points 10 Turn the ribbon winding knob again in the direction of the arrow to take up slack in the ribbon 11 To ensure that the ribbon guide runs freely a...

Page 20: ...nstalled in front position on the lower push tractor 1 Find the upper push tractor among the accessories 2 Install the upper push tractor aligning both its hooks with the lower push tractor pins and i...

Page 21: ...e installed as shown in figure 4 If you need to remove the upper push tractor turn the printer off Take the connector cable off and press on the push buttons located in the upper push tractor hooks to...

Page 22: ...al IEEE1284 parallel interface A RS 232 C or RS 422 A serial interface Before connecting the interface cable make sure that the printer and the host computer are turned OFF Insert the parallel interfa...

Page 23: ...application package The installation procedures depend upon the host environment Follow the instructions in the readme file you find on the CD ROM In a WINDOWS 95 98 2000 environment the printer suppo...

Page 24: ...late of the printer that you find under the rear ASF cover In case the power rating does not correspond DO NOT CONNECT THE PRINTER TO THE MAINS Consult your dealer for help 1 Make sure the power outle...

Page 25: ...er cable plug into the printer connector and the other power cable end into a convenient outlet the figure shows the European version 1 2 4 If you need to turn the printer on press the power switch in...

Page 26: ...owing messages will be displayed 9078 plus or 9078D plus then PRINT OUT NO 3 Press the key to enter the setup The first setup item is displayed LOW JAM SENS Y 4 Press the key until the language first...

Page 27: ...or panel enables you to perform many of the printer functions including paper path selections font selection and the printer setup ON LINE PROGRAM MA CRO FONT LF LOAD FF PROGRAM READY SHIFT SHIFT PATH...

Page 28: ...M3 M4 Indicate which of the four User Macros is currently used ASF1 ASF2 ASF3 LOWER PUSH UPPER PUSH PUSH PULL LOW PUSH MF PSH PLL MF MANUAL FORM Indicates which Paper Path is currently used The print...

Page 29: ...PULL Indicates that the currently selected paper path is out of paper The messages are displayed only for the available paper paths according to the installed devices ASF1 ASF2 ASF3 LOWER PUSH UPPER P...

Page 30: ...er push and manual paper path PSH PLL MF Push Pull and manual paper path LOCKED MENU When the access to the Printer Setups has been locked at the power on the printer displays this message MACRO CHANG...

Page 31: ...hen the printer receives a paper parking command and the TEAR NO is selected for the tear off function Tear off the fanfold then press the PARK key to park the paper TEAR OFF PAPER PARK PAPER These me...

Page 32: ...s offline R E ADY Unlit when the printer is disabled and the buffer does not contain any data or during the initialization setup or tests PROGRAM Blinks when one of the printer setup procedures has be...

Page 33: ...of the keys are described on the gray areas beside the keys The SHIFT indicator is lit and the display shows SHIFT FUNCTION This function is not enabled if the printer is in setup mode Program Functio...

Page 34: ...input buffer is cleared an a break 250 msec on a serial interface is sent The message RESET BREAK is displayed PROGRAM Key PROGRAM Enables the printer setups as follows Normal Function Pressing this...

Page 35: ...ng procedure See also How to Handle the Paper Parking later in this manual Shift Function Disables the alternative key functions If pressed after the PARK key the parking procedure is interrupted LOAD...

Page 36: ...ayed macro wait for 2 seconds without pressing any key and the parameters of this macro will be set PATH Shift Function Selects one of the paper paths The parameters of the displayed path are set pres...

Page 37: ...t buffer READY indicator blinks press these two keys contemporaneously the printing noise level toggles between normal QUIET PRINT OFF and reduced noise level QUIET PRINT ON When the printer is off li...

Page 38: ...without printing or offline READY indicator unlit These settings can be stored in the NVM E En nt te er ri in ng g t th he e P Pr ri in nt te er r S Se et tu up ps s Press the PROGRAM key and keep it...

Page 39: ...am Setup the following choice is offered to store the values set STORE QUIT The new settings are not activated and the old settings remain valid STORE SAVE The new settings are stored permanently in t...

Page 40: ...gu ur ra at ti io on n 1 Make sure that the printer is turned off 2 Press and hold the PROGRAM key pressed while powering on the printer until the RELEASE KEY message is displayed As soon as the PROGR...

Page 41: ...The functions concerning the interfaces group the parameters for the configuration of the interfaces The setup item Functions groups the following printer functions Paper overlay 9078 plus model only...

Page 42: ...he printout starts as soon as you select this value Enable Disable Lower Tractor Jam Sensor PRINT OUT NO LOW JAM SENS Y or LOW JAM SENS N or UPP JAM SENS Y LOW JAM SENS Y Enables the paper jam sensor...

Page 43: ...Y or UPP JAM SENS N or PARALL INTERFACE UPP JAM SENS Y Enables the paper jam sensor located in the Upper Push Tractor UPP JAM SENS N Disables the paper jam sensor located in the Upper Push Tractor Wh...

Page 44: ...to the interface specific parameters Parallel Interface Parameters CX Parallel I F Select In On Data Bits 7 Dedic Buffer Emul IBM Parall Interface Char Set Nation Serial Interface Auto LF Char Set Na...

Page 45: ...DIR i F Bidirectional IEEE 1284 parallel interface CX PARALLEL I F Centronics type parallel interface monodirectional Setting the Select In Signal 1284 BIDIR I F SELECT IN HOST or SELECTIN ON or DATA...

Page 46: ...2K Selection of the number of data bits 7 or 8 Input Buffer Size DATA BITS 8 DEDIC BUFFER 256 or DEDIC BUFFER 2K or DEDIC BUFFER 12K or DEDIC BUFFER 32K or DEDIC BUFFER 64K or EMUL EPSON LQ Selects t...

Page 47: ...mulation EMUL IBM XL24 The printer uses the IBM Proprinter XL24e emulation EMUL IBM XL24AGM The printer uses the IBM Proprinter XL24 AGM emulation EMUL IBM 2391 The printer uses the IBM Personal 2391...

Page 48: ...character sets are available CP 437 CP437 G 96 GREEK CP850 CP851 CP 852 CP 853 CP 855 CP 857 CP 858 CP 860 CP 862 CP 863 CP 864 CP 865 CP 866 CP 867 CP 876 CP 877 CP 1250 CP 1251 CP 1252 GOST TASS MAZ...

Page 49: ...P 437 CP437 G 96 GREEK CP850 CP851 CP 852 CP 853 CP 855 CP 857 CP 858 CP 860 CP 862 CP 863 CP 864 CP 865 CP 866 CP 867 CP 876 CP 877 CP 1250 CP 1251 CP 1252 GOST TASS MAZOWIA ISO 8859 1 ISO 8859 2 ISO...

Page 50: ...The printer performs an automatic carriage return after a LF VT or ESCJ code LF Code Behavior AUTO CR NO or NATION CP437 AUTO LF NO or AUTO LF YES or AUTO LF HOST or 20 CPI IBM NO or PARALL INTERFACE...

Page 51: ...are displayed only if the IBM emulation is selected AUTO LF NO 20 CPI IBM NO or 20 CPI IBM YES or PARALL INTERFACE 20 CPI IBM NO The compressed printing is performed at 17 1 cpi 20 CPI IBM YES The com...

Page 52: ...rameters Serial Interface Parameters Serial I F No Baud 9600 Data Bits 8 Parity None Handshake DTR Serial I F Baud Data Bits 7 Parity Handshake Xon Xof Serial Interface Connection Local Dedic Buffer 2...

Page 53: ...TERFACE SERIAL INTERFACE SERIAL I F NO or SERIAL I F 232 or SERIAL I F 422 or FUNCTIONS BAUD 9600 SERIAL I F NO The serial interface is disabled SERIAL I F 232 Defines the usage of the serial interfac...

Page 54: ...2400 or BAUD 4800 or BAUD 9600 or BAUD 19200 or BAUD 38400 or DATA BITS 8 The baud rate is selected in bits per second The above values can be selected Number of Data Bits BAUD 9600 DATA BITS 8 or DA...

Page 55: ...parity bit i e 8 bit data are transferred and the parity check is disabled PARITY ODD Parity check is enabled for odd parity PARITY EVEN Parity check is enabled for even parity PARITY MARK Parity che...

Page 56: ...CTION LOCAL HANDSHAKE DTR The Handshake is performed using the DTR Protocol HANDSHAKE XONXOF The Handshake is performed using the XON XOFF Protocol Connection Type HANDSHAKE DTR CONNECTION LOCAL or CO...

Page 57: ...the DLL is not available Printer Emulation DEDIC BUFFER 2K EMUL EPSON LQ or EMUL IBM XL24 or EMUL IBM XL24AGM or EMUL IBM 2391 or CHAR SET CS2 EMUL EPSON LQ The printer uses the EPSON LQ 1050 2550 em...

Page 58: ...T CS2 or CHAR SET ITALIC or NATION CP437 These items select the character set to be used in EPSON emulation IBM Character sets EMUL IBM xxx CHAR SET CS1 or CHAR SET CS2 or NATION CP437 These items sel...

Page 59: ...3 CP 855 CP 857 CP 858 CP 860 CP 862 CP 863 CP 864 CP 865 CP 866 CP 867 CP 876 CP 877 CP 1250 CP 1251 CP 1252 GOST TASS MAZOWIA ISO 8859 1 ISO 8859 2 ISO 8859 3 ISO 8859 4 ISO 8859 5 ISO 8859 6 ISO 88...

Page 60: ...P 437 CP437 G 96 GREEK CP850 CP851 CP 852 CP 853 CP 855 CP 857 CP 858 CP 860 CP 862 CP 863 CP 864 CP 865 CP 866 CP 867 CP 876 CP 877 CP 1250 CP 1251 CP 1252 GOST TASS MAZOWIA ISO 8859 1 ISO 8859 2 ISO...

Page 61: ...CR NO No automatic carriage return is performed after a LF VT or ESCJ code AUTO CR YES The printer performs an automatic carriage return after a LF VT or ESCJ code LF Code Behavior AUTO CR NO or NATIO...

Page 62: ...are displayed only if the IBM emulation is selected AUTO LF NO 20 CPI IBM NO or 20 CPI IBM YES or SERIAL INTERFACE 20 CPI IBM NO The compressed printing is performed at 17 1 cpi 20 CPI IBM YES The com...

Page 63: ...model Sequence None Buzzer Yes Quick Yes Ribbon Black Bar Codes 60 Text Direct Bi Graph Direct Bi Bar Code Bi P On Path Macro Menu ENGLISH Sequence Buzzer No Ribbon Color Text Direct Uni Graph Direct...

Page 64: ...e None Buzzer Yes Ribbon Black Bar Codes 60 Text Direct Bi Graph Direct Bi Bar Code Bi P On Path Macro Menu ENGLISH Sequence Buzzer No Ribbon Color Text Direct Uni Graph Direct Uni Bar Code Uni P On P...

Page 65: ...apping 9078 plus model only FUNCTIONS PAPER OVERLY NO or PAPER OVERLY YES or SEQUENCE NONE PAPER OVERLY NO When feeding a cut sheet through the manual entry slot the fanfold paper must be parked PAPER...

Page 66: ...anel SEQ L U PUSH The paper is fed firstly through the lower push path and successively through the upper push path 9078D plus model only SEQUENCE ASF1 2 This item appears only if the automatic sheet...

Page 67: ...or disables the buzzer Quick Manual Loading through the Manual Slot 9078 plus model only BUZZER YES QUICK NO or QUICK YES or RIBBON BLACK QUICK NO The single sheet in the manual path is loaded by the...

Page 68: ...ribbon type to be used with the printer black or color Bar Code Density RIBBON BLACK BAR CODE 60DPI or BAR CODE 90DPI or TEXT DIRECT BI Selects the bar code print density 60 or 90 dpi Text Print Direc...

Page 69: ...ECT UNI or BARCODES DIR UNI Selects the print direction for graphics bidirectional or unidirectional Bar Codes Print Direction GRAPH DIRECT BI BARCODES DIR BI or BARCODES DIR UNI or P ON PATH MACRO Se...

Page 70: ...ro P ON PATH LAST The paper path at power on is the last one that was selected before the printer was powered off Selection of the Language of the Display Messages P ON PATH MACRO MENU ENGLISH or MENU...

Page 71: ...just done The default values for the menu items are indicated in bold FUNCTIONS BACK TO MFG NO or BACK TO MFG YES or PROG PRINT OUT NO If you want to select BACK TO MFG YES you have to exit from this...

Reviews: