background image

28  DataMan 300 Quick Reference Guide

DataMan 300 Quick Reference Guide   29

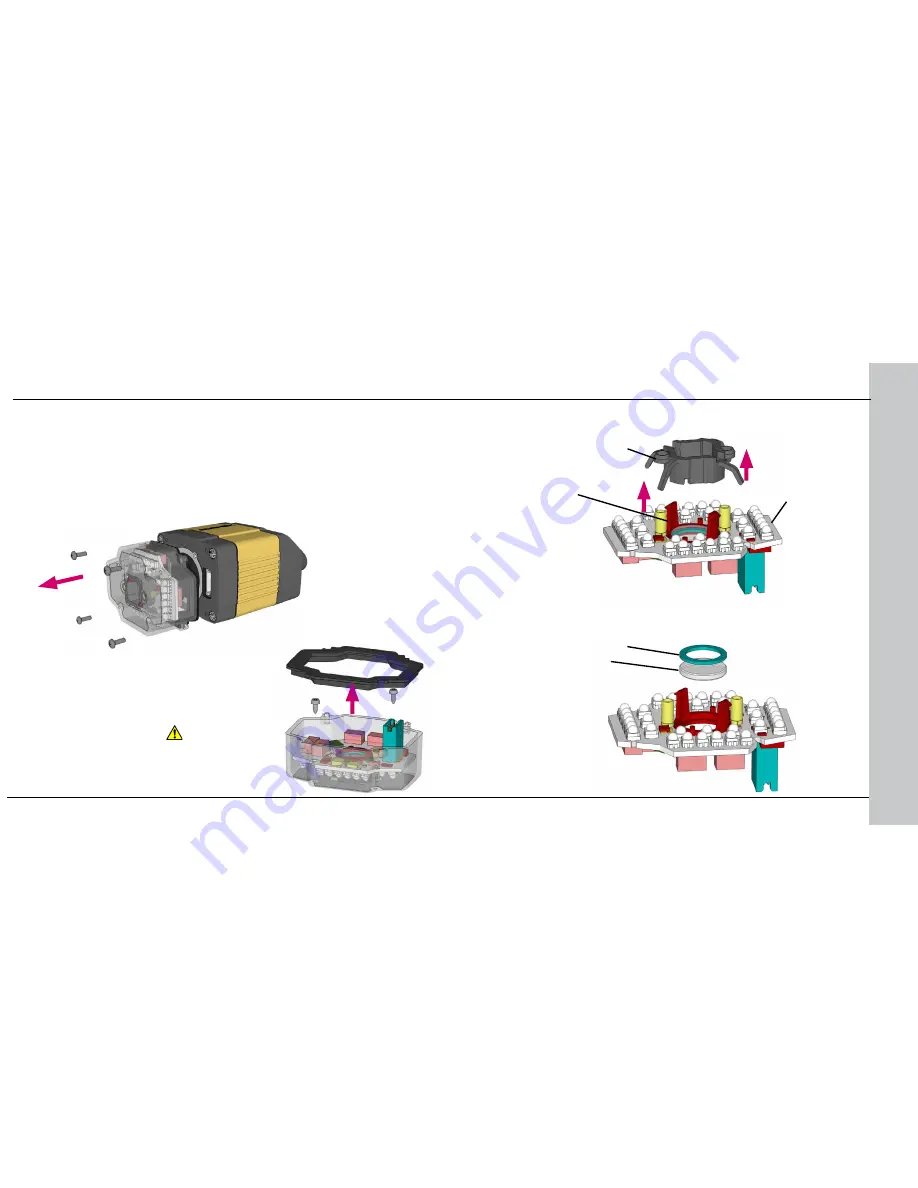
Perform the following steps to install an optical filter in the front cover.
Observe the following constraints on the filter:

•  Diameter (Ø): 12.3mm<Ø<12.7mm

•  Thickness (t): 1.6mm<t<2mm

1.  First, remove the front cover: unscrew the four M3 screws and take off  the 

LED cover. 

2.  Take off the rubber seal, remove the two  

smaller screws, and remove the PCB. 


Installing a Filter (Flat-Front Cover)

Use a T6 Torx 

screwdriver.

3. 

Working from the front of the PCB, press the legs of the filter holder 

gently together and pull off the clip. 


4. 

Insert first the filter glass, then the soft spacer (that was removed 

from its place between the filter holder and the filter retaining clip) 

into the filter holder. A pair of tweezers may be helpful.


Filter retaining clip

LED PCB

Filter holder

Soft spacer

Filter glass

NOTE:

 Make sure that no electrostatic 

charges are applied to the PCB. (E.g. wear 

ESD shoes.) 

Summary of Contents for DataMan 300L

Page 1: ...COGNEX DataMan 300 Series Quick Reference Guide...

Page 2: ...ring Training the Reader Scripting Package Detection 1 Connections Optics and Lighting Page 73 4 External Light Control I O Cable High Speed Output Lines High Speed Output Wiring Ethernet M12 to RJ45...

Page 3: ...ool Help menu after you install the DataMan software on your PC DataMan Fixed Mount Readers Reference is a complete online hardware reference for the DataMan fixed mount ID readers Cognex DataMan Soft...

Page 4: ...cover with IR LED illumination DM300 DLCOV IR 10 3 mm IR M12 lens with locking DM300 LENS 10 IR Liquid lens module and pre focused 10 3 mm IR M12 lens with wrench DM300 LENS 10LL IR 5 4 6 5 9 10 13 1...

Page 5: ...External light cable CCB M12x4MS xxx xxx specifies length I O extension cable 5m straight CKR 200 CBL EXT 37 37 38 38 POWER SUPPLIES 39 40 39 40 Connection cable 24V I O RS 232 CCB M12x12Fy xx y strai...

Page 6: ...DataMan 300 Quick Reference Guide 11 DataMan 300 Systems Omni directional 1 D Code Reading 1DMax Best In Class 1 D Reading IDQuick High Speed 2 D Reading 2DMax for hard to read DPM and damaged 2 D co...

Page 7: ...the lens Illumination LED clusters External illumination mounting points Ethernet The following image shows the built in lighting system of the DataMan 300 series reader underneath the plastic lighti...

Page 8: ...late available through the Windows Start menu or the Setup Tool Help menu to align the edge of the reader body to the line marked with the target distance used in your application 4 Adjust focus for m...

Page 9: ...Quick Reference Guide DataMan 300 Quick Reference Guide 17 5 Tighten the lens 6 Attach front cover 7 Insert and tighten screws Installing the Lens Continued Tighten in sequence Torque limit 9 Ncm 0 08...

Page 10: ...hat it lies flat Tighten the locking ring 4 Connect the liquid lens cable to the reader Thread the lens into the reader WARNING To avoid equipment damage the cables must be routed as shown in the figu...

Page 11: ...e marked with the target distance used in your application 4 Adjust focus for maximum sharpness Enhance image quality in the Setup Tool for better guidance Place the reader at the desired working dist...

Page 12: ...ults Display pane check the Focus Feedback option and enable Live Display 3 Use the DataMan Focus Target template available through the Windows Start menu or the Setup Tool Help menu to align the edge...

Page 13: ...eg on the reader and the slot on the cover so that the cover locks in place 24 DataMan 300 Quick Reference Guide DataMan 300 Quick Reference Guide 25 1 2 3 4 Installing the Lens Continued Add screws t...

Page 14: ...orm the following steps 1 Insert a flat head screwdriver with a tip of max 2 2 mm on either the top or bottom side of the filter clip to release the clip on one side 2 Insert the screw driver on the o...

Page 15: ...e two smaller screws and remove the PCB Installing a Filter Flat Front Cover Use a T6 Torx screwdriver 3 Working from the front of the PCB press the legs of the filter holder gently together and pull...

Page 16: ...he filter retaining clip Check that the snap hooks are correctly positioned and fully engaged Laser guides Orientation pin Laser modules 6 Insert the PCB with the filter retaining clip and the filter...

Page 17: ...he correct orientation Tighten in sequence Torque limit 9 Ncm 0 08 in lbs 1 2 3 8 Remount the front cover Observing the tightening sequence below tighten all four screws to 9 Ncm using a torque wrench...

Page 18: ...ting brackets The brackets are intended to mount any of the different lights to the reader They can also be used to mount the reader with lights attached to your machine Pivot mounting as illustrated...

Page 19: ...ps between 0 and 200 This way you can get better coverage Both Optimize Focus and the Focus Feedback use the same procedure for testing the current focus They consider various subregions of the image...

Page 20: ...column is green the lens is in focus and you will be able to decode the image For the C mount or other non Cognex S Mount lenses the lens s focal length focus setting and aperture setting determine th...

Page 21: ...l 20 350 mm 0 7 13 7 in 13 mil 25 735 mm 0 9 28 9 in 18 mil 25 840 mm 0 9 33 1 in 2 D 1 D DM300 DM302 DM300 DM302 2 D 1 D DM303 DM303 40 DataMan 300 Quick Reference Guide DataMan 300 Quick Reference G...

Page 22: ...95 in 125 mm 4 9 in 1 D DM300 DM302 DM300 DM302 2 D 1 D DM303 DM303 42 DataMan 300 Quick Reference Guide DataMan 300 Quick Reference Guide 43 This map shows the field of view of the DataMan 300 serie...

Page 23: ...303 DM303 86 mm 3 4 in 56 mm 2 2 in 2 3 7 6 in 2 mil 61 97 mm 44 DataMan 300 Quick Reference Guide DataMan 300 Quick Reference Guide 45 Reading Distance and Field of View DataMan 300 Series Readers wi...

Page 24: ...0 mm 3 5 21 2 in 16 mm 0 6 in 39 mm 1 5 in 78 mm 3 07 in 25 mm 0 98 in 62 mm 2 4 in 125 mm 4 9 in 2 D 1 D DM300 DM302 DM300 DM302 2 D 1 D DM303 DM303 46 DataMan 300 Quick Reference Guide DataMan 300 Q...

Page 25: ...installing your reader 48 DataMan 300 Quick Reference Guide DataMan 300 Quick Reference Guide 49 Dimensions M3 5 4x mounting holes for the device M3 6 4x mounting holes for external illumination LEDs...

Page 26: ...th optional liquid lens S Mount 16 mm F 9 C Mount lenses with limitations see below Limitations to C Mount lenses The length of the thread may not exceed 5 4 mm The back side of the lens may not excee...

Page 27: ...e from the Reader Configuration Codes document available through the Windows Start menu or the Setup Tool Help menu Quick Setup All main controls and visual feedback in a single view for easiest setup...

Page 28: ...onnection to configure the reader with parameters that allow it to communicate over your Ethernet network Use the Setup Tool Menu Bar The In1 button on the toolbar creates a virtual rising edge signal...

Page 29: ...Upload an image to be used for training Use the Setup Tool Menu Bar Continued Use the Edit menu for standard Cut Copy and Paste operations Use the View menu to view reader information serial number fi...

Page 30: ...ble through the Windows Start menu or the Setup Tool Help menu Select industrial protocol samples and tools you want to use when you install the DataMan Software Test Mode Test mode lets you configure...

Page 31: ...ton Burst Performs multiple image acquisitions based on an external trigger and decodes any symbol appearing in a single image or within a sequence of images or multiple symbols in a single image or w...

Page 32: ...ence 62 DataMan 300 Quick Reference Guide DataMan 300 Quick Reference Guide 63 DataMan 300 Series Read Setups Your reader can be configured for up to 16 different settings In Single Continuous Self an...

Page 33: ...llowing filters on the Setup Tool s Image Filtering pane under Light and Imager Settings Equalize This filter redistributes the brightness values of the pixels in the image As a result the range of br...

Page 34: ...ersion of pixel values based on the 256 step greyscale The result is an output image that is a negative of the input image To use Image Filtering perform the following steps 1 On the Image Filtering p...

Page 35: ...r with the expected symbology can make the time required to decode successive symbols more consistent In addition training may help increase decode yield To train your reader place a code in front of...

Page 36: ...decode The reader will train each new symbology while retaining the existing trained symbologies Scripting Training the Reader Continued In addition to standard formatting possibilities you have the...

Page 37: ...f your reader 2 On the Setup Tool s System Settings pane s Inputs tab check Allow Buffered No Read Images on the input you connected your reader to 3 On the Setup Tool s Image Record and Playback pane...

Page 38: ...es can be clipped short or tied back using a tie made of non conductive material For RS 232 use the Power Supply return path for ground 5m I O Breakout Cable CCB M12xM12Fy xx Pin Signal Name Wire Colo...

Page 39: ...V when ON which causes current to flow through the load When the outputs are OFF no current flows through the load Specification Description Voltage 26 4V maximum through external load Current 50mA ma...

Page 40: ...f the load is pulled down to less than 3V and 24 appears across the load Use a protection diode for a large inductive load with the anode connected to the output and the cathode connected to 24V GND p...

Page 41: ...nd connect Common In to 0V When the output turns on it pulls In 0 up to 24V turning the opto coupler ON 26 4V Max across input pins Transition approximately 12V Min Ethernet M12 to RJ45 Cable The Ethe...

Page 42: ...d used in accordance with the instructions may cause harmful interference to radio communications Operation of this Compliance Statements i NOTE For product support contact http support cognex com CAU...

Page 43: ...quipment WEEE Compliance Statements Continued equipment in a residential area is likely to cause harmful interference in which case the user will be required to correct the interference at personal ex...

Page 44: ...18W internal external lights Light Connector Current load Average 500mA Peak 1A max 100 s Ethernet Speed 10 100 Duplex Mode Full duplex or half duplex DataMan 300 Series Specifications This product ha...

Page 45: ...ration The hardware and portions of the software described in this document may be covered by one or more of the U S patents listed on the Cognex web site http www cognex com patents asp Other U S and...

Reviews: