background image


XPEED Indoor Series                                                                                                                                                                       WWW.CNBTEC.COM
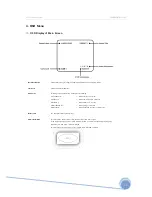
 

4. OSD Menu 


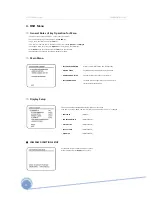
■  AUTO EXPOSURE SETUP 


•  BACKLIGHT 

[OFF/C1/C2/L1/L2/U1/U2/D1/D2/R1/R2] 
Sets Backlight Compensation. 
The  reference  position  and  the  level  of  BLC  are  selectable.  Refer  to  the  table 
below. 

Note1)


•  DAY/NIGHT 

[AUTO/DAY/NIGHT]


•  SLOW SHOUTTER 

[OFF/2~128 Field] 
Activates SLOW SHUTTER function when luminance of image(signal) is too dark. 
It is possible to set up the maximum number of fields piled up one on another 
by SLOW SHUTTER function. It is only available when DAY/NIGHT mode is DAY 

•  AE MODE 

[AUTO/SHUTTER/IRIS/AGC/MANUAL] 
There are five modes of Auto Exposure function. 
Except AUTO mode, the others can be selected when DAY/NIGHT mode is DAY 
and Slow Shutter mode is OFF. 

•  IRIS LEVEL 

[0~255] 
It can be set when AE is in IRIS mode or MANUAL mode. 

•  GAIN LEVEL 

[0~255] 
It can be set when AE is in AGC mode or MANUAL mode. 

•  SHUTTER SPEED 

[0~27] 
It can be set when AE is in SHUTTTER SPEED mode or in MANUAL mode. 
As for setting value, refer to the table below. 

Note2)


•  BRIGHTNESS 

[0~96] 
It can be set when AE is not in MANUAL mode. 


Note1)

 Backlight Compensation 

Value 

Description 

Value 

Description 

C1 

Low weight at the center of the screen 

C2 

High weight at the center of the screen 

L1 

Low weight at the left of the screen 

L2 

High weight at the left of the screen 

U1 

Low weight at the upper of the screen 

U2 

High weight at the upper of the screen 

D1 

Low weight at the lower of the screen 

D2 

High weight at the lower of the screen 

R1 

Low weight at the right of the screen 

R2 

High weight at the right of the screen 


Note2)


Shutter Speed Table

                                                                                    *The values are based on NTSC type models. 

Value 

Shutter 

Value 

Shutter 

Value 

Shutter 

Value 

Shutter 

1/60 sec 

1/400 sec 

14 

1/1000 sec 

21 

1/2500 sec 

1/125 sec 

1/450 sec 

15 

1/1100 sec 

22 

1/2500 sec 

1/150 sec 

1/500 sec 

16 

1/1300 sec 

23 

1/3000 sec 

1/200 sec 

10 

1/600 sec 

17 

1/1500 sec 

24 

1/3500 sec 

1/250 sec 

11 

1/700 sec 

18 

1/1600 sec 

25 

1/4000 sec 

1/300 sec 

12 

1/800 sec 

19 

1/1800 sec 

26 

1/6000 sec 

1/350 sec 

13 

1/900 sec 

20 

1/2000 sec 

27 

1/10000 sec 


23 

Summary of Contents for XPEED Indoor Series

Page 1: ...www cnbtec com XPEED Indoor Series Ver 1 0 INSTALLATION AND OPERATION MANUAL 3810 0251A_110119...

Page 2: ...nnected While operating if any abnormal condition or malfunction is observed stop using the camera immediately and then contact your local dealer Handling Do not disassemble or tamper with parts insid...

Page 3: ...17 Group 18 Other Functions 18 4 OSD Menu OSD Display of Main Screen 19 General Rules of key Operation for Menu 20 Main Menu 20 Display Setup 20 Privacy Zone Mask Setup 26x S1465N P X 36x S1965N P X...

Page 4: ...on of preset or pattern or Swing A Group is composed of Max 20 entities of Preset Patten Swings Privacy Masks are assignable not to intrude on other s privacy 8 Privacy Zones Only available with Model...

Page 5: ...XPEED Indoor Series WWW CNBTEC COM 1 Introduction Product Accessories Basic Components Other Components available to be ordered separately 5...

Page 6: ...hook when assembling the main body to the mounting base TORX Screw When the main body and the mounting base are assembled be sure to insert the screw to the mounting base otherwise there is a risk of...

Page 7: ...XPEED Indoor Series WWW CNBTEC COM 1 Introduction Disassembling the Mounting Base Assembling the Mounting Base 7...

Page 8: ...FF OFF OFF OFF OFF Ex ID 10 OFF ON OFF ON OFF OFF OFF OFF The range of ID 1 255 Do not use 0 as camera ID Factory default of Camera ID is 1 If you want to control a certain camera you must match the c...

Page 9: ...ensor 2 Normal Open ST3 Pin 6 ON Sensor 3 Normal Close OFF Sensor 3 Normal Open ST4 Pin 7 ON Sensor 4 Normal Close OFF Sensor 4 Normal Open If a wrong type of sensor is selected it activates in the op...

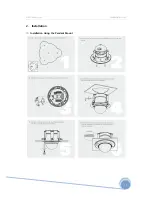
Page 10: ...XPEED Indoor Series WWW CNBTEC COM 2 Installation Installation Using the Wall Mount 10...

Page 11: ...XPEED Indoor Series WWW CNBTEC COM 2 Installation Installation Using the Pendant Mount 11...

Page 12: ...XPEED Indoor Series WWW CNBTEC COM 2 Installation Installation using the Pendant Mount 12...

Page 13: ...XPEED Indoor Series WWW CNBTEC COM 2 Installation Installation using the Wall Mount 13...

Page 14: ...24VAC 2A Please check the voltage and current capacity of rated power carefully Video Connection Connect With BNC coaxial cable RS 485 Communication For PTZ control connect this line to keyboard and...

Page 15: ...erly after considering these types Also the sensor type i e Normal Open or Normal Close in DIP switch in main body of camera must be set properly Signal Line Description IN COM Connect cable of electr...

Page 16: ...ler or DVR in advance to operate camera function fully when using controller or DVR Refer to the following table when using standard Pelco protocol controller Go Preset Input Preset Number and press P...

Page 17: ...urns on its axis by 360 in CW Clockwise direction and then it turns on its axis by 360 in CCW Counterclockwise direction Speed can be set up from 1 sec to 180 sec Set Swing To set Swing use OSD menu R...

Page 18: ...eset positions to do counteractions such as turning on the light or sounding the alarm It is noted that the latest alarm input is effective if multiple sensors are activated Privacy Zone Mask To prote...

Page 19: ...PRESET xxx When camera reach to preset xxx PATTERN x When Pattern x is in action SWGx PRESET xxx When Swing x is in action UNDEFINED When undefined function is called to run Preset Label The Label sto...

Page 20: ...y models Main Menu SYSTEM INFORMATION Displays system information and configuration DISPLAU SETUP Enable Disable of OSD display on Main Screen DOME CAMERA SETUP Configure various functions of this cam...

Page 21: ...t was set Otherwise UNDEFINED will be displayed under MASK NO DISPLAY ON OFF Sets if camera makes mask shows or not on images CLEAR MASK CANCEL OK Deletes data in the selected mask NO Privacy Zone Are...

Page 22: ...this happens turn FLICKERLESS setting ON This prevents flickering which happens when the frequency of the power and the frequency of camera are different When FLICKERLESS in ON Day Night mode goes DAY...

Page 23: ...in MANUAL mode As for setting value refer to the table below Note2 BRIGHTNESS 0 96 It can be set when AE is not in MANUAL mode Note1 Backlight Compensation Value Description Value Description C1 Low...

Page 24: ...60Hz flickering may appear on the screen When this happens turn Flickerlees setting ON This prevents flickering which happens when the frequency of the power and the frequency of camera are different...

Page 25: ...keress mode is ON AE mode is automatically in SHUTTER SPEED mode IRIS LEVEL CLOSE F1 6 F28 Model S1465N P X S1965N P X CLOSE F1 4 F22 Model S1665N P X It can be set when AE is in IRIS mode or MANUAL m...

Page 26: ...lected the view in the screen is moving reversely FRZ IN PRESET ON OFF 27x 36x Models Only If Freeze in preset function mode is ON camera starts freezing the image of start point at start point of pre...

Page 27: ...e allowed RELAY OUT Sets the relay output The figure on the right is current Setting value indicates OFF mode If the relay is shown as figures it means relay is ON CAM ADJUST GLOBAL LOCAL WB White Bal...

Page 28: ...g alphabet cursor moves to the next digit Using Left Right Up Down of joystick move to an appropriate character from the Character set To choose that character press the NEAR key If you want to use bl...

Page 29: ...era moves from the preset assigned as the 1st point to the preset assigned as the 2nd point in CW Clockwise direction Then camera moves from the preset assigned as the 2nd point to the preset assigned...

Page 30: ...TTERN By using Joystick move to start position with appropriate zoom To start pattern recording press NEAR key To exit this menu press FAR key Move camera with joystick of controller or run preset fun...

Page 31: ...art Group setup Note that MAX 20Functions are allowed in a Group Move cursor up down and press NEAR key to set up Set up Action Dwell time and Option Note that selected item is displayed in reverse Mo...

Page 32: ...er finishing setting up a Action press NEAR key to one upper Level Menu Step Move cursor Up Down to select Action Number and repeat Step Step to edit selected Group After Finishing setting up all Acti...

Page 33: ...g Camera ID PTZ Information Action Title Preset Label Alarm I O North Direction Privacy Zone ON AUTO AUTO AUTO AUTO Pan 0 Undefined Focus mode Digital Zoom Max Zoom Flickerless Color Line Lock White B...

Page 34: ...ness White Balance Auto Manual Red Blue Gain Adjustable BLC On Off Flickerless On Off Pan Tilt Operation Range Pan 360 Endless Tilt 90 Operation Speed Preset 360 sec Manual 1 360 sec inter locked with...

Page 35: ...c AGC Normal High Off White Balance Auto Manual Red Blue Gain Adjustable BLC NORMAL C L U D R HIGH LOW 6 Area Selectable Flickerless On Off Brightness Adjustable 0 96 Pan Tilt Operation Range Pan 360...

Page 36: ...Manual Brightness White Balance Auto Manual Red Blue Gain Adjustable BLC On Off WDR Flickerless On Off Pan Tilt Operation Range Pan 360 Endless Tilt 90 Operation Speed Preset 360 sec Manual 1 360 sec...

Page 37: ...XPEED Indoor Series WWW CNBTEC COM 5 Specifications Dimensional Drawings Unit mm 37...

Page 38: ...XPEED Indoor Series WWW CNBTEC COM 5 Specifications Dimensional Drawings Unit mm 38...

Page 39: ...XPEED Indoor Series WWW CNBTEC COM MEMO 39...

Reviews: