6
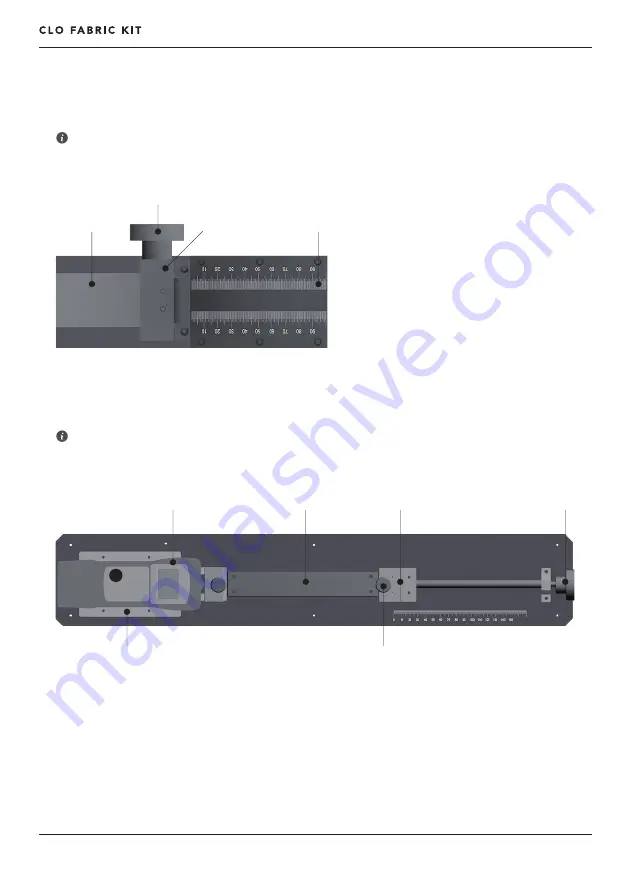
2. TOOL LEGEND
BENDING TEST DEVICE
STRETCH TEST DEVICE
DIGITAL FORCE GAUGE
2-1 FABRIC BED
JIG
2-3 CONTROL LEVER
DIGITAL FORCE GAUGE HOLDER
CLAMP
2-2 POWER BUTTON
1-3 FABRIC BED
1-4 CONTROL LEVER
1-2 CLAMP
1-1 RULER
Page 1: ......
Page 2: ...red Component or part does not extend the original Warranty Period for such Covered Component Exclusions and Limitations This warranty is void and does not apply to a damage resulting from mishandling...
Page 3: ...LIABILITY OF SUCH CLO PARTIES TO YOU TO THE LOWEST AMOUNT PERMITTED BY APPLICABLE LAW THIS LIMITATION IS INDEPENDENT OF ANY OTHER LIMITATION SET FORTH HEREIN IF YOU ARE A CALIFORNIA RESIDENT YOU WAIVE...
Page 4: ...ur name Your Company if applicable Address Phone number Email address A description of the reason for your return 1 Compose an e mail with the following information 2 Email the information to support...
Page 5: ...the order destination Orders shipped outside of the United States or South Korea may be subject to import taxes customs duties and fees levied by the destination country which are levied once a shipm...
Page 6: ...5 1 COMPONENTS Please identify and confirm the following components STRETCH TEST DEVICE BENDING TEST DEVICE STENCIL THICKNESS GAUGE SCALE UTILITY KNIFE SCREWDRIVER CHARGING ADAPTER USER MANUAL...
Page 7: ...LEGEND BENDING TEST DEVICE STRETCH TEST DEVICE DIGITAL FORCE GAUGE 2 1 FABRIC BED JIG 2 3 CONTROL LEVER DIGITAL FORCE GAUGE HOLDER CLAMP 2 2 POWER BUTTON 1 3 FABRIC BED 1 4 CONTROL LEVER 1 2 CLAMP 1...
Page 8: ...x 76mm 188mm x 69 5mm x 41mm NICKEL BATTERY 6V 1500Ah 120mm x 60mm x 20mm 90mm x 55mm x 17mm 330mm x 240mm x 4mm STRETCH TEST DEVICE BENDING TEST DEVICE DIGITAL FORCE GAUGE SIZE DIGITAL FORCE GAUGE B...
Page 9: ...oosely tighten the Screws x4 to affix the Digital Force Gauge to the Fabric Kit enough so that Digital Force Gauge can be moved 4 Shift the Digital Force Gauge to vertically align the Jig as the image...
Page 10: ...watches with the provided stencil Each swatch will represent a different grain cut in the 1 weft 2 warp and 3 bias directions measuring 220mm x 30mm in size These will be used to measure the weight be...
Page 11: ...e displayed weight in the Emulator 1 2 3 C FABRIC THICKNESS Press the lever of the thickness gauge to create a gap and place the swatch Place the 220mm x 30mm swatch in between the gap Release the lev...
Page 12: ...affix the swatch 1 2 3 Wind the 1 4 Control Lever clockwise then stop when the swatch hits the ground 4 Measure and enter this point of contact as the Contact Distance A Place the 1 1 Ruler beneath t...
Page 13: ...f the force when swatch is pulled to 1mm 2 Starting with the length reached at step 1 check the length and force of each 1mm increments 3 At this time measure 3 to 5 sections We recommend that you fil...
Page 14: ...l Force Gauge uses the default settings as the image below If a button was mistak enly pushed power the Digital Force Gauge off then on to reset the device to its default settings However if the defau...