background image

The blank channel can be used if you want an empty space – in Live Mode the desktop will be shown in this channel, or any 
other application you may have running in the background.

Click 

OK

 to accept this channel type and add the channel to the template. Click 

Cancel

 to return without 

adding this channel. To remove any channel, click to highlight it and click the red – button at the bottom of 
the template.

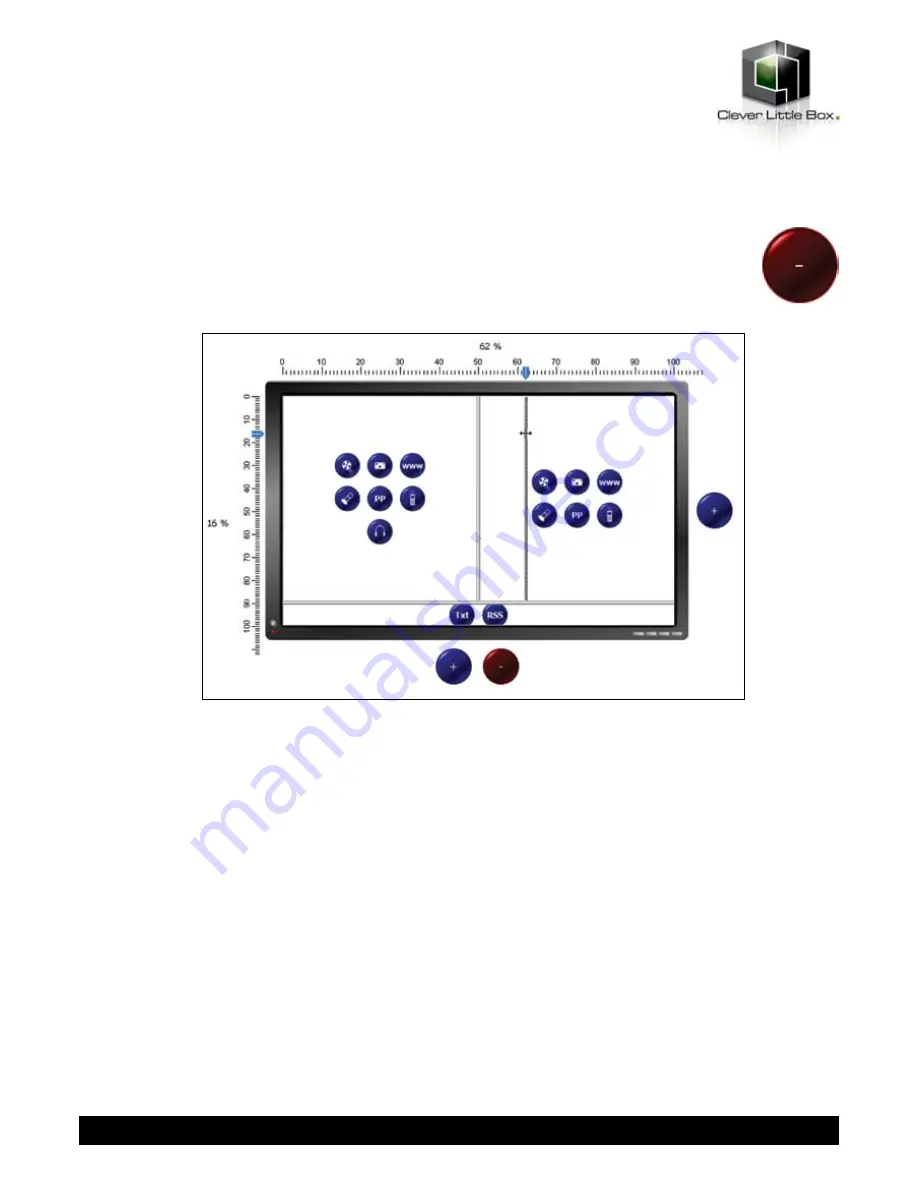
To resize, click on the divider between two channels and drag the border into the desired position. Rulers 
will appear at the top and left of the template to assist with accurate positioning.

17

The template format can be set to portrait or landscape by clicking the Change Format button.

Please note that the format change applies only to design mode. In order to play content on a portrait screen, desktop 
rotation must be enabled on the graphics card – please refer to Appendix 2 for further details.

You can add borders to channels to make them stand out more. Select the channel you want to change and click the 
Border Design button.

www.cie-group.com

Summary of Contents for Luminis AiO

Page 1: ...User Guide Luminis AiO Dedicated Support Line T 0844 561 0514 ...

Page 2: ...chedules 27 Contents 02 Clients 28 Groups 29 Submissions 30 Web Interface 31 32 Manage Media 33 Edit Templates and Media 34 Manage Multimedia Playlist 35 36 Manage RSS Text Playlist 37 RSS News Feeds 37 Text Messaging 38 39 Template Config 40 42 Preview 43 User Rights 44 Schedule My Templates 45 46 More Options 46 Change your Username and Password 46 Choose another Luminis AiO Installation 47 Publ...

Page 3: ... keyboard and press the escape key to access the main menu Note that if you are using a PS 2 keyboard this needs to be connected before you start up your Luminis AiO unit From the main menu you will be unable to access any part of the Luminis AiO software Click Exit to Windows then double click the Luminis AiO icon on the desktop Enter the username Administrator The default password is blank this ...

Page 4: ...e list of files in Import Directory by 04 Select the files you wish to manage from the Import Directory or My Media Directory You can use the ctrl and shift keys or the All and None buttons to select multiple files Click Import to copy the selected files from import directory to my media directory and Export to copy from my media directory to import directory Click the Delete button to remove the ...

Page 5: ...template for easy reference click the Rename Template button For more information on the template config button see advanced usage 05 When you have found the template you wish to manage click Select Each template may consist of several channels These are the areas of the screen that display media or text The picture above contains two channels a large multimedia channel at the top and a small RSS ...

Page 6: ...MV MPG 1 2 AVI Animations SWF Still images JPG BMP GIF PowerPoint PPS PPT You can also select www to add a web page to the playlist or the remote control icon to add live TV radio or AV from another source you must have a TV tuner installed for this Click on a file in the Media Files Available list to preview it in the Preview Media window You can toggle preview on and off by clicking the Preview ...

Page 7: ...ck the Stretch Media box if you want the media to fill the entire channel If this option is left unticked the aspect ratio of the file will be preserved but this may cause black letterbox borders around the media If you have selected TV AV select the channel or AV source you wish to display and set the duration If you have selected www enter the URL into the webpage field and set the duration You ...

Page 8: ...tries 08 Now that the playlist has entries you can edit delete and move them Click Edit to return to the Edit Multimedia Entry screen as above The only difference with this screen is that you can only select one file webpage or TV entry to replace the currently selected entry Click Delete Media to remove the entry from the playlist Click Move Up or Move Down to change the selected entry s position...

Page 9: ... each feed every time the playlist cycles around 09 Manage RSS Text Playlist Click the icon or the text label of any of the news feeds you wish to display Once a source is selected the icon changes colour and the label becomes bold Click OK to confirm your entries and return to the playlist or click Back to cancel and return The RSS feed will be added to the playlist with the default font style an...

Page 10: ...r them into the text field Use the shift button to toggle between lower case upper case and symbols Use the return button to confirm your entry and return to the Edit Message Entry screen Press the backspace button to delete the character you last entered Backspace Return Shift Text Messages You can add your own text messages to the screen to inform customers about your latest news and offers or m...

Page 11: ...Date buttons to insert the current time or date into the message these appear in the format Time and Date Each time the entry is displayed these will be updated so the correct information is always displayed Click the Set To Default button to return the font size style and colour settings to the default for new text entries Click OK to confirm your entry and return to the playlist or click Back to...

Page 12: ...e day only and select that day from the Repeat Day dropdown menu Click Add to insert a new template into the schedule Set the times that you want the template to start and end select the template to display from the dropdown menu and click Update The template will now appear in the schedule window Click Edit to change the times or template to be displayed click Remove to delete the template from t...

Page 13: ...ate begins eg 11 59 59 13 If any templates overlap a message will appear at the top of the screen and the entry that overlaps will be highlighted in red The offending entry should be removed from the schedule as this can cause errors in Live Mode The Load and Save buttons are only used when this Luminis AiO unit is configured in network mode Please refer to Network Mode section under Advanced Usag...

Page 14: ...the screen may be useful for troubleshooting and technical support The Clients Groups button is only used when this Luminis AiO unit is configured in Network mode Please refer to Network Mode section of this user guide for more details Click the Network Settings button to run the network connection wizard for this unit You can set the computer name and workgroup Contact your IT department for furt...

Page 15: ... of this user guide for further information on these settings Click the Date Time button to change the system time date and time zone and select whether to automatically adjust for daylight savings This information will affect the text message display and template scheduling so you should ensure that it is correct Click the Users button to manage Luminis AiO users and set access rights Please refe...

Page 16: ...split the multimedia channel horizontally with the new channel on the right click the icon on the right hand side of the screen Select the type for the new channel from Multimedia With Audio Multimedia Without Audio Text RSS Feeds and Blank Make sure your template has only one multimedia channel with audio otherwise you may hear sound from several different media files at once The multimedia chann...

Page 17: ... divider between two channels and drag the border into the desired position Rulers will appear at the top and left of the template to assist with accurate positioning 17 The template format can be set to portrait or landscape by clicking the Change Format button Please note that the format change applies only to design mode In order to play content on a portrait screen desktop rotation must be ena...

Page 18: ...rom the palette below Use the tick boxes to toggle bevelled and tube effect on and off and set the bevel size and border width using the arrow buttons Click no border to remove the border completely Click save to confirm your settings and return to Template Config and click back to cancel When you have finished configuring your template click save to go back to the template selection screen Click ...

Page 19: ...e Mode there may be a delay of between 30 and 60 seconds before the TV channel is displayed while the Hauppauge WinTV splash screen is displayed It is normal for this splash screen to be displayed even if you are not showing TV or do not have a tuner installed It is only possible to have one multimedia channel within a template displaying TV any other multimedia channels must be displaying multime...

Page 20: ...ill need to change them then do so and click Scan The program will begin to scan for analogue and then digital channels available in your area This scan may take up to ten minutes to complete When it has completed you will have a list of available channels in the right hand window 20 ...

Page 21: ... left to switch between channels You can also click menu Select Channel to choose from a list There might be a slight delay when switching between channels Click the X in the top right corner to return to Luminis AiO You can now schedule TV channels within Edit my Media and Templates 21 www cie group com ...

Page 22: ...e receiver is turned on and tuned to a channel and click the TV AV button in the Setup Luminis AiO screen You may have to wait a few seconds for the wizard to appear Enter the suite manager program as described above and select the Sources tab Select Composite Source and change the video format if necessary consult the documentation that accompanies your AV source if you are unsure Enter a name an...

Page 23: ...o expire after a specific date enter it here By default this is 31 12 2099 Enabled This box to allow the user to log in Removing this tick will prevent them from being able to access Luminis AiO To remove a user from the system click the Delete button Users Where many different people will make changes to the Luminis AiO system it may be beneficial to have different user accounts and passwords The...

Page 24: ...ot change access rights for the Administrator account Network Mode If you have more than one Luminis AiO unit on your network it is possible to configure them in a server client s relationship Please note that the configuration can be complicated and requires an understanding of Windows Internet Information Services and that this would usually be performed by a Luminis AiO engineer The Luminis AiO...

Page 25: ...ed media on the server you need to setup a schedule This is done in the same way as if the server was running as a standalone playback unit Template Schedules Click the Save button when you have finished setting up the schedule 25 www cie group com ...

Page 26: ...n you have saved the schedule you will be returned to the schedule templates screen To recall a previously saved schedule click the Load button Select the schedule from the list and click Load again You can now make changes and save the schedule again Submitting schedules When you have saved your template schedule you need to submit it to one or more Luminis AiO clients for it to be displayed From...

Page 27: ...ame of the client Refer to your network administrator if you are unsure Server Address This is the HTTP address of this Luminis AiO server Refer to the Luminis AiO engineer for this information Reference This reference field can be used for storing information relevant to the client for example the serial number Product Code This is the unique product code for Luminis AiO This information is avail...

Page 28: ...bottom right corner of the screen Select the group you wish to add the client s to and click OK Repeat this procedure for all clients in the Unallocated group Groups Submissions are sent to clients in predefined groups rather than by selecting each client you want to send the template schedule to If you do not already have groups created you will need to create one By default all clients are added...

Page 29: ...and templates before switching to the new template schedule The frequency of updates can be set on the clients please contact Luminis AiO support for further details Submissions In order to play the correct media and templates the Luminis AiO clients must have a job submitted to them Before submitting check that you have completed the following steps added media to a template added the template to...

Page 30: ...address of your Luminis AiO unit in the Setup my Luminis AiO screen Enter http IP ADDRESS Luminis AiO into Internet Explorer on another PC on the network to open the Web Interface If you have a compatible router it may be possible to forward ports from your external IP address in order to manage the Luminis AiO unit from a remote location You should refer to your network administrator in order to ...

Page 31: ...Your Luminis AiO unit can remain in Live Mode while you make your changes 31 www cie group com ...

Page 32: ... The file will then be transferred to the Luminis AiO unit and will be available to add to playlists Tick the Preview box to show a preview of the selected file Note that large movie files may take a few seconds to start previewing If you are uploading files that require specific codecs you will need to make sure they are installed on the Luminis AiO unit To remove a file from the Luminis AiO unit...

Page 33: ...Edit Templates and Media Click the Edit My Templates and Media button to setup playlists Click on a channel to highlight it in blue and then click Edit to manage the playlist 33 www cie group com ...

Page 34: ...review it in the Preview Media window Select a Transition Style from the dropdown menu if required At the end of the file this transition will be used to link to the next one If you do not want a transition select None Use the arrow buttons or enter a duration in seconds to display the file before moving onto the next Duration for movie files should be read automatically provided the correct codec...

Page 35: ...added automatically When you have made your selection click the button to add this to the Selected Media window You can add more files in the same way remove files from the right hand side by clicking or confirm your entries and add to the playlist by clicking OK Click Back to cancel and return to the Manage Multimedia Playlist screen without adding new entries Now that the playlist has entries yo...

Page 36: ...rom each feed every time the playlist cycles around Click the icon or the text label of any of the news feeds you wish to display Once a source is selected the icon changes colour and the label becomes bold Click OK to confirm your entries and return to the playlist or click Back to cancel and return The RSS feed will be added to the playlist with the default font style and colour To change these ...

Page 37: ...ge Entry screen Tick the Scrolling Text box to make the message text scroll across the screen in Live Mode If this option is not ticked the text will appear static Where there is too much text to fit on one line the entry will be split and one half will appear followed by the other Click the Add Time or Add Date buttons to insert the current time or date into the message these appear in the format...

Page 38: ... playlist has entries you can edit delete and move them Click on an entry to select it and click Edit to return to the Edit Message Entry screen as above Click Delete Entry to remove the entry from the playlist Click Move Up or Move Down to change the selected entry s position in the playlist When you have finished click Menu to return to the main menu screen or Back to return to the channel selec...

Page 39: ...will have to be scheduled again Select the type for the new channel from Multimedia With Audio Multimedia Without Audio Text RSS Feeds and Blank Make sure your template has only one multimedia channel with audio otherwise you may hear sound from several different media files at once The multimedia channel with audio will have the headphones icon at the bottom while channels without audio will not ...

Page 40: ... click on the divider between two channels and drag the border into the desired position Rulers will appear at the top and left of the template to assist with accurate positioning The template format can be set to portrait or landscape by clicking the Change Format button Please note that the format change applies only to design mode In order to play content on a portrait screen desktop rotation m...

Page 41: ...Width using the arrow buttons Click No Border to remove the border completely Click the Refresh button to preview these settings Click OK to confirm your settings and return to Template Config and click Back or Menu to cancel When you have finished configuring your template click OK to go back to the template selection screen Click Back or Menu to cancel you will be asked to confirm if you want to...

Page 42: ... Preview button Please note that this preview is not an exact replication of how the template will look in Live Mode and that it is intended for guideline only Transition effects are not displayed You must have any required codecs installed on your PC to preview media files Click Menu or Back to exit the template preview 42 ...

Page 43: ... dropdown menu to set their access level to the selected channel Permissions are as follows Write User has full access to the channel Read User can view the channel playlist but cannot modify it None The user cannot access the channel If a user tries to access a channel they do not have permission to view or edit they will see an error message Please note that user rights can only be setup from th...

Page 44: ...ou want the template to start and end select the template to display from the dropdown menu and click Update The template will now appear in the schedule window Double click on the entry to change the times or template to be displayed click Remove to delete the template from the schedule or click Add to insert another template If no template is scheduled the screen will appear black with the text ...

Page 45: ...t to other Luminis AiO units on the network or submit template schedules in network mode Change your Username and Password User names can be set up within the Luminis AiO application Please refer to the User Rights section of this user guide for more information Users can change their own username and password from the More Options page in the web interface To change the username enter the require...

Page 46: ...ured in a server client relationship you can submit jobs from the web interface Please refer to the Network Mode section of this user guide for details on setting up clients and groups When you have saved your template schedule you need to submit it to one or more Luminis AiO clients for it to be displayed From the More Options page click the Publish Media button In order to play the correct media...

Page 47: ...Submit button You will see a confirmation box appear Make a note of the Job ID as this may be required for support or troubleshooting purposes and click OK The client s that this job have been submitted to will pick up the new job information and download any required media and templates before switching to the new template schedule The frequency of updates can be set on the clients please contact...

Page 48: ...ress or DNS name of the client Refer to your network administrator if you are unsure Media Server This is the HTTP address of this Luminis AiO server Refer to the Luminis AiO engineer for this information Reference This reference field can be used for storing information relevant to the client for example the serial number Product Code This is the unique product code for Luminis AiO This informati...

Page 49: ...in menu and click the Luminis AiO robot in the middle of the page or go into More Options and click the Log Out button If a user is left logged into the Luminis AiO web interface without interacting for a short while they will be logged out automatically Click the OK button to be directed to the login page 49 www cie group com ...

Page 50: ...these settings will already be in place for Microsoft Office 2007 installations however they are returned to default when Microsoft Office updates are applied and or a different version of Microsoft Office is installed Exit Luminis AiO and return to the Windows desktop Open My Computer and select Tools Folder Options Select the File Types tab 50 ...

Page 51: ...oad is unticked and click OK For PPT files also ensure Confirm open after download is unticked and ensure Browse in same window is ticked Repeat these steps for PPSX and PPTX file types if you have updated your installation of Microsoft Office 2007 51 www cie group com ...

Page 52: ...iles Before saving the file you will need to make sure the following settings are correct Click Slide Show Set Up Show Ensure show type is set to browse by an individual window and that show scroll bar is unticked Ensure slides are set to advance automatically and save the file as PPS ...

Page 53: ...uminis AiO will only support the playback of PowerPoint files in one multimedia channel at a time If you have more than one multimedia channel containing PowerPoint presentations the files will display in one channel and be skipped in the other 53 www cie group com ...

Page 54: ... Control Centre from the Start Menu 54 Select Displays Manager Displays Properties From the rotation dropdown menu select the direction in which the desktop should be rotated this will be dependent on which way the screen is to be mounted The desktop will now be rotated Ensure that when the screen is mounted in a portrait orientation the Start Menu and taskbar appear at the bottom of the screen ...

Page 55: ...the template in portrait mode will make it easier to get channels in the correct proportions In Template Config click the Change Format button to switch between portrait and landscape This is for design purposes only all other functionality remains the same Because the rotation will be handled by the graphics card there is no requirement to rotate media files www cie group com ...

Page 56: ... Estate Bulwell Nottingham NG6 8WB T 0115 9770075 F 0115 9770081 E info cie group com W www cie group com Take a look at our new website for details on our full range of Clever Little Box products Luminis AiO Dedicated Support Line T 0844 561 0514 ...

Reviews: