background image


CLASSIC BLAST MACHINE with TLR-100/300 REMOTE CONTROLS


Page 5 


© 2018 CLEMCO INDUSTRIES CORP.  

  www.clemcoindustries.com  

  Manual No. 22501, Rev. I 02/18 

operator presses the control lever, a rubber button 
seals the opening, and outbound air returns through 
the inbound line to open the inlet valve and close the 
outlet valve. This action pressurizes the blast machine 
and begins the blasting. Releasing the handle 
exhausts the control air, which causes the inlet valve to 
close and the outlet valve to open to depressurize the 
blast machine and stop the blasting. 


1.4.4 

Abrasive Cutoff System (ACS) Option 


1.4.4.1

 The abrasive cutoff switch is mounted on the 

control handle. It closes the metering valve so that air 
alone without abrasive exits the nozzle. This feature is 
used to clear the blast hose and to blowdown the blast 
surface.  


NOTE: The ACS feature requires a pneumatically 
operated abrasive metering valve. It is not available 
on Lo-Pot blast machines, which do not have 
adequate clearance for the metering valve. 
 
1.4.4.2

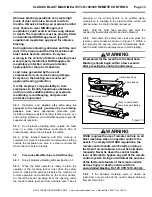
  Parts used with an optional ACS are shown in 

Figure 9. In addition to the standard remote controls, an 
ACS also includes a 50-ft. single-line hose, an additional 
18-inch-long interconnecting hose, an RLX control 
handle with ACS air switch assembly, and a 
pneumatically operated metering valve. The metering 
valve supplied with the system may differ from the one 
shown. A separate owner’s manual is supplied with an 
alternate metering valve. 


1.4.5 

Electric Control Alternate


1.4.5.1

  Electric remote controls (electro-pneumatic) are 

recommended when the nozzle and remote control 
handle are farther than 100 feet from the blast machine. 
Pressure drop of pneumatic systems over longer 
distances increases response time, which prevents fast, 
safe operation. Contact your local Clemco Distributor for 
additional information. 
 

1.5 Abrasive 


WARNING 

Abrasives and dust from blasting may contain 
toxic materials (e.g., lead paint, silica) that are 
hazardous to workers. Before blasting, obtain a 
safety data sheet (SDS) for the blast abrasive 
and identify all substances removed by the 
blasting process. 
•  Silica sand (crystalline) can cause silicosis, 

lung cancer, and breathing problems in 
exposed workers. 

•  Slags can contain trace amounts of toxic 

metals such as arsenic, beryllium, and 
cadmium and have the potential to cause 
lung disease.  


NO DUST IS SAFE TO BREATH. DUST 
PRODUCED FROM ANY ABRASIVE OR FROM 
THE BLASTING PROCESS CAN CAUSE 
SERIOUS LUNG DISEASE AND DEATH WHEN 
INHALED. It is the employer’s responsibility to 
train employees to identify hazardous 
substances and to provide suitable policies, 
procedures, monitoring, recordkeeping, and 
personal protective equipment. 


NOTE: Use only abrasives specifically manufactured 
for blasting that are compatible with the surface 
being blasted. Abrasives produced for other 
applications may be inconsistent in size and shape 
and produce an unsatisfactory finish, contain 
particles that could jam the abrasive metering valve, 
or cause irregular wear.  


1.5.1

  Selection of blasting abrasive can play a 

significant part in worker health risk, job productivity, and 
maintenance of the blast machine. DO NOT USE 
abrasives containing more than 1% crystalline (free) 
silica. Obtain safety data sheets (SDS) for the blasting 
abrasive prior to blasting, paying particular attention to 
worker health risks and presence of any hazardous/toxic 
substances.  
 

1.5.2 

Abrasive Mesh Size 


1.5.2.1

 The choice of abrasive mesh size depends on 

the desired profile, cleaning rate, nozzle orifice size, and 
availability of clean, dry air. Generally, larger, denser 
abrasives provide a deeper profile, while smaller 
abrasives clean faster. Most abrasive blasting is done 
with abrasive sizes between 16 and 80 mesh. Larger 
sizes may be used if the nozzle orifice is large enough to 
prevent particles to pass without jamming. Finer 

Summary of Contents for CLASSIC BLAST MACHINE

Page 1: ...090 Phone 636 239 4300 Fax 800 726 7559 Email info clemcoindustries com www clemcoindustries com Do not use this equipment before READING this MANUAL and UNDERSTANDING its contents These WARNINGS are included for the health and safety of the operator and those in the immediate vicinity Electronic files include a Preface containing the same important information as in the orange cover WARNING ...

Page 2: ...tains important safety information about abrasive blasting that may not be included in equipment operation manuals The booklet is available in both English and Spanish to request copies email info clemcoindustries com 1 2 Safety Alerts 1 2 1 Clemco uses safety alert signal words based on ANSI Z535 4 2011 to alert the user of a potentially hazardous situation that may be encountered while operating...

Page 3: ...Safety Accessories 8 2 TLR 100 300 Remote Control Systems 8 3 Exhaust Muffler 8 4 Blast Machine and Accessories 8 5 FSV Abrasive Metering Valve 8 6 Remote Control System Replacement Parts 8 7 ACS System Replacement Parts 8 8 1 1 2 Inlet Valve 8 9 1 Inlet Valve 8 10 1 Piston Outlet Valve 8 11 1 Diaphragm Outlet Valve 8 12 Abrasive Trap 8 13 RLX Control Handle Refer to Manual No 10574 1 4 Components...

Page 4: ...tible with Clemco equipment If ANY part of the remote control system is altered involuntary activation can occur causing serious injury 1 4 3 1 A remote control system is an OSHA required safety device it is required when an operator mans the nozzle The remote controls allow the blast operator to pressurize the machine to start blasting and depressurize it to stop blasting 1 4 3 2 The control hand...

Page 5: ...e remote controls or prevent the controls from deactivating upon release of the control handle This situation can result in serious injury or death If remote controls are operated in freezing or near freezing weather install a Clemco Antifreeze Injector stock no 05537 on the remote control air supply line 1 4 3 5 Clemco remote controls operate pneumatically on a return air principle A stream of co...

Page 6: ...dditional information 1 5 Abrasive WARNING Abrasives and dust from blasting may contain toxic materials e g lead paint silica that are hazardous to workers Before blasting obtain a safety data sheet SDS for the blast abrasive and identify all substances removed by the blasting process Silica sand crystalline can cause silicosis lung cancer and breathing problems in exposed workers Slags can contai...

Page 7: ...ve use of plastic and some other lightweight media requires a blast machine with a 60o conical bottom for continuous uninterrupted media flow 2 0 INITIAL SETUP WARNING Clemco supplies an exhaust muffler with all blast machines of 2 cuft capacity and larger The muffler reduces exhaust noise and prevents abrasive from exhausting upward or sideways into the air When the blast machine is depressurized...

Page 8: ...ast machine systems 2 4 1 Install a compressed air filter to the inlet valve as shown in Figure 4 It is recommended that a filter be installed at this location to remove moisture from air before it enters the machine If problems with moisture persists after installing the filter a dryer or aftercooler may be required in the air supply line Figure 4 2 5 Compressed Air Supply Hose Connection 2 5 1 A...

Page 9: ...t machines or stock no 15891 for up to four machines Mark each hose and corresponding connection per the instructions supplied with the kit and carefully trace and verify each connection before operating WARNING Moist air that freezes can cause blockage at the control handle or in the control lines Blockage can cause involuntary activation of the remote controls or prevent the controls from deacti...

Page 10: ...coupling nipple 2 6 9 Attach the 50 foot twinline hose to the unions on the 5 foot twinline 2 6 10 Make sure that all fittings are tight Leaks cause the system to malfunction NOTE When removing the blast hose from the machine disconnect the 50 foot twinline hose at the unions When attaching the blast hose make sure all twinline fittings are tight Make sure coupling gaskets are in place and in good...

Page 11: ... flat surfaces 3 1 2 1 An empty machine may be moved manually on level flat surfaces by at least two people 3 1 2 2 Slide the machine by pushing it in a forward direction toward the wheels To avoid tripping hazards that may be out of view do not back up while moving the machine 3 1 2 3 The Clemco Mule Stock No 20331 is designed to facilitate moving empty 2 cuft to 6 cuft capacity Clemco blast mach...

Page 12: ...eigh 100 pounds per cubic foot Nozzle Pressure at the Nozzle psi Air Power Orifice and Abrasive Size in 50 60 70 80 90 100 125 140 Requirements 26 30 33 38 41 45 55 61 Air cfm No 3 150 171 196 216 238 264 319 353 Abrasive lbs hr 3 16 6 7 8 9 10 10 12 14 Compressor hp 47 54 61 68 74 81 98 108 Air cfm No 4 268 312 354 408 448 494 608 676 Abrasive lbs hr 1 4 11 12 14 16 17 18 22 24 Compressor hp 77 8...

Page 13: ...Load abrasive into the machine by following the instructions in Section 3 8 3 2 15 Do not allow anyone near the blast machine except machine tenders who are appropriately attired in approved personal protective equipment as noted in Section 3 3 WARNING Everyone except for the blast operator or blast machine tender must stay clear of the blast machine The machine tender or blast operator may pressu...

Page 14: ...hing outside the respirator use area in a clean environment where the air is safe to breathe 3 4 Pressurize Blast Machine to Start Blasting 3 4 1 Don all protective blasting attire per Section 3 3 3 4 2 When the blast operator is ready to blast the operator or the machine tender must close the safety petcock Closing the petcock prepares the machine for remote operation and activation by the contro...

Page 15: ...hment it is used to assist in drying the surface after it is washed down WARNING OSHA sets exposure limits for people and the environment Airborne dust can increase the exposure levels beyond permissible limits OSHA prohibits blowing with compressed air as a cleaning method for lead based paint dust or other hazardous dust unless the compressed air is used in conjunction with a ventilation system ...

Page 16: ... to prevent abrasive from being forced up and out of the machine when it pressurizes 3 8 2 When ready to blast the operator or machine tender while standing back and facing away from the concave filling head and exhaust muffler closes the safety petcock 3 8 3 Begin blasting or resume blasting per Section 3 4 3 9 Emptying the Machine of Abrasive 3 9 1 Empty the machine of all abrasive when shutting...

Page 17: ... until it hits the stops The alternate Quantum or MPV manual pinch tube metering valve is closed when the metering knob is turned fully clockwise 4 1 3 While the operator is blasting the machine tender increases abrasive flow by moving the handle toward center no more than 1 4 at a time allowing time for the flow to stabilize before readjusting The valve is fully open when the handle is centered F...

Page 18: ...round couplings and nozzle holders indicate worn or loose fitting parts Nozzle holders and couplings that do not fit tightly on hose and nozzles that do not fit tightly in nozzle holders could disconnect while under pressure Impact from objects nozzles couplings hoses or abrasive disconnected by pressure during operation can cause severe injury 5 2 Weekly Inspection 5 2 1 With the air OFF before b...

Page 19: ...two drops of lightweight machine oil in the inlet valve through the safety petcock This will lubricate the piston and O rings in the inlet and outlet valves 6 0 SERVICE MAINTENANCE WARNING To avoid serious injury from the sudden release of compressed air observe the following before performing any maintenance Depressurize the blast machine Turn OFF the compressed air supply Bleed the air supply li...

Page 20: ...ng the wing nuts securing it 6 2 4 Check the metering valve for blockage by inserting a finger into the opening and feeling for an obstruction or foreign object 6 2 5 If the metering valve is clear remove the blast machine inspection door and check inside for foreign objects 6 2 6 Make sure the inspection door gasket is in good condition and in place before re bolting the door onto the machine 6 2...

Page 21: ...h the piston out the top of the valve body 6 3 2 5 Inspect all items for wear and damage The piston cup should fit snugly against the cylinder wall If it does not replace the piston assembly The piston rod should be free of deep abrasion and move freely in the rod s bore If it is badly abraded drags in the bore or is loose in the bore replace the piston assembly If the piston rod O ring is flatten...

Page 22: ...l or tool oil 6 4 9 Install the piston into the bonnet s cylinder Cocking the piston so it enters the bonnet at a slight angle and rotating it while applying pressure makes assembly easier Do not push the piston fully into the bonnet the rod should be flush with the opening 6 4 10 Place the spring over the guide bolt and place the plug assembly retainer down on the spring 6 4 11 Place the spindle ...

Page 23: ...mb screw on the lower lock bar swing the lock bar off the lower cap and then remove the cap 6 6 4 Empty all abrasive from the bottom and top sections 6 6 5 Install the screen in the top section The smaller diameter end of the screen must face up as shown in Figure 21 6 6 6 Reassemble the upper and lower caps NOTE The upper and lower caps are identical except the screen gasket is glued into the upp...

Page 24: ...h the machine depressurized the air OFF the air supply locked out and tagged out and the air supply line bled 6 8 1 Remove the old seal by using a finger screwdriver or similar object to work the seal out of the retainer groove If for some reason replacement cannot be made from the top of the machine observe the warning at the beginning of this section and empty the machine and bleed the air suppl...

Page 25: ...xhaust elbow In its final position the muffler must face up WARNING The muffler reduces exhaust noise and prevents abrasive from exhausting upward or sideways when the blast machine is depressurized To reduce risk of injury from abrasive carried by high velocity air the muffler must be installed with the body facing up 6 10 Remove and Install Reusable Control Hose Fittings Figure 26 6 10 1 Control...

Page 26: ...Section 4 1 7 4 Abrasive Surging 7 4 1 A moderate amount of abrasive surge is normal at startup Should the flow of abrasive continue to surge reduce the amount of abrasive in the air stream by adjusting the metering valve Adjust abrasive flow per Section 4 1 7 4 2 Check the abrasive trap and exhaust muffler for blockage Slow depressurization will load the blast hose with abrasive and cause surging...

Page 27: ...tcock on the inlet valve If the machine does depressurizes control air remains in the control lines Refer to Paragraphs 7 7 4 7 7 5 7 7 6 and 7 7 7 If the machine does not depressurize the inlet valve is not fully closing or the outlet valve is not fully opening Refer to Paragraphs 7 7 8 7 7 9 and 7 7 10 7 7 4 Check the pneumatic adaptor gasket on the control handle for swelling which restricts ai...

Page 28: ...in 22364 8 2 Hose Safety Accessories Figure 27 NOTE Spring lock pins are affixed to nylon couplings When connecting two nylon coupling together make sure the coupling lock pins are at 180 degrees Pins should enter the open hole of the adjoining coupling One lock pin as shown in Figure 27 is used when connecting a nylon coupling to a metal coupling and two lock pins are used when connecting two met...

Page 29: ... 01818 9 Leg pad right for 2 cuft machine 20735 3 cuft and 6 cuft machine 03654 10 Leg pad left for 2 cuft machine 20736 3 cuft and 6 cuft machine 03655 11 Metering valve FSV w wye 02427 12 Gasket CQG coupling package of 10 00850 13 Wheel and tire 10 x 2 75 for 2 cuft 20349 14 Axle for 2 cuft for 10 wheel 20734 3 cuft for 16 wheel 02402 6 cuft for 16 wheel 02403 15 Wheel and tire 16 x 400 20427 16...

Page 30: ...nut 1 4 NC 03113 9 Handle bolt spacer 02431 10 Valve handle pin 20246 11 Gauge unit 02433 12 Set screw 1 4 NC x 1 2 square head 03080 13 Spring compression 01982 14 Stud 02436 15 Packing gland 02437 16 O ring 7 8 OD 21165 17 Gasket shaft 02439 18 Inspection plate 02440 19 Cap screw 5 16 NC x 1 hex head 03152 20 Wing nut 5 16 NC 03213 21 O ring 01990 22 Nipple heavy wall 1 1 2 x close 01791 23 Wye ...

Page 31: ...nd reusable 01943 9 Hose 50 foot twinline coupled 01951 10 Union hose 01944 11 Elbow 1 4 NPT adaptor 02513 Figure 31 8 8 ACS System Replacement Parts Figure 32 NOTE All parts not shown are the same as those shown in Section 8 7 and Figure 31 Refer to the RLX manual for replacement parts for ACS parts Refer to the metering valve manual for metering valve replacement parts Item Description Stock No ...

Page 32: ...1 02007 16 Cylinder cap 01997 Service kit includes items marked quantities are shown in 01927 Figure 33 8 10 1 Inlet Valve Figure 34 Item Description Stock No 1 Inlet valve complete 01980 1 Petcock 1 4 NPT 01993 2 Elbow 1 8 NPT adaptor 02827 3 Elbow 1 8 NPT brass street 03993 4 Adaptor 1 8 NPT with 1 16 orifice 01945 5 Bottom cap 01985 6 Spring 5 8 x 1 11 16 long 1 01982 7 Seal bottom cap 1 01989 ...

Page 33: ...2 7 Washer valve plug 2 01969 8 Retainer valve plug washer 1 01986 9 Valve body 01968 10 Spring 7 16 x 1 5 8 long 1 01974 11 Nylon washer 01979 12 Cap screw 3 8 NC x 3 4 03251 Service kit includes items marked quantities are shown in 01928 Figure 35 8 12 1 Diaphragm Outlet Valve Figure 36 Item Description Stock No 1 Diaphragm outlet valve complete 03371 1 Nipple 1 x close 01701 2 Diaphragm 06149 3...

Page 34: ...lete 02011 1 Screen 3 02012 2 O ring 2 02013 3 Cap 02014 4 Body 02015 5 Lock bar 02016 6 Screw 3 8 NC x 1 thumb 03289 7 Shoulder screw 3 8 x 3 8 03291 8 Gasket screen 1 8 Thick 1 02434 9 Label clean screen twice daily 02129 Service kit includes items marked quantities are shown in 01925 Figure 37 8 14 RLX Control Handle Refer to RLX Control Handle Manual No 10574 for RLX replacement parts 5 7 6 3 ...

Reviews: