CLASSIC BLAST MACHINE with TLR-100/300 REMOTE CONTROLS
Page 23
© 2018 CLEMCO INDUSTRIES CORP.
www.clemcoindustries.com
Manual No. 22501, Rev. I 02/18
could result in early valve failure or abrasive leakage
when the machine is pressurized or depressurized.
Figure
22
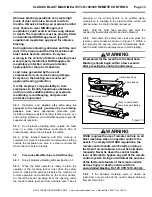
6.7.4
Slide the new pop-up valve over the guide and
then screw the valve guide (with the pop-up valve on it)
into position inside the machine. Tighten the guide
wrench-snug, but not wrench-tight. Over-tightening the
guide will make it difficult to remove the next time the
pop-up valve needs replacement.
6.7.5
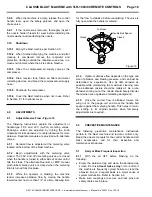
Refer to Figure 23 to check the pop-up height. If
the pop-up sits too low, misalignment could occur when
the pop-up comes up against the seal. If the pop-up sits
too high, it will take longer for abrasive to flow through
the opening when filling. Adjust the height by replacing
the guide with one that is longer or shorter.
6.7.6
Put a new gasket on the inspection door before
bolting the door onto the machine.
Figure
23
6.8
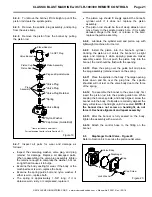
Replacing the Pop-Up Seal - Figure 24
WARNING
To avoid serious injury from the sudden release
of compressed air, all service on the blast
machine must be done with the machine
depressurized, the air OFF, the air supply locked
out and tagged out, and the air-supply line bled.
6.8.1
Remove the old seal by using a finger,
screwdriver, or similar object to work the seal out of the
retainer groove. If for some reason replacement cannot
be made from the top of the machine, observe the
warning at the beginning of this section, and empty the
machine and bleed the air supply line. Remove the
inspection door assembly and work through the
inspection door opening.
Figure
24
6.8.2
Push the new seal all the way through the port
and then fit it into the retaining groove. For the last few
inches, pull up on the seal and allow it to pop into
position.
6.9
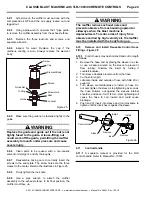
Exhaust Muffler - Figure 25
WARNING
Replace the muffler or element body as soon as
blast machine depressurization time increases
noticeably. Longer depressurization time
indicates the porous element body is becoming
clogged. If the element becomes plugged,
excessive air pressure could build up inside the
element and cause it to burst, resulting in injury.
Loosen
Tighten
Pop-Up Guide
Pop-Up Valve
Distance between the top of
the pop-up valve to the top of
the welding ring should be
1
1
/
2
min. and 2
1
/
2
max.
Pop-Up Guide
Seat Casting
Retainer Groove
Pop-Up Seat
Top of Blast Machine
Push into groove
Push or pull up to "pop"
it into the groove.
Welding Ring
Pop-Up Valve
1
1
/
2
- 2
1
/
2


