background image

5

CLEARSPAN

 GREENHOUSES

Revision date: 07.29.14

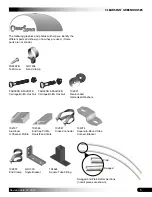
The following graphics and photos will help you identify the 

different parts and show you how they are used.  (Some 

parts are not shown.)

Swaged

Plain

Swaged and Plain Rafter Sections  

(not all pieces are shown)

FAH320B & FALB32B  

Carriage Bolt & Hex Nut

FA4482B

Tek Screw

QH1404

Band Clamp

102547

Cross Connector

104074

Square-to-Round Tube 

Connect Bracket

102857

End Clamp

FAH009B & FALB01B  

Carriage Bolt & Hex Nut

104624

Square Tube Fitting

QH1330

Angle Bracket

104548

End Cap Profile

Doors/Fans/Vents

102921

Neo-bonded 

Galvanized Washers

102197

Aluminum 

U-Channel Profile

Summary of Contents for 106265

Page 1: ...ights Reserved Reproduction is prohibited without permission ClearSpan Round Style Clear View Greenhouses Photo may show a different but similar model STK DIMENSIONS 106265 30 W x 12 H x 36 L 106266 30 W x 12 H x 48 L 106267 30 W x 12 H x 60 L 106268 30 W x 12 H x 72 L ...

Page 2: ...N Choosing the proper location is an important step before you begin to assemble the structure The following suggestions and precautions will help you determine whether your selected location is the best location Never erect the structure under power lines Identify whether underground cables and pipes are present before preparing the site or anchoring the structure Location should be away from str...

Page 3: ...ll framing to the rafter pipe In some cases band clamps are also used to connect diagonal struts to the assembled frame Clip or Fabric Clip A short half section piece of conduit cut lengthwise used to secure the end panel cover to the leg or rafter assembly The clip or fabric clip is typically fastened in place using self tapping Tek screw Conduit An assembly of pipes used to secure the main cover...

Page 4: ... NOTE At this time you do not need to open the plastic bags containing smaller parts such as fasteners or washers if equipped SPECIAL NOTE Baseboards for Frame These instructions describe installing a baseboard recommended at ground level along each side of the frame The baseboard runs from the front to the back of the frame This baseboard is not included with the shipment and must be supplied by ...

Page 5: ...d Plain Rafter Sections not all pieces are shown FAH320B FALB32B Carriage Bolt Hex Nut FA4482B Tek Screw QH1404 Band Clamp 102547 Cross Connector 104074 Square to Round Tube Connect Bracket 102857 End Clamp FAH009B FALB01B Carriage Bolt Hex Nut 104624 Square Tube Fitting QH1330 Angle Bracket 104548 End Cap Profile Doors Fans Vents 102921 Neo bonded Galvanized Washers 102197 Aluminum U Channel Prof...

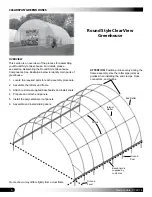
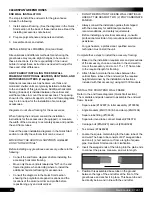
Page 6: ...RVIEW This section is an overview of the process for assembling your Round Style Greenhouse For details please see section Assembling the Round Style Greenhouse Components See illustration below to identify main parts of greenhouse 1 Locate the required parts for each assembly procedure 2 Assemble the rafters and frame 3 Attach customer supplied baseboards and install struts 4 Prepare and attach e...

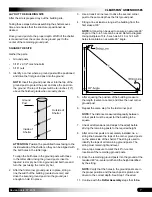
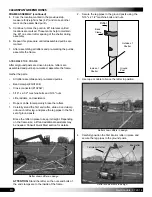
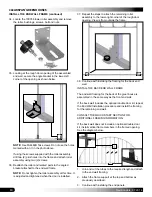
Page 7: ... same step for the last corner post NOTE The distance measured diagonally between corner posts must be equal for the building to be square 7 Check all dimensions and adjust if needed before driving the remaining posts to the required height 8 After all corner posts are accurately installed tie a string line between the tops of the corner ground posts on the same side of the shelter The string is u...

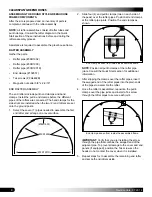
Page 8: ... to assemble the first end rafter and arrange on a level surface 2 Slide four 4 end purlin clamps two on each side of the peak over the rafter pipes Position all end clamps at the rafter pipe joints Position the end clamps as shown 30R1901D 30R1902 30R1903 NOTE Position all purlin clamps at the rafter pipe joints Consult the Quick Start section for additional information 3 After slipping the clamp...

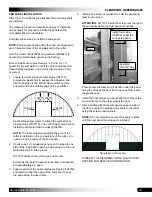
Page 9: ...semblies is achieved and maintained during assembly Gather the parts Pipe 1 315 x 75 swaged 131S075 Pipe 1 315 x XX plain 131P0XX Marker and tape measure NOTE The purlins are part of the assembled frame and run perpendicular to the rafter assemblies Each purlin consists of 1 315 x 75 131S075 swaged pipes number is determined by shelter length and one 1 1 315 x XX 131P0XX plain pipe The XX represen...

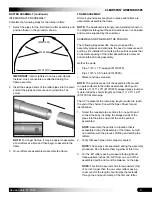
Page 10: ... design 2 Secure the leg pipes to the ground posts using the 5 16 x 2 1 2 machine bolts and nuts Rafter shown differs in design ATTENTION Stand the rafter so the nuts and bolts of the end clamps are to the inside of the frame 3 Use rope or cable to brace the rafter in position 4 Carefully position the first interior rafter in place and secure the leg pipes to the ground posts Rafter shown differs ...

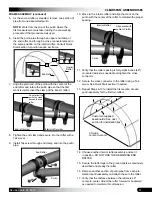
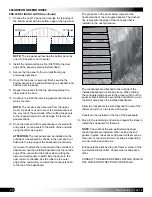
Page 11: ...ith the center of the rafter to maintain the proper spacing Interior Rafter Align mark with center of rafter Purlin 11 Verify that the rafter spacing is forty eight inches 48 on center adjust as needed and tighten the cross connector 12 Secure the cross connector to the rafter using a Tek screw See Quick Start section if needed 13 Repeat Steps 6 12 to install the first section of each purlin assem...

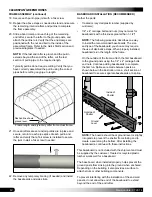
Page 12: ...r the parts Treated or recycled plastic lumber supplied by customer 1 4 x 4 carriage bolts and nuts may not work for baseboards with a thickness greater than 1 1 2 NOTE The following procedure describes one way to install the recommended baseboards The size and type of the baseboard you choose may require the use of alternative steps When properly installed baseboards run the length of the frame O...

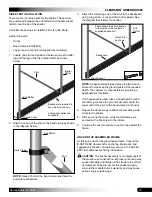
Page 13: ...UST READ document for anchoring information and suggestions Please call customer service at 1 800 245 9881 for additional anchoring information CAUTION The anchor assembly is an integral part of the greenhouse construction Improper anchoring may cause instability and failure of the structure to perform as designed Failing to anchor the shelter properly will void the manufacturer s warranty and may...

Page 14: ... to install the additional horizontal framing for accessories Consult the diagrams in the Quick Start section showing the polycarbonate panel locations and the locations of the aluminum trim and profile before repositioning any end wall vertical DO NOT REPOSITION THE END WALL VERTICALS USED AT THE SEAM OF TWO 2 POLYCARBONATE PANELS Always consult the installation guides that shipped with the acces...

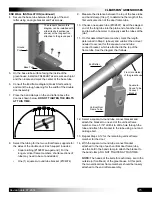
Page 15: ...rmine the length of the first vertical section of the door frame tube 10 Choose one square tube 102897 insert the swaged end of the long tube into the plain end of another tube and tap with a hammer to properly seat the tubes at the joint 11 On this assembled frame member mark the length determined in Step 9 above and subtract the amount needed to account for the square to round tube connect brack...

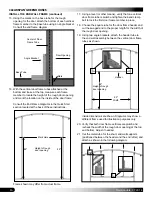
Page 16: ...9 89 Height of rough door opening Mark Here 17 Using a level or other means verify that one vertical door frame tube is plumb and tighten the band clamp bolt to lock the first door frame member in place 18 Choose the square tube for the door frame header and cut the swaged end to the proper length for the width of the rough door opening 19 Using two angle brackets attach the header tube to the end...

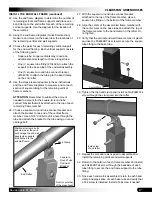
Page 17: ...e 1 square tube fitting 104624 to attach the support to the base tube of the end wall assembly One 1 square to round tube connect bracket 104074 to attach the tubing to the band clamp on the end rafter Front or outside of the greenhouse Square to Round Tube Connect Bracket Band Clamp Position all screws bolts and clamps so they will not damage the end wall panels when panels are attached to the en...

Page 18: ...d when the door is installed X X 37 Repeat the steps to attach the remaining roller assembly to the lower right corner of the rough door opening View is from outside the frame 38 Continue with installing the framing for the back end wall INSTALL THE BACK END WALL FRAME The end wall framing for the back of the greenhouse is assembled in the same way as the front end wall If the back wall includes t...

Page 19: ...h of the rafter is installed on the end wall face of the rafter It is used to seal the edges of the end panels 2 Choose one 12 corrugated panel set it in place to one side of the rough door opening and secure it to the end wall frame tube in a few places DO NOT attach it along the edges at this time All screws that hold the panels to the frame are spaced at approximately 24 apart 3 Take a section ...

Page 20: ...tach the roof panels to the outside of a baseboard use the installed baseboard as the outside edge of the end wall at the bottom when cutting the lower end wall panels to width See the photo in the next column for details Use the rafter as the outer edge of the end wall if you install the roof panels flush to the top of the baseboard 12 Panel 12 Panel The gray bars in the photo below represent the...

Page 21: ...ure strip under the edge of the panel before attaching the panel to the rafters See the arrow above The horizontal closure strip 104709 can also be installed flush with the top of the baseboard to prevent dirt and debris from filling the spaces between the polycarbonate and the baseboard See the dashed line in the photo above 2 Place the panel at the desired height above the ground and on top of t...

Page 22: ...ide of the greenhouse roof where panels overlap Install Tek screws FA4482B and washers from the outside through the two polycarbonate panels where they overlap and into the poly latch U Channel to secure the seam Install screws in the valleys of the panels Secure all overlap seams as you work toward the other end of the greenhouse Use 4 Tek screws FA4482B and 4 washers for each seam to secure the ...

Page 23: ...e installing the roller assemblies you must drill holes through the panel at the top edge of the door frame to allow the mounting bolts for the roller assembly to be installed properly If a rib of the corrugated panel falls where the mounting bolts are located nuts of the bolts will fall under the rib The roller assembly mounting bolts must be tightened against the flat surface of the door frame D...

Page 24: ...e Insert the mounting carriage bolts for the brackets from the back to prevent damage to the polycarbonate panels on the end wall when the door is used Brackets must be assembled as shown so that the holes in the brackets are aligned 8 Adjust the flat plate and brackets to align the adjusting nut with the pre drilled 1 2 hole and tighten bolts NOTE The adjusting nut must turn freely between the br...

Page 25: ...ng at the point where the door meets the door frame of the end wall Door End Wall Frame Tube Photo below shows the assembled doors and the corrugated polycarbonate panels 3 Using the lower roller assembly as a guide place one assembled door into position and rest its bottom edge on the lower roller assembly as shown below Stay Roller Adjust Stay Roller as needed Door Frame End Wall Frame Side view...

Page 26: ...nside the building and tap it with a hammer to set it tight against the end wall frame member Install a flat washer lock washer and nut to secure the mounting bolt to the end wall frame Cut if desired 5 Repeat the steps to install the remaining sliding track mounting bolts All mounting bolts must be installed at the same height on the end wall frame so that the track is level 6 After installing th...

Page 27: ...f needed Check connections and all fasteners to verify that they remain tight Do not climb or stand on the greenhouse at anytime See the ridge cap installation notes Inspect the anchoring system to verify that all components remain tight and in good condition Remove debris and objects that can accumulate on the greenhouse Use tools that will not damage the cover when removing debris Remove snow to...

Page 28: ...AN GREENHOUSES 28 Revision date 07 29 14 QUICK START GUIDE 30 Round Style Greenhouse 30 0 Width 12 6 5 8 Height Grid Represents 12 Squares FRONT Frame shown may differ in length from actual frame Ground Level ...

Page 29: ...ter Pos 2 30R1902 Rafter Pos 2 30R1903 Rafter Pos 3 30R1901D Rafter Pos 1 Purlin Connection See Connection Note Purlin Connection See Connection Note Purlin Connection See Connection Note Purlin Connection See Connection Note Connection Notes Purlin Connections Purlin connected to end rafters using 102857 clamp Purlin connected to mid rafters using 102547 connector Ground Level ...

Page 30: ...CLEARSPAN GREENHOUSES 30 Revision date 07 29 14 SIDE PROFILE 106265 131S075 131S075 131S075 131S075 131S075 131P0735 Baseboards Supplied by Customer 36 0 Shelter Length 4 0 Rafter Spacing ...

Page 31: ...31 CLEARSPAN GREENHOUSES Revision date 07 29 14 SIDE PROFILE 106266 131S075 131S075 4 0 Rafter Spacing 48 0 Length 131S075 131S075 131S075 131S075 131P0735 131S075 ...

Page 32: ...CLEARSPAN GREENHOUSES 32 Revision date 07 29 14 SIDE PROFILE 106267 Spacing 60 0 Length 131S075 131S075 131S075 131S075 131P0735 131S075 131S075 131S075 131S075 131S075 ...

Page 33: ...NHOUSES Revision date 07 29 14 SIDE PROFILE 106268 131S075 131S075 131S075 131S075 131S075 Baseboards Supplied by Customer 131S075 131S075 131S075 131S075 131P0735 131S075 131S075 72 0 Shelter Length 4 0 Rafter Spacing ...

Page 34: ...GREENHOUSES 34 Revision date 07 29 14 CONNECTIONS End Rafter Purlin Connection View 3 Mid Rafter Purlin Connection View 4 Rafter Strut Connection View 1 Rafter Ground Post Connection View 2 G r o u n d L e v e l ...

Page 35: ...Rafter 102857 End Purlin Connector View 3 End Rafter Purlin Connection Rafter Purlin 102547 1 90 Cross Clamp View 4 Mid Rafter Purlin Connection Rafter QH1304 Strut View 1 Rafter Strut Connection QH1404 1 90 Band Clamp View 2 Rafter Ground Post Connection Rafter 102675 Ground Post ...

Page 36: ...side Dimension C L Center Line Dimension Balloon Number reflects detail See Detail Guide Note Balloons only point out several instances of each detail applications may apply elsewhere in assembly All end framing tubes are cut from or are full 102897 1 1 2 x1 1 2 swaged square tubing Non critical verticals are spaced 24 on center working outwards from the door However these verticals can be spaced ...

Page 37: ...4 CONNECTIONS END FRAMING VIEW 2 END FRAME QH1330 QH1330 Tek Screws VIEW 1 END FRAME RAFTER 1 90 Band Clamp Rafter 104074 Bracket Vertical Assembly 5 16 x2 1 2 Carr Bolt 5 16 Nut VIEW 3 END FRAME 104624 Vertical Assembly 104624 Tek Screws Base Rail ...

Page 38: ...l verticals are spaced 24 on center working outwards from the door However these verticals can be spaced differently for the framing of greenhouse accessories For the framing of accessories check for rough opening and space accordingly Critical verticals can not be spaced differently because of door opening or Polycarb attachment Height of verticals depends on location Measure location before cutt...

Page 39: ...SPLICE Upper poly sheet Upper sheets always overlap lower sheets Lower poly sheet Lower sheets always get overlapped by upper sheets Tek Screw Neo Bonded Washer BASE SEAL Base Board Corr Poly Sheet Neo Bonded Washer Tek Screw 104709 Closure Strip Creates seal between Polycarbonate and base board 4 x12 4 x8 4 x8 4 x8 4 x8 Poly Splice Poly Splice Poly Splice Poly Splice Base Seal Base Seal ...

Page 40: ...OUT Front End Frame Door 1 Door 2 Front End Frame Door 2 Door 1 Trimmed Poly to be used elsewhere Area of overlapping sheets Upper sheets always overlap lower sheets Symbol Key Symbol Key 104709 Corr Closure Strip 104710 Flat Closure Strip Excess Excess 4 x 12 4 x 12 4 x 12 4 x 12 4 x 12 4 x 12 CORRUGATED POLYCARBONATE LAYOUT ...

Page 41: ...TE CLOSURE STRIP LAYOUT Front End Frame Trimmed Poly to be used elsewhere Area of overlapping sheets Higher sheets always laps over lower sheets Symbol Key Symbol Key 104710 Flat Closure Strip Excess Excess 4 x 12 4 x 12 4 x 12 4 x 12 4 x 12 4 x 12 CORRUGATED POLYCARBONATE LAYOUT 4 x 8 4 x 8 ...

Reviews: