background image

11

Parts & Service: 020 8988 7400 / E-mail: [email protected] or [email protected]

WELDING PITFALLS

The arc welding technique is an acquired skill and requires considerable 
practice before perfect results are obtained. The diagrams below will help to 
explain the pitfalls in your technique and how to overcome them.

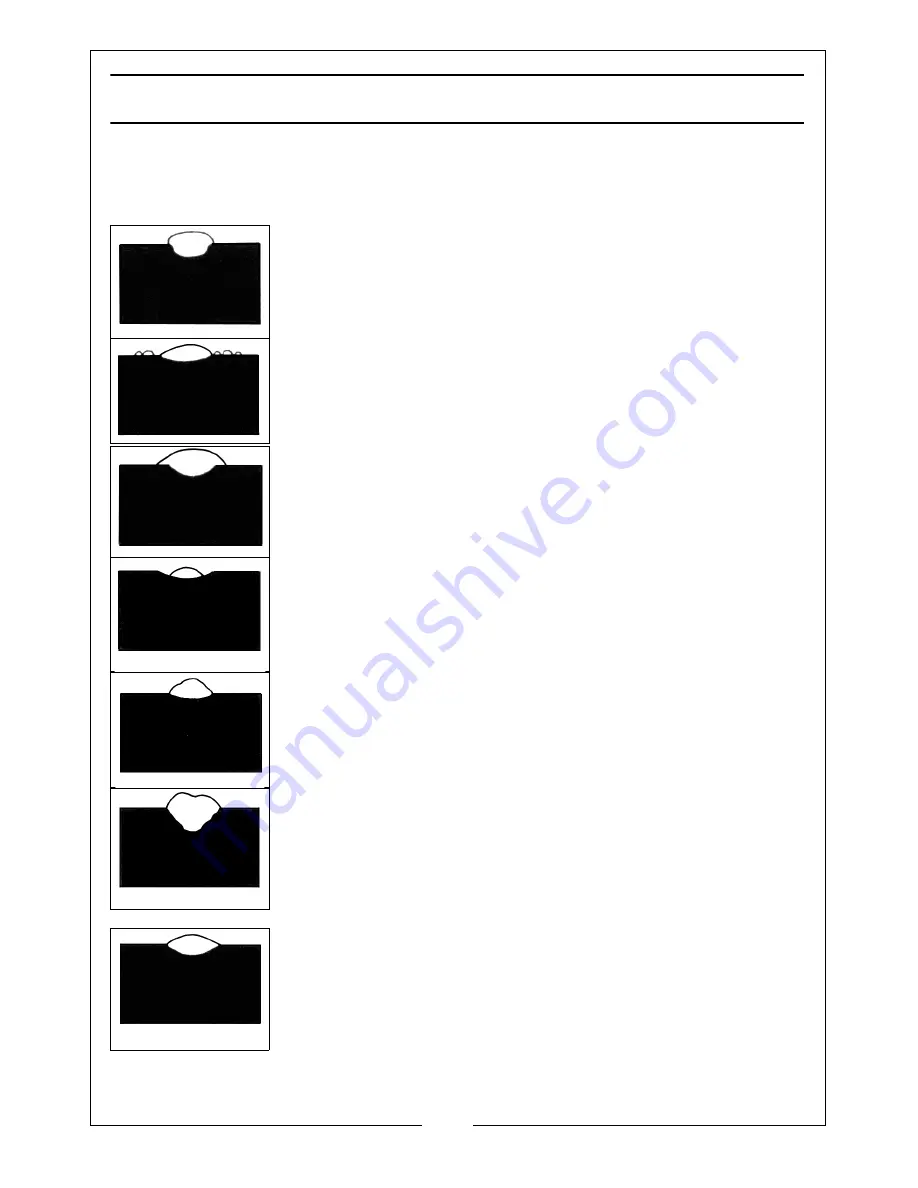
ARC TOO SHORT

This causes irregular masses of weld to be deposited, with 
slag contamination on an uneven surface.

ARC TOO LONG

This causes poor penetration resulting in a weak weld with 
excessive spatter and porosity. Surface of the weld is rough 
and the arc makes a hissing sound

ELECTRODE MOVED TOO SLOWLY

This causes a very wide and heavy deposit which overlaps 
at the sides. It is wasteful both in terms of time and electrode 
use.

ELECTRODE MOVED TOO QUICKLY

This causes poor penetration with a ‘stringy’ and incomplete 
weld deposit. Slag is very hard to remove.

CURRENT TOO LOW

This causes poor penetration and causes the electrode to 
stick to the workpiece too readily. Also results in a very 
irregular and high weld deposit. Slag is very hard to remove.

CURRENT TOO HIGH

This causes excessive penetration with spatter and deep 
pointed crater. It may also cause holes to be burned in the 
workpiece. 

Burns electrodes very quickly.

THE PERFECT WELD

With the correct combination of arc length, current 
regulation, inclination and speed of the electrode, you will, 
with practice, produce the perfect weld.

This should be regular with uniform ripples and no slag 
contamination. The arc will make a steady crackling sound.

Summary of Contents for EASIARC 165

Page 1: ...Read these instructions before using the machine WARNING A suitable welding headshield must be worn during use OPERATION MAINTENANCE INSTRUCTIONS LS0413 160 AMP ARC WELDER MODEL NO EASIARC 165 PART NO...

Page 2: ...d against faulty manufacture for a period of 12 months from the date of purchase Please keep your receipt as proof of purchase This guarantee is invalid if the product is found to have been abused or...

Page 3: ...g part of the welding circuit FUMES GASES The welding process generates hazardous fumes as a by product Inhalation of these fumes is hazardous to health Keep your head away from the weld to avoid brea...

Page 4: ...e worn when others are working overhead Flammable hair sprays gels should not be used by persons intending to weld or cut PROTECTIVE CLOTHING Wear gauntlet gloves designed for use in welding Wear an a...

Page 5: ...traction in the work area as the welding process gives off toxic fumes ALWAYS ensure there is a fire extinguisher on hand ALWAYS ensure that a medical supply is on hand and that treatment for burns is...

Page 6: ...of this product do not correspond with the markings on the terminals of your plug proceed as follows The wire which is coloured Blue must be connected to the terminal which is marked N or coloured Bl...

Page 7: ...ediately The components include the following 1 x 160 Amp AC Arc Welder 1 x Combination Wire Brush Hammer 1 x Clarke Instruction Manual 1 x Face Shield OVERVIEW NO DESCRIPTION NO DESCRIPTION 1 Handle...

Page 8: ...s created from the flux within the welding rod electrode When using the welder outside you may need to take measures to erect a wind break to make sure the shielding gas is not blown away thereby leav...

Page 9: ...TH CLAMP Attach the earth clamp firmly to the workpiece as close as possible to the point of weld IMPORTANT Ensure that the earth clamp is attached to clean solid metal If necessary thoroughly clean w...

Page 10: ...should come unstuck with a sharp tug If it will not free easily turn off the welder immediately as it will quickly overheat then give the join a tap from the chipping hammer As you get more experience...

Page 11: ...heavy deposit which overlaps at the sides It is wasteful both in terms of time and electrode use ELECTRODE MOVED TOO QUICKLY This causes poor penetration with a stringy and incomplete weld deposit Sla...

Page 12: ...heres etc Always inspect the earth return and torch hose before use to ensure they are in perfect condition and that the earth clamp is clean and secured correctly to the cable As a general rule the p...

Page 13: ...Address Of Manufacturer 12 Rated Welding Current Symbol 2 Model Number Part Number 13 Conventional Load Voltage Symbol 3 Serial Batch Number 14 Energy Supply Symbol 4 Welding Power Source 15 Rated Su...

Page 14: ...me of the accessories available from your CLARKE dealer Please quote the part numbers shown below Model Easiarc165 Power Supply 230V 50Hz Rated Max Input Current I1Max I1eff 36 13 7 A Open Circuit Vol...

Page 15: ...15 Parts Service 020 8988 7400 E mail Parts clarkeinternational com or Service clarkeinternational com DECLARATION OF CONFORMITY...

Page 16: ......

Reviews: