


9
❑
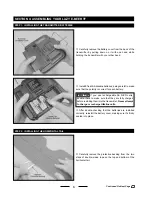
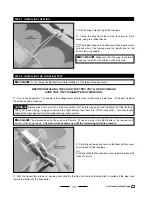
While holding the landing gear assembly centered,
carefully secure each rubber band over the notch in the
plastic landing gear mount and the corresponding plastic
mount on the side of the fuselage.
☞
The rubber bands will hold the landing gear assembly
in place while giving it shock absorbing action.
STEP 6: INSTALLING THE PROPELLER
❑
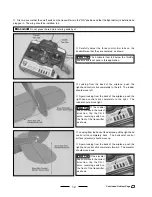
Thread one hex nut onto the propeller shaft and tighten
it by hand until it will not thread on any further.
❑
Slide the propeller onto the propeller shaft, making
sure that the back sticker on the front of the propeller is
toward you.
☞
The back of the propeller is molded to fit over the
hex nut.
❑
Slide the flat washer up against the propeller and thread
on the second hex nut. Tighten the hex nut, using an
adjustable wrench, to hold the propeller in place.
❑
Install the rubber spinner cone over the front of the
propeller, as shown. So that the rubber spinner cone is
secured into place properly, make sure to push it firmly over
the propeller.
✦
✦
✦
✦
✦
WARNING
✦
✦
✦
✦
✦
Do not operate the motor or fly the
airplane without the rubber spinner cone in place.
✦
✦
✦
✦
✦
IMPORTANT
✦
✦
✦
✦
✦
When installing the propeller, make sure that the sticker on the front of the propeller is toward you.
The motor assembly is held in place with rubber bands. This allows the motor assembly to move if you should crash,
preventing damage to the motor assembly. Because of this, you may need to hold the motor assembly with one hand
while installing the propeller and the rubber spinner cone.
Continued On Next Page
☛
☛
☛
☛
☛


