8
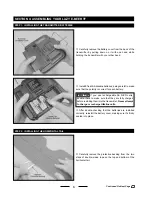
STEP 4: CONNECTING THE PUSHROD WIRES
❑
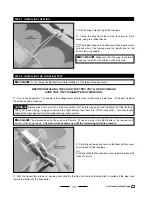
Install the pushrod wire into the rudder control horn by
first gently twisting the control horn up, then carefully
flexing the pushrod wire until you can insert the end of the
wire into the
outermost hole
in the control horn.
✦
✦
✦
✦
✦
IMPORTANT
✦
✦
✦
✦
✦
We strongly suggest installing the
pushrod wire into the outermost hole in the control horn.
This will make it easier to control the airplane. Installing
the pushrod wire into the innermost or middle hole will
make the airplane difficult to control.
❑
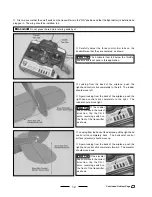
Install the pushrod wire into the elevator control horn by
first gently twisting the control horn back, then carefully
flexing the pushrod wire until you can insert the end of the
wire into the
outermost hole
in the control horn.
✦
✦
✦
✦
✦
IMPORTANT
✦
✦
✦
✦
✦
We suggest installing the pushrod wire
into the outermost hole in the control horn for your first
few flights. This will make it easier to control the airplane.
Once you're proficient at flying the airplane, you can move
the pushrod wire into the middle or innermost hole to
increase the control response.
STEP 5: INSTALLING THE LANDING GEAR
✦
✦
✦
✦
✦
IMPORTANT
✦
✦
✦
✦
✦
When you insert the bend in the pushrod wires into the plastic control horns in the next two
procedures, the elevator (control surface on the back of the horizontal tail) and rudder might not be centered. That's
okay for now. We'll center them by adjusting the pushrod wires when we test the radio system later.
❑
Set the landing gear assembly into the back of the
plastic landing gear mount on the bottom of the fuselage
and center it.
☞
One small preinstalled rubber band should be on each
side of the landing gear assembly, as shown.
Continued On Next Page
☛
☛
☛
☛
☛

