


10
PRO TIP
❑
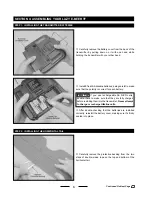
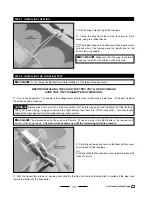
Set the wing onto the top of the fuselage.
❑
Center the wing from side to side, then secure it into
place, using two rubber bands.
☞
The rubber bands are hooked around the plastic mount
on each side of the fuselage and the plastic post at the
front of the wing saddle.
✦
✦
✦
✦
✦
IMPORTANT
✦
✦
✦
✦
✦
Make sure that the wing is centered
when you install it or the airplane will not fly well.
STEP 7: INSTALLING THE WING
STEP 8: INSTALLING THE FLIGHT BATTERY
✦
✦
✦
✦
✦
WARNING
✦
✦
✦
✦
✦
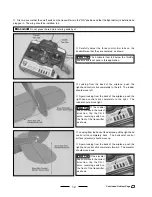
Do not charge the flight battery before installing it. Charging will be done later.
BEFORE INSTALLING THE FLIGHT BATTERY, YOU'LL NEED TO MAKE
SURE THAT THE TRANSMITTER IS TURNED ON.
❑
Turn on the transmitter. The needle in the voltage meter should move into the green "safe" area. If it doesn't, replace
the batteries with a fresh set.
Always make sure you turn on the transmitter first, before plugging in and installing the flight battery.
After you're done flying, unplug and remove the flight battery first, then turn off the transmitter. This will prevent
unexpected radio signals from interfering with your radio system.
✦
✦
✦
✦
✦
WARNING
✦
✦
✦
✦
✦
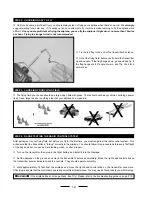
The airplane does not have an on/off switch. When you plug in the flight battery, the receiver and
servos will be powered up.
The motor will not power up until the red arming switch is pressed.
❑
Carefully pull away and remove the foam battery cover
from the front of the fuselage.
☞
Notice that the foam battery cover is held in place with
strips of Velcro
®
.
❑
With the transmitter turned on, double-check that the throttle control stick (left-side stick) is pulled all the way back
toward the bottom of the transmitter.
Continued On Next Page
☛
☛
☛
☛
☛


