


14
❑
Tie the red flag to the end of the transmitter's antenna.
❑
Out at the flying field, before you fly, hold the transmitter
up at an angle. If the flag hangs down, go ahead and fly. If
the flag hangs at a 45º angle or more, don't fly. Wait for a
calmer day.
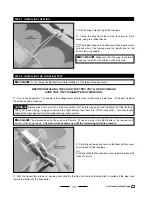
STEP 4: RANGE TESTING THE RADIO CONTROL SYSTEM
After getting out to your flying field, but before you fly for the first time, you must range test the radio control system. This
will ensure that the transmitter is "talking" correctly to the airplane. You should follow this procedure before every first flight
of the day and after you have a hard landing, crash, or after a repair.
❑
Turn on the transmitter, then plug in the flight battery and install it into the fuselage.
❑
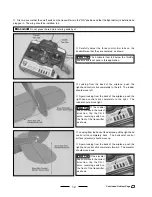
Set the airplane on the ground and extend the transmitter's antenna completely. Move the right-hand control stick on
the transmitter several times to check the controls. They should operate smoothly.
❑
Walk approximately 75 feet from the airplane and move the right-hand control stick on the transmitter once more.
Check to make sure that the controls are operating smoothly at this distance. You may need a friend to help you with this step.
✦
✦
✦
✦
✦
WARNING
✦
✦
✦
✦
✦
If the airplane does not range check, don't fly! Please refer to the troubleshooting guide on page # 19.
❑
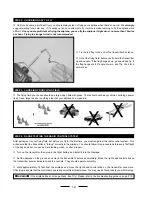
The flying field you choose should be a large, open field with grass. There should not be any vehicles, buildings, power
lines, trees, large rocks or anything else that your airplane can crash into.
STEP 3: CHOOSING YOUR FLYING FIELD
❑
Until you become a proficient flyer you should always plan on flying your airplane when there's no wind. We
strongly
suggest waiting for a calm day. If it's windy out and you attempt to fly, it will only make learning to fly the airplane more
difficult.
Once you are proficient at flying the airplane, you can fly the airplane in light wind - no more than 10 miles
per hour. Flying in stronger wind is not recommended.
STEP 2: CHOOSING A DAY TO FLY


