Chapter 3 Names and Functions of Printer Parts
−
12
−
3.2 Control
panel
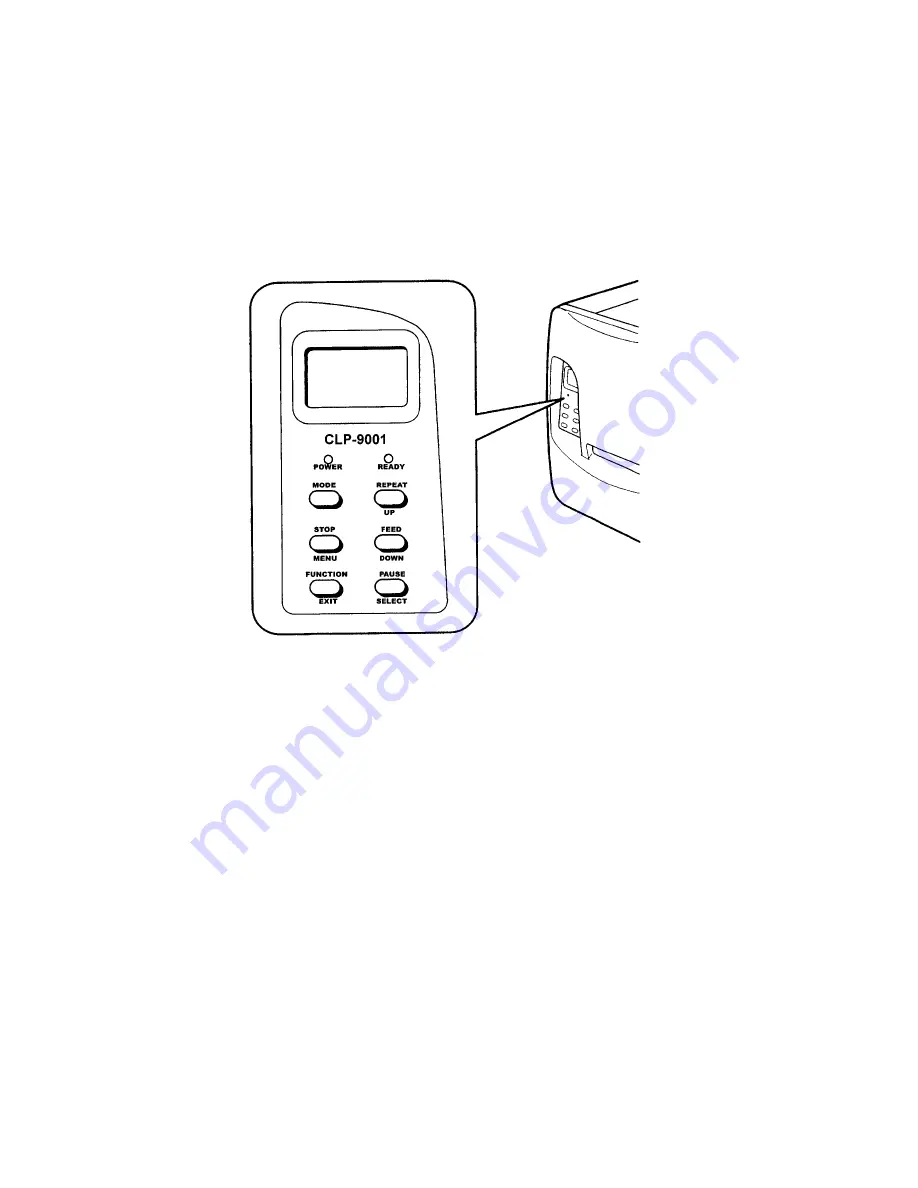
The control panel consists of an LCD displaying two lines of eight characters, two LEDs and six control
keys.
Two functions
are assigned to
each key
except the MODE key.
z
Indications
LCD (Display)
Shows the current printer status by a message on the display.
POWER LED
Lights up when the printer power is turned on.
READY LED
•
Lights up when the printer is placed into the print ready state. When the PAUSE key is pressed, the
READY LED goes out and shows "Pause" on the LCD (Display). By pressing the PAUSE key again,
the READY LED lights up.
•
The printer is in Ready mode after the power-on sequence has finished.
•
The Ready mode is selected using the MODE key.
Summary of Contents for CLP-9001
Page 1: ......
Page 9: ... viii ...
Page 13: ...Chapter 2 Safety Precautions 4 ...
Page 14: ...Chapter 2 Safety Precautions 5 ...
Page 15: ...Chapter 2 Safety Precautions 6 ...
Page 16: ...Chapter 2 Safety Precautions 7 ...
Page 17: ...Chapter 2 Safety Precautions 8 ...
Page 20: ...Chapter 3 Names and Functions of Printer Parts 11 ...
Page 27: ...Chapter 4 Media Paper and Ribbon 18 4 2 Paper size ...
Page 41: ...Chapter 5 Power ON and Using the Control Panel 32 5 4 Navigating the Menu System ...
Page 42: ...Chapter 5 Power ON and Using the Control Panel 33 5 5 Changing Menu Values ...
Page 43: ...Chapter 5 Power ON and Using the Control Panel 34 5 6 Permanently Saving Printer Settings ...
Page 44: ...Chapter 5 Power ON and Using the Control Panel 35 5 7 Producing a Test or Configuration Print ...
Page 45: ...Chapter 5 Power ON and Using the Control Panel 36 5 8 Turning the printer OFF ...
Page 47: ...Chapter 6 Configuring Your Printer Using the Menus 38 6 2 Page Setup Menu ...
Page 48: ...Chapter 6 Configuring Your Printer Using the Menus 39 6 3 System Setup Menu ...
Page 49: ...Chapter 6 Configuring Your Printer Using the Menus 40 ...
Page 50: ...Chapter 6 Configuring Your Printer Using the Menus 41 6 4 After Print Menu ...
Page 51: ...Chapter 6 Configuring Your Printer Using the Menus 42 6 5 Interface Setup Menu ...
Page 53: ...Chapter 6 Configuring Your Printer Using the Menus 44 6 8 Menu Mode Description ...
Page 54: ...Chapter 6 Configuring Your Printer Using the Menus 45 ...
Page 55: ...Chapter 6 Configuring Your Printer Using the Menus 46 ...
Page 56: ...Chapter 6 Configuring Your Printer Using the Menus 47 ...
Page 57: ...Chapter 6 Configuring Your Printer Using the Menus 48 ...
Page 59: ...Chapter 7 Troubleshooting 50 ...
Page 60: ...Chapter 7 Troubleshooting 51 7 2 Error messages and corrective actions ...
Page 61: ...Chapter 7 Troubleshooting 52 ...
Page 63: ...Chapter 8 Maintenance 54 8 2 Cleaning method ...
Page 64: ...Chapter 9 Specifications 55 Chapter 9 Specifications 9 1 General specifications ...
Page 69: ...Chapter 9 Specifications 60 9 4 Adjustable sensor ...
Page 70: ...Chapter 9 Specifications 61 9 5 Auto Cutter optional ...
Page 72: ......


