background image

7

89

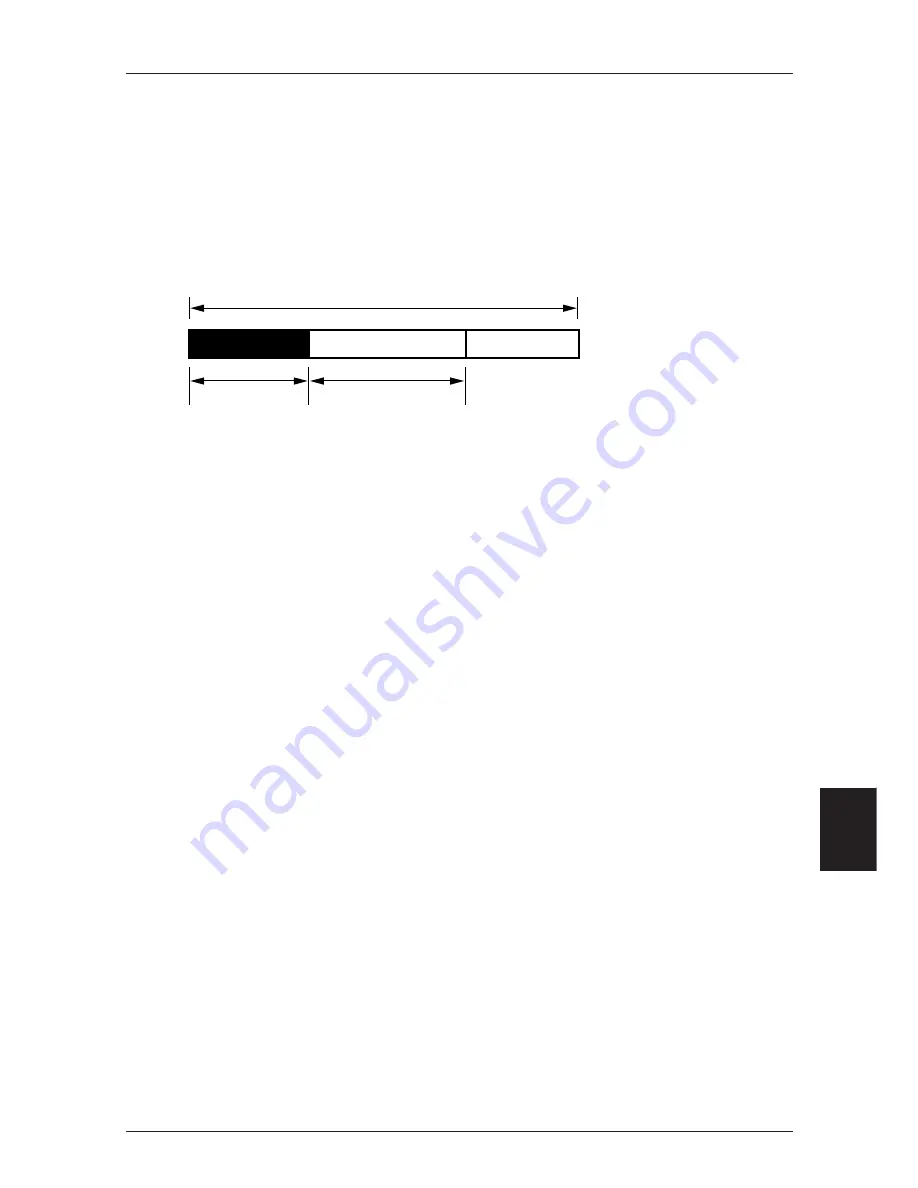
Printable Range

Width of Print Area

Left Margin

This command is valid only when input at the head of a line.

When Page mode is selected, if this command is input, the printer's internal flag
operation only is executed.

Setting of this command has no influence on the Page mode.

The maximum settable left margin is the same as the area in the horizontal direc-
tion that can be printed.  Settings that exceed the maximum value are rounded to
the maximum value.

The basic calculation pitch is set by GS P.  Also, once the left margin is set, it will
not change even if the basic calculation pitch is changed by GS P.

The horizontal basic calculation pitch (x) in GS P is used in calculating the left
margin.  Also, if there is a fraction, interpolation is carried out at the mechanism's
minimum pitch.  Remainders are cut off.

The left margin is set for the set sheet selected as valid by ESC c 1.

The left margin can be set independently for the receipt and journal printers, but if
printing of the same data in the receipt and journal printers is specified, the left
margin set in the journal printer is disregarded and that set in the receipt printer is
enabled.

The initial values are “n1 = 0” and “n2 = 2”.

Input Data Format

(55) Setting the left margin  (GS L n1 n2)

Code:  [1D] h + [4C] h + n1 + n2
* (0 

 n1 

 FF)

(0 

 n2 

 FF)  Data are expressed in Hex code.

This command sets the left margin specified by n1 and n2.
The left margin is [(n1 + n2 x 256) x basic calculation pitch] inch.

Summary of Contents for CBM-262 Type II

Page 1: ...User sManual LINE THERMAL PRINTER CBM 262 MODEL ...

Page 2: ...M 262 Series CBM 262 R CBM 262 P S No 1001001 Conform to the following Standards LVD EN60950 1992 A1 A2 1993 EMC EN55022 1995 Class B EN50082 1 1992 IEC801 2 1991 4KV CD 8KV AD IEC801 3 1984 3V m 27MHz 500MHz IEC801 4 1988 0 5KV Signal Line 1KV AC Mains Supplementary Information The product complies with the requirements of the Low Voltage Directive 73 23 EEC 93 68 EEC and the Directive 89 336 EEC...

Page 3: ...mpany shall not be liable in any way for damages of loss of profits etc resulting from loss of data due to breakdown repairs or inspections etc Please understand this point in advance 8 If you find any points in these materials which are uncertain are misprinted or are missing please notify this company 9 Please note that this company shall not be liable for any influence which may effect opera ti...

Page 4: ... to connect this device to computers Any changes or modifications not expressly approved by the grantee of this device could void the use s authority to operate the equipment ETAT DE CONFORMITE EMI A L USAGE DES UTILISATEURS CANADIENS Cet équipment produit et utilise l énergie à radiofréquences et s il n est pas installé et utilisé correctment c est à dire en accord strict avec les instructions du...

Page 5: ...ot allow anything to rest on the power cord Do not locate this product where cord will be walked on 10 If an extension cord is used with this product make sure that the total of the ampere ratings on the products plugged into the extension cord do not exceed the extension cord ampere rating Also make sure that the total of all products plugged into the wall outlet does not exceed 15 amperes 11 Nev...

Page 6: ...duct at a voltage and frequency other than the specified voltage and frequency Do not disconnect the power cord or data cable by grasping the cable and do not pull on this product while a heavy weight is bearing on the cables or attempt to carry it by holding the cables Do not drop or poke foreign objects such as paper clips straight pins etc inside this product Do not plug this product into a hea...

Page 7: ...fied voltage and frequency Make sure the circuit where this printer is plugged in has sufficient surplus capacity to operate this printer without trouble Avoid attaching this printer s power cord to an overloaded electric circuit If the circuit is overloaded it could cause the electric line to overheat and cause a fire or trip the circuit breaker Also do not walk on the power cable or place object...

Page 8: ...ting unit on the print head While the power is on do not touch the printer s internal cutter gears or other moving parts or electrical components with bare hands Be careful not to injure yourself or damage other objects by the edges of metal pan els etc If anything abnormal occurs during operation stop use immediately and pull the power plug out of the outlet When the printer breaks down contact y...

Page 9: ...dling 11 Setting the Receipt Roll Paper 12 Setting the Journal Roll Paper 14 Replacing Roll Paper 18 Specified Paper and Printing Area 20 Specified Paper 20 Printing Area 20 Chapter 4 Using the Printer 21 Operation Panel Keys 22 Entering Configuration Mode 23 Test Printing 24 DIP Switches 25 Chapter 5 Sensors and Error Indications 27 Sensors 28 Printer Cover Open Sensor 28 Head Up Sensor 28 Head T...

Page 10: ...or Connection Diagram 42 Drive Circuits 43 Chapter 7 Print Control Codes 45 Control Code List 46 Input Data Format 49 Chapter 8 Character Code Tables 107 Code Page 108 Japanese Code Table 111 International Character Code Tables 112 Chapter 9 Appendix 113 Journal Protection Key 114 Maintenance Cautions 115 Removing Paper Jams 115 Cautions in Handling of Roll Paper 116 Operating Temperature and Humi...

Page 11: ...printer is a tandem type 2 station line thermal printer which accepts 58 mm wide paper developed for use in PC POS ECR terminals and all types of data communications terminals etc Features Accessories Names and Functions of Parts ...

Page 12: ... Simple controls which conform to ESC POSTM Drawer control is enabled using the drawer kick interface Paper setting chore is simplified by the roll drop in type auto loading feature A coin tray magnet plate and writing table are standard equipment Accessories Standard Specifications without Journal Protection Key Roll Paper x 2 Adapter x 1 Power Cord x 1 User s manual x 1 Optional Specifications w...

Page 13: ...3 1 Front Cover Journal Window Power Switch Turns the power on and off Coin Tray Magnet Plate Rear Cover Operation Panel Names and Functions of Parts Names and Functions of Parts Printer Unit ...

Page 14: ...one line based on the amount for a carriage return set previously If the key is pressed continuously the paper is fed continuously 4 ERROR Indicator Orange Lights up or blinks when an error occurs The content of the error is indicated by the indicator lighting up or blinking see Chapter 5 Sensors and Error Indications on page 30 Goes off when the printer s condition returns to normal When the RECE...

Page 15: ...5 1 Connectors DIP Switch Cover Interface Connector Drawer Kick Connector Power Connector Ground Cable Connection Tap Ground Terminal Bottom View Names and Functions of Parts ...

Page 16: ...witch 2 is used for the serial interface only See Chapter 4 Using the Printer on pages 25 and 26 ON 1 2 3 4 5 6 7 8 ON 2 3 4 1 DIP Switch 1 DIP Switch 2 The above switches are shown in the OFF position Factory DIP Switch Settings ...

Page 17: ...s are completed insert the power cord plug in the receptacle When redoing connections be sure to turn off the power to the printer main unit and the terminal first Connecting the Interface Cable Connecting the Drawer Kick Cable Connecting the Power Supply ...

Page 18: ...ctor After making sure the connector is inserted fully tighten the screws to fasten the con nector in place Use screws which can be tightened by hand to fasten the connector to the interface Fastening the Parallel Interface Connector After making sure the connector is inserted fully turn the wire clamps in the arrow direction to fasten the connector in place 3 Connecting the Cable to the Computer ...

Page 19: ... the drawer kick connector then insert the connector until it makes a clicking sound Do not connect the connector for any other drawer solenoid to the drawer kick connector than that specified Use a M3 X 6 self tapping screw to fasten the grand wire Connecting the Drawer Kick Cable Connect the drawer ground wire to the ground terminal with a screw ...

Page 20: ...onnector Align the top and bottom of the cable and connector to connect them When the AC adapter s plug is disconnected from the printer grasp the plug with your fingers to pull it out 2 Connect the AC power cord and the AC adapter 3 Connect the power cord to the receptacle Connect the AC adapter with the printer s power supply switched off ...

Page 21: ...3 11 Chapter 3 Paper Handling Setting the Receipt Roll Paper Setting the Journal Roll Paper Replacing Roll Paper Specified Paper and Printing Area ...

Page 22: ... the power on The POWER indicator lights up and the ERROR indicator blinks 2 Remove the front cover 3 Place the roll paper in the paper holder as shown in the illustration Be sure the roll paper s winding direction is correct when inserting the roll Make sure the roll paper turns smoothly in the paper holder ...

Page 23: ...s then loaded automatically auto loading If the end of the roll of paper is feathered or folded cut off the end with scissors etc so that the end is squared off When operation stops then setting of the roll paper is completed If the paper is inserted crooked move the head up lever forward then correct the paper s path manually with the head in the up condition Next set the journal roll paper ...

Page 24: ... cover before opening the rear cover 2 Remove the spool then lower the writing table to the rear 3 Place the roll paper in the paper holder as shown in the illustration Be sure the roll paper s winding direction is correct when inserting the roll Make sure the roll paper is turning smoothly in the paper holder ...

Page 25: ...er insertion slot The proper amount of paper is then loaded automatically auto loading If the end of the roll of paper is feathered or folded cut off the end with scissors etc so that the end is squared off If the paper is inserted crooked move the head up lever forward then correct the paper s path manually with the head in the up condition 6 Press the JOURNAL key and advance about 30 cm 12 inch ...

Page 26: ...emporarily then insert the end of the roll of paper into the slot in the spool and wind up the paper on the spool two or three times so it will not come off the spool Replace the spool partner on the spool Wind up the roll paper making sure it is winding in the correct winding direction when taking up paper from the roll paper Spool Partner ...

Page 27: ...f the spool is engaged in the printer gear 10 Close the rear cover then replace the front cover following the procedure used for removing the covers in the reverse order The ERROR indicator on the operation panel will go off If the front cover is not closed securely the ERROR indicator may not go off At such a time replace the cover securely once more That completes setting of the roll paper Setti...

Page 28: ...op automatically if the printer runs out of roll paper The print head and auto cutter are hot during or immediately after printing Please wait until the print head and auto cutter have cooled sufficiently before replacing the roll paper 1 Remove the cover 2 Move the head up lever in the arrow direction 3 Pull the remaining roll paper out of the paper outlet and remove it 4 Return the head up lever...

Page 29: ...ct the paper s path manually Remove the finished journal roll paper form the spool Follow the procedure below when replacing the journal roll paper 1 Press the JOURNAL key and wind about 30 cm of paper 2 Place the roll paper along the guide in the writing table while winding the roll paper onto the spool then place the spool in the spool holder see steps 9 and 10 of Setting the Journal Roll Paper ...

Page 30: ...3 dia mm or less Printing Surface Roll Outside Surface Specified Paper Mitsubishi Paper Co Ltd F220VP Shinoji Paper Co Ltd PD160R PD160R N Nihon Paper Co Ltd TF 50KS E2C Print density may differ depending on the paper used In such cases please adjust the print density See Chapter 4 Using the Printer on pages 22 and 23 Printing Area 2mm 2mm Printing Area 54 mm Paper Width 58 mm ...

Page 31: ...4 21 Chapter 4 Using the Printer Settings Using the Operating Buttons Setting the DIP Switches ...

Page 32: ...per Receipt Paper Near End Sets the print stop function on enabled or disabled in response to signals from the receipt paper near end sensor Journal Paper Near End Sets the print stop function on enabled or disabled in response to signals from the journal paper near end sensor CR Operation Sets CR LF LF Disregard Reset by DSR Sets enabling or disabling of reset by the serial interface DSR signal R...

Page 33: ...led 2 3 5 8 4 7 1 6 PRINTER SETTING MODE YES Push R eceipt Key NO Push J ournal Key ROM Even AW32 0A0A ROM Odd AW33 0A0A ROM Date MAY 28 1996 Reset Current Settings To Factory Settungs Print Current Settings Current Settings HARDWARE SETTINGS RECEIPT DENSITY JOURNAL DENSITY COVER OPEN SENSOR AUTO CUTTER AUTO LOADING R PAPER NEAR END J PAPER NEAR END CR CONTROL KANJI MODE RESET BY INIT RESET BY DSR...

Page 34: ... the Printer 24 Test Printing Test printing can be done by turning the printer s power switch ON while pressing the RECEIPT key TEST PRINTING MODE ROM Even XXXX ROM Odd XXXX ROM Date MM DD YY YY DIP SW 1 00 DIP SW 2 00 ...

Page 35: ...TR DSR XON XOFF 3 Input Buffer 8KB 1 Line 4 Code Page PC437 PC850 5 6 International Characters See the following table 7 8 Setting International Characters SW1 5 SW1 6 SW1 7 SW1 8 International Character Set OFF OFF OFF OFF Japanese OFF OFF OFF ON U S A OFF OFF ON OFF French OFF OFF ON ON German OFF ON OFF OFF U K OFF ON OFF ON Danish OFF ON ON OFF Swedish OFF ON ON ON Italian ON OFF OFF OFF Spani...

Page 36: ... 1 Baud Rate Setting OFF OFF 9600 OFF ON 4800 ON OFF 2400 ON ON 19200 2 Parity Settings SW2 4 SW2 3 Parity Setting OFF OFF No Parity OFF ON Odd Parity ON OFF Even Parity ON ON DIP switch 2 is included only in the case of a Serial interface No Content OFF ON 1 2 Baud Rate See Table 1 below 3 4 Parity See Table 2 below ...

Page 37: ...5 27 Chapter 5 Sensors and Error Indications This chapter explains the various sensors that this printer is equipped with and the error indications accompany ing them Sensors Error Indications ...

Page 38: ...e ER ROR indicator Head Overheat Printing is halted When the head s temperature drops approximately 55 C 131 F or lower printing resumes automatically Paper Sensor This sensor is located in the paper path of the receipt printer and the journal printer When paper is inserted in the printer s paper path the paper is loaded If the paper in the paper path runs out it is indicated by the ERROR indicato...

Page 39: ... the adjustment scale When the specified paper with a winding core whose outer diameter is ø18 mm and inner diameter is ø12 mm is used the approximate adjustment scale step are as fol lows The factory default setting of the scale is lowest position Dimension T corresponding to the step on the adjustment scale may vary some what 3 Tighten the adjustment screw and close the sensor lever Check if the...

Page 40: ... up Recovery impossible Cover Open Lights up Close the cover Head Up Lights up Return head up lever to original position Head Overheat Lights up Recovers automatically when the temperature drops Paper End or Lights up Set new roll paper Paper Near End Cutter Motor Lights up Clear the paper jam Lock Macro Execution Lights up Press the RECEIPT or JOURNAL Wait key Blinks slowly Blinks fast Blinks onc...

Page 41: ...6 31 Chapter 6 Interfaces Serial Interface Parallel Interface Drawer Kick Connector ...

Page 42: ...e Host to the printer OUT indicates a signal from the printer to the Host 1 25pin INIT is HIGH or the TTL HIGH level of input 2V 15V Pin No 1 2 3 4 6 7 20 25 Direction OUT IN OUT IN OUT IN 1 DTR DSR Not used Data are sent when the status information send signal is HIGH LOW when Busy HIGH when Ready 13 25 14 1 X ON X OFF Connects the Host CPU and printer Sends transmission data and X ON X OFF signa...

Page 43: ... reset can be carried out through the menu setting S GND Signal Ground The GND earth for the signal line DTR Data Terminal Ready Signal line which indicates to the Host that the printer is ready to receive RTS Request To Send Pulled up to 10V at 3 3k ohms INIT This is the signal line used by the host to send a reset command to the printer However this is when enabling of the INIT signal by the men...

Page 44: ...6 Chapter 6 Interfaces 34 Reset by DSR Reset by INIT Resets if the voltage becomes 2V 15V TRS TRS 1ms Resets if the voltage becomes 15V 3V TRS ...

Page 45: ... when the power is turned ON are expected When the menu setting error handshake is disabled XON XOFF is not output when the error status changes DTR DSR Protocol Control is by the level of the DTR signal Ready High Busy Low If the printer s status is sent to the Host it is sent when DSR is High If DSR is Low the printer waits until it goes High Conditions for the DTR Signal to become Ready High Wh...

Page 46: ...Level Connector Corresponds to DDK 57RE 40360 803B Timing Chart At Power On If the printer goes Online The means negative logic signals During Data Reception a Min 0 5 µ Sec d Approx 2 9 µ Sec b Min 0 5 µ Sec c Min 0 5 µ Sec Value at the receiving end Power on RESET BUSY ACK SELECT a b c d DATA1 8 STROBE BUSY ACK ...

Page 47: ...6 37 When Receiving the INIT Signal INIT BUSY ACK FAULT SELECT 1 µSec or longer Within 200 µ Sec Level does not change Level does not change Parallel Interface ...

Page 48: ...Input Circuit Output Circuit 3 3K 3 3K DATA1 8 INIT CMOS VH 2 0V VL 0 8V STROBE 3 3K 1000p 100 3 3K VH 1 8V VL 0 9V Signal Name Configuration CMOS Schmidt SELECT FAULT ACK PE BUSY DRAWER KICK STATUS 3 3K Signal Name Configuration Compatible with 7406 ...

Page 49: ...or state The buffer is full and data cannot be received After receiving the INIT signal after printing of the data in the buffer during the interval until initialization is completed 12 PE OUT In the case that Paper End detection is enabled by the control code it goes High during the paper end state 13 SELECT OUT Indicates whether the printer is in the Online state or the Offline state Goes Low wh...

Page 50: ...iving the INIT Signal 32 FAULT OUT This signal indicates that the printer is in the error state It goes Low under any one of the following condi tions Paper End When an abnormal operation is detected 33 GND Signal line ground 34 DRAWER KICK OUT The drawer kick connector s status signal is output STATUS 35 FUSE OUT Connected to 5 V through a 3 3k ohm resistor 36 Not used IN indicates signals from t...

Page 51: ...atus of SW can be known from pin 34 of the interface connector in the case of the parallel interface and by the GSr for instance command in the case of the serial interface Electrical Characteristics Drive Voltage DC 24 V Drive Current Max 0 8 A should be within 510 ms SW Signal Signal level L 0 0 5 V H 3 5 V Drawer Kick Connector ...

Page 52: ...nnector Used TM5RJ3 66 Hirose Compatible Connector Compatible with TM3P 66P Hirose No signals are output during printing Both drawers 1 and 2 cannot be driven simultaneously Use a 36 ohm or higher drawer solenoid Be careful not to let the output current exceed 0 8A If the output current exceeds 0 8 A results cannot be guaranteed The drawer kick connector is not the type used for connections to tel...

Page 53: ...6 43 Drive Circuit 1 2 3 4 5 6 1 5A 24V Drawer Kick Connector ...

Page 54: ...6 Chapter 6 Interfaces 44 ...

Page 55: ...7 45 Chapter 7 Print Control Codes List of Control Codes Input Data Format ...

Page 56: ...Clearing the download character set 57 14 Defining download characters 58 15 Specifying a bit image 61 16 Specifying Clearing underline 63 17 2 Specifying the 1 6 inch line feed amount 63 18 3 Specifying the line feed amount 64 19 Controlling data input 65 20 Erasing download characters 65 21 Printer initialization 66 22 D Setting the horizontal tab position 66 23 E Specifying Clearing bold charac...

Page 57: ... 39 d Print and feed paper n lines 78 40 i Full cut 78 41 m Partial cut 78 42 p Generates a specification pulse 78 43 t Selecting the character code table 79 44 u Peripheral device status signal 80 45 v Sending the printer status 81 46 z Specifying Clearing printing of the same data 82 by the receipt and journal printers 47 Specifying Clearing inverted characters 82 48 GS Specifying the character ...

Page 58: ...the print area width 93 60 Specifying the relative position of characters in 95 the vertical direction in the page mode 61 Execution of a macro 96 62 a Enabling Disabling automatic sending of 97 the status 63 f Selecting the font of HRI characters 100 64 h Selecting the bar code height 100 65 k Printing bar codes 101 66 r Sending of the status 103 67 w Selecting the horizontal size of a bar code 1...

Page 59: ...LF and in the case of Disregard If data exist in the print buffer a line feed is executed after printing If no data exist a line feed only is executed A LF code input immediately following a CR code is disregarded 3 Print command CR Code 0D h Menu Setting The operation differs according to the contents set by the CR operation In the case of LF If data exist in the print buffer a line feed is execu...

Page 60: ...g area Valid when Page mode is selected only The portions of data included in the currently set printing area are canceled even if they are data from a previously set printing area 6 Journal tab RS Code 1E h Moves the print position to the head of the journal paper Note Valid only when Receipt Journal is selected printing of the same data by the receipt and journal printers is cleared and the prin...

Page 61: ... dk d1 10 h d2 04 h d3 01 h Do not insert this command in the code strings of other commands consisting of codes with 2 bytes or more Example If the host side wants to send ESC 3 n then DLE EOT 3 is sent just at the point where ESC 3 has been sent the printer will process the command as ESC 3 10 h Therefore the user s attention is necessary In cases where ASB is valid due to GS a it is necessary t...

Page 62: ...pen Cover Cover Closed Closed 3 Paper Feed by paper feed switch No paper Paper feed feed in progress 4 Not used Fixed at 1 5 Printing not stopped by No Paper No stopped Stopped 6 Error generated None Error exists 7 Not used Fixed at 0 Bit 5 When the roll paper end sensor signals that there is no paper or when there is no paper when the roll paper near end sensor is enabled by ESC c 4 printing is s...

Page 63: ... present 4 Not used Fixed at 1 5 Journal end detection Paper No paper present 6 Receipt end detection Paper No paper present 7 Not used Fixed at 0 Input Data Format Bit 3 If this error is generated due to a paper jam etc you can recover by DLE ENQ n 1 n 2 after the error cause is eliminated If the error was generated due to a fault in the circuit broken connection etc then you cannot recover Bit 6...

Page 64: ... as when this command is executed Example In ESC m nl nh d k d1 10 h d2 05 h d3 10 h Do not insert this command in the code strings of other commands consisting of codes with 2 bytes or more Example If the host side wants to send ESC 3 n then DLE EOT 3 is sent just at the point where ESC 3 has been sent the printer will process the command as ESC 3 10 h Therefore the user s attention is necessary ...

Page 65: ...f space does not change even if the basic calculated pitch is changed by GS P If there is a fraction interpolation is carried out at the mechanism s minimum pitch Remainders are cut off In the Standard mode the basic calculation pitch x in the horizontal direction is used In the Page mode the basic calculation pitch used according to the starting point is as follows 1 If the starting point is spec...

Page 66: ...rs printed but portions skipped with a horizontal tab HT and portions with characters which are rotated 90 degrees to the right are not underlined The underline width is the width set in ESC _ with no relation to the character size Mixed printing with double enlarged characters and with characters of different sizes is possible Character sizes can also be specified by GS but the command that is se...

Page 67: ...ing point is specified as top left or bottom right by ESC T an absolute position in a direction perpendicular to the paper feed direction the character s horizontal direction is specified The horizontal basic calculation pitch x is used in calculations at this time 2 If the starting point is specified as top right or bottom left by ESC T the absolute position in the paper feed direction the charac...

Page 68: ...racter is defined n is made equal to m Definable character codes are within the range 20 H 7E H of ASCII code A total of 95 characters can be defined a indicates the number of horizontal dots that are defined Dn are the defining data and indicate the pattern of a dots from the left end in the horizontal direction The pattern remaining on the right end is filled with spaces Once it is defined a dow...

Page 69: ...7 59 24 Dots p1 p2 p3 p4 p5 p6 p7 p34 p35 p36 MSB LSB 12 Dots p1 OF H p4 30 H p7 40 H p2 03 H p5 80 H p8 40 H p3 00 H p6 C0 H p9 20 H Example In the case of Font A Input Data Format ...

Page 70: ...7 Chapter 7 Print Control Codes 60 In the case of Font B d1 d4 d7 d25 d2 d5 d26 d3 d6 d27 24 Dots 9 Dots MSB LSB d1 03 H d4 01 H d7 02 H d2 FF H d5 00 H d8 00 H d3 FF H d6 20 H d9 10 H ...

Page 71: ... m n1 n2 D1 Dn Code 1B h 2A h m n1 n2 Dn m Bit Image Mode See the following table 0 n1 FF 0 n2 03 Data are expressed in Hex code Data are printed in a bit image in accordance with the Bit Image mode specified by m The number of dots printed in the horizontal direction is divided by 256 with n2 being the product and n1 the remainder The total number of dots printed as the bit image is n1 256 x n2 I...

Page 72: ...t Image Data 24 dot bit image Bit Image Data d1 d2 d3 LSB MSB d1 d2 d3 Double Density Bit Image Data Printing Data Printing Data represent dots Single Density d1 d2 d3 d4 d5 d6 d8 d9 d7 LSB MSB d1 d2 d3 d4 d5 d6 d7 d8 d9 Double Density Bit Image Data Printing Data Printing Data represent dots Single Density ...

Page 73: ...ters which are rotated 90 degrees to the right are not underlined During the printing of Kanji this underline specification clearing command can not be applied The type of underline is distinguished by the value of n as follows n 0 30 Underline is cleared n 1 31 A one dot wide underline is specified n 2 32 A two dot wide underline is specified The initial value is n 0 17 Specifying the 1 6 inch li...

Page 74: ...lso once the line feed amount has been set it does not change even if the basic calculation pitch is changed by GS P If there is a fraction as a result of calculations interpolation is carried out at the mechanism s minimum pitch Remainders are cut off In the Standard mode the basic calculation pitch y for the vertical direction pa per feed direction is used If used in the Page mode movement from ...

Page 75: ...lected by this command Even if the printer is not selected the printer may according to its operation enter the BUSY state The initial value is n 1 20 Erasing download characters ESC n Code 1B h 3F h n 20 n 7E Data are expressed in Hex code The download characters with the specified code are erased n indicates the character code that erases the definition pattern After erasure printing of the same...

Page 76: ...and when the horizontal enlargement rate is 2 or greater the character width is also made larger corresponding to the enlargement rate The maximum number of places a tab position can be set is 32 positions Settings exceeding this number are disregarded ESC D NUL clears all the set tab positions After clearing the horizontal tab HT is disregarded The initial value is every 8 characters for Font A a...

Page 77: ... amount set by ESC 2 or ESC 3 The basic calculation pitch is set by GS P If there is a fraction as a result of calculations interpolation is carried out at the mechanism s minimum pitch Remainders are cut off In the Standard mode the basic calculation pitch y for the vertical direction is used If used in the Page mode movement from the starting point is as follows 1 If the starting point is specif...

Page 78: ... specified by ESC T within the printing area specified by ESC W The values set in the following commands which are set independently in the Page mode and the Standard mode respectively are switched to the values set in the Page mode 1 Space amount setting ESC SP FS S 2 Line feed amount setting ESC 2 ESC 3 The following commands are valid only when set in the Page mode 1 ESC V Specifying Clearing 9...

Page 79: ... Legal Input Data Format 27 Selecting international characters ESC R n Code 1B h 52 h n 0 n 0D n 40 Data are expressed in Hex code This command carries out selection of international characters The international character set is set by the value of n as shown in the following table The initial value of n becomes the character set of the country specified by the DIP switch ...

Page 80: ...n the Page mode Data developed in the Page mode are erased The top of the line is made the next printing position The printing area set by ESC W is initialized The values set in the following commands which are set independently in the Page mode and the Standard mode respectively are switched to the values set in the Page mode 1 Space amount setting ESC SP FS S 2 Line feed amount setting ESC 2 ESC...

Page 81: ... Standard mode is selected the printer s internal flag operation only is executed In this case it has no influence on printing in the Standard mode The character development position becomes the starting point within the printing area set by ESC W The basic calculation pitch x or y used in the following commands differs ac cording to the starting point 1 If the starting point is top left or bottom...

Page 82: ...ical Length dy1 dy2 x 256 x basic calculation pitch inches If this command is input when the Standard mode is selected the printer s internal flag operations only are executed In this case Standard mode printing is not influenced If the horizontal starting point or the vertical starting point is outside the area where printing is possible command processing is terminated and the next data are pro ...

Page 83: ...rtical starting point and the vertical length If X is the horizontal starting point Y is the vertical starting point Dx is the hori zontal length and Dy is the vertical length the printing area becomes as shown in the following diagram Paper Dx Dy The area which this printer can print is a 432 203 inch in the horizontal direction and 938 203 inch in the vertical direction The initial values are x1...

Page 84: ...ed as a complement of 65536 For example if shifting by N pitch to the left this is expressed by n1 n2 x 256 65536 N The basic calculation pitch is set by GS P If there is a fraction as a result of calculations interpolation is carried out at the mechanism s minimum pitch Remainders are cut off The horizontal basic calculation pitch x is used in the Standard mode In the Page mode operation is as fo...

Page 85: ...ment This command is valid only if input at the head of a line If this command is input when selecting the Page mode the printer s internal flag only is operated This command does not influence the Page mode The initial value is n 0 34 Selecting the printing sheet ESC c 0 n Code 1B h 63 h 30 h n 1 n 3 Data are expressed in Hex code Selects the sheet receipt journal which is printed Each bit of n i...

Page 86: ...setting sheet ESC c 1 n Code 1B h 63 h 31 h n 1 n 3 Data are expressed in Hex code Selects the sheet which is the object of line feed settings set by ESC 2 and ESC 3 Each bit of n is as shown in the following table If the value of n deviates from the definition range this command is disregarded The initial value is n 3 36 Selecting an effective paper end sensor for outputting the paper end signal ...

Page 87: ...stop when any one of the sensors detects the paper end If printing is stopped the print operation actually stops after the current line has been printed and paper feed has been completed If paper end is detected by the journal or receipt sensor the printer goes off line after printing stops The initial value is the state specified in the menu setting 38 Enabling Disabling the panel switch ESC c 5 ...

Page 88: ...full cut of the receipt paper This command is valid only if it is input at the head of a line 41 Partial cut ESC m Code 1B h 6D h Executes a partial cut one point is left of the receipt paper This command is valid only if it is input at the head of a line 42 Generates a specification pulse ESC p m n1 n2 Code 1B h 70 h m n1 n2 0 n1 FF 0 n2 FF Data are expressed in Hex code This command outputs the ...

Page 89: ...nch 5 PC865 Nordic 6 PC858 Multilingual II FF Blank page Input Data Format The initial value is n 0 or 2 Depending on the setting of DIP switch See page 25 43 Selecting the character code table ESC t n Code 1B h 74 h n 0 n 6 n FF Data are expressed in Hex code Selects the page n of the character code table ...

Page 90: ...he case of DTR DSR control after confirming that the host is ready to receive the DSR signal is High one byte only is sent In the case of XON XOFF control one byte only is sent without confirming the status of the DSR signal In the case of DTR DSR control if the host is not ready to receive the DSR signal is Low it waits until the host is ready to receive Bit Function Value 0 1 0 Level of Pin No 3...

Page 91: ...tus of the DSR signal In the case of DTR DSR control if the host is not ready to receive the DSR signal is Low it waits until the host is ready to receive Bit Function Value 0 1 0 Journal near end sensor Paper present No paper 1 Receipt near end sensor Paper present No paper 2 Journal near end sensor Paper present No paper 3 Receipt end sensor Paper present No paper 4 Not used Fixed at 0 5 Downloa...

Page 92: ...e receipt and journal print ers are not selected as the printing sheet the printing will not be the same for both printers When Page mode is selected this command is disabled The initial value is n0 0 47 Specifying Clearing inverted characters ESC n Code 1B h 7B h n 0 n FF Data are expressed in Hex code In n the least significant bit n0 becomes enabled The least significant bit n0 is as follows n0...

Page 93: ...1 Horizontal Enlargement Rate 8 This command specifies the character size vertical enlargement rate horizontal en largement rate Table 1 Vertical Enlargement Rate 3210 Bits Value Enlargement Rate 000B 00 Normal Size 0001B 01 2 times 0010B 02 3 times 0011B 03 4 times 0100B 04 5 times 0101B 05 6 times 0110B 06 7 times 0111B 07 8 times Table 2 Horizontal Enlargement Rate 7654 Bits Value Enlargement R...

Page 94: ...ssed in Hex code In the Page mode this command specifies the position in the characters vertical direc tion of the data development start position as an absolute position with the starting point as the reference The position in the characters vertical direction of the next data development start position is a position n1 n2 x 256 x basic calculation pitch inch from the starting point This command ...

Page 95: ...umber of dots in the horizontal direction is n1 x 8 and the number of dots in the vertical direction is n2 x 8 Dn is the bit image data Once a downloaded bit image has been defined it is valid until it is redefined ESC is executed ESC is executed or the power is switched OFF Downloaded characters and a downloaded bit image cannot be defined at the same time If this command is executed contents def...

Page 96: ...f data exist in the print buffer this command is disregarded If a downloaded bit image is not defined this command is disregarded The portion of a downloaded bit image that exceeds the length of a line is not printed 51 Printing a downloaded bit image GS m Code 1D h 2F h m 0 m 3 30 m 33 Data are expressed in Hex code This command prints a downloaded bit image in the mode specified by m The modes s...

Page 97: ...ed even when ESC printer initiation is executed so ESC can be included in the contents of a macro definition Ordinary printing operations can be executed in the middle of macro definition A macro is a string of commands corresponding to the user s purpose taken from the control commands of this printer which are arranged to form a single command in order to carry out daily operations efficiently T...

Page 98: ...ers The space to the right of characters set by ESC SP is also the object of black white reversed printing Bit images downloaded bit images bar codes HRI characters and portions skipped due to HT ESC ESC are not influenced Spaces between lines are not influenced Specification of black white reversed printing has priority over underline specifi cations Therefore underlines are not added to black wh...

Page 99: ...horizontal basic calculation pitch x in GS P is used in calculating the left margin Also if there is a fraction interpolation is carried out at the mechanism s minimum pitch Remainders are cut off The left margin is set for the set sheet selected as valid by ESC c 1 The left margin can be set independently for the receipt and journal printers but if printing of the same data in the receipt and jou...

Page 100: ...educed characters in the vertical direction is specified in the Page mode then reduced characters are printed in the characters vertical direction with out relation to the printing direction selected by ESC T If characters of different vertical sizes are mixed on the same line they are ar ranged along the printing base line If reduction printing is specified underlines are not added even when unde...

Page 101: ... degrees to the right etc 1 Commands using x ESC SP ESC ESC FS S GS L GS W 2 Commands using y ESC 3 ESC J In the Page mode the parameters shown below are used according to the charac ters direction 1 If the starting point is top left or bottom right by ESC T characters are developed in the direction perpendicular to the paper feed direction Commands using x ESC SP ESC ESC W ESC FS S Commands using...

Page 102: ...xecutes the specified paper cut In the Standard mode this command is valid only if it is input at the head of the line In the case of 1 When m 1 or m 31 a partial cut 1 point left is executed In the case of 2 When n 0 after executing paper feed to the cutting position the paper is cut When n 0 after executing paper feed n x basic calculation pitch inch from the cutting position the paper is cut Th...

Page 103: ...printable area of one line is input it is set with the entire area except the left margin used as the print area width The basic calculation pitch is set by GS P Also once the print area width has been set it will not change even if the basic calculation pitch is changed by GS P The horizontal basic calculation pitch x in GS P is used in calculating the print area width Also if there is a fraction...

Page 104: ...still cannot be secured by the processing in 2 the right space is erased When developing a bit image or a downloaded bit image if the print area width does not fill the bit image s minimum horizontal width 2 dots for single density 1 dot for double density the following processing is carried out for that line only 1 The print area is enlarged to the right until it is equal to the minimum horizon t...

Page 105: ... speci fied the value is a negative number minus Negative numbers are expressed as a complement of 65 536 For example if moving in the upward direction by N pitch n1 n2 x 256 65536 N A relative position which exceeds the specified print area is disregarded Operation according to the starting point by ESC T is as follows 1 If the starting point is specified as top left or bottom right the relative ...

Page 106: ...es in n1 with the time interval specified in n2 inserted between executions Execution by pressing the paper feed key After waiting the length of time specified in n2 the ERROR indicator blinks and the printer waits for the paper feed key to be pressed When the key is pressed the macro is executed one time This operation is repeated the number of times specified in n1 If this command is received du...

Page 107: ...l state is enabled the status at the point when communications were first enabled after the power was switched on is sent The 4 byte status shown below is sent without confirm whether the host is ready to receive or not Except for the XOFF code the 4 byte status is always continuous This command is executed when the receiving buffer is developed so there is a possibility of delay between the recep...

Page 108: ...h feeding feeding 7 Not used 0 Bit Status Value 0 1 0 Not defined 1 Not defined 2 Not defined 3 Auto cutter error No error Error 4 Not used 0 5 Irrecoverable error No error Error 6 Auto recovery error No error Error 7 Not used 0 If DLE EOT GS I and GS r are used it is necessary to distinguish between the status from these commands and the ASB status For the identification method see pages 49 51 1 ...

Page 109: ...r present No paper 4 Not used 0 5 Not defined 6 Not defined 7 Not used 0 The initial value is n 0 when menu setting error handshake is BUSY and n 2 when menu setting error handshake is disregarded Bit Status Value 0 1 0 Not defined 1 Not defined 2 Not defined 3 Not defined 4 Not used 0 5 Not defined 6 Not defined 7 Not used 0 Input Data Format 3 Third Byte Paper Sensor Information 4 Fourth Byte Pa...

Page 110: ...essed in Hex code This command selects the font of HRI characters when printing a bar code n has the following meanings The initial value is n 0 64 Selecting the bar code height GS h n Code 1D h 68 h n 1 n FF Data are expressed in Hex code This command selects the bar code height n indicates the number of dots in the vertical direction The initial value is n A2 ...

Page 111: ... 44h JAN8 EAN 7 s 8 30 D 39 45h CODE39 1 s FF 30 D 39 41 D 5A 20 24 25 2B 2D 2E 2F 46h ITF 1 s 30 D 39 Even Number 47h CODABAR 1 s FF 30 D 39 41 D 5A 24 2B 2D 2E 2F 3A 48h CODE93 1 s FF 0 s 7F 49h CODE128 2 s FF 0 s 7F Input Data Format however an even number 65 Printing bar codes GS kn 1 Dn NUL Code 1D h 6B h n1 Ds 00 h 1 0 n1 6 Data are expressed in Hex code Code 1D h 6B h n1 s Ds 2 41 n1 49 Dat...

Page 112: ...If the horizontal width of a bar code exceeds the one line printing range the bar code is not printed but a paper feed only is executed Paper feed by the amount of the bar code height including HRI characters when HRI characters are specified is executed without relationship to the line feed amount set by ESC 3 ESC 2 etc This command is disregarded when data exist in the print buffer When characte...

Page 113: ...s n 2 32 Sends the drawer kick connector status When the printer has Serial interface specifications In the case of DTR DSR Control After confirming that the host computer is ready to receive the status is sent If it is impossible for the host to receive waiting continues until it is possible for it to receive In the case of XON OFF Control The printer sends the status without confirming if it is ...

Page 114: ...trol Codes 104 Drawer Kick Connector Status n 2 32 Bit Printer Status Value 0 1 0 Status of Drawer Kick Connector Pin No 3 L H 1 Not defined 2 Not defined 3 Not defined 4 Not used 0 5 Not defined 6 Not defined 7 Not used 0 ...

Page 115: ... Specifying and Clearing smoothing GS b n Code 1D h 62 h n Data are expressed in Hex code This command specifies or clears smoothing In n the least significant bit n0 only is valid n0 0 Clears smoothing n0 1 Specifies smoothing The object of smoothing is the internal characters and download characters Even when smoothing is specified if either the vertical enlargement rate or the horizontal enlarg...

Page 116: ...7 Chapter 7 Print Control Codes 106 ...

Page 117: ...8 107 Chapter 8 Character Code Tables Code Page Japanese Code Table International Character Code Table ...

Page 118: ...8 Chapter 8 Character Code Tables 108 Code Page ...

Page 119: ...8 109 Code Page ...

Page 120: ...8 Chapter 8 Character Code Tables 110 ...

Page 121: ...8 111 Japanese Code Table Japanese Code Table ...

Page 122: ...8 Chapter 8 Character Code Tables 112 International Character Code Table Note n indicates the ESC R parameter ...

Page 123: ...9 113 Chapter 9 Appendices Journal Protection Key Maintenance Cautions Specifications External View ...

Page 124: ...9 Chapter 9 Appendix 114 Journal Protection Key If a printer with optional specifications is used the rear cover can be locked using the journal protection key that is included Unlocked Locked ...

Page 125: ... printer in the head up condition with the head platen open 2 Remove the jammed paper with utmost care If the jammed paper is wrapped around the platen roller take it out a little at a time while turning the paper feed knob When removing jammed paper be sure to set the printer in the head up condition with the head platen open Turning the paper feed knob while in the head down state or attempting ...

Page 126: ... paper with fingernails or with hard metal objects etc This could cause the paper to become discolored Discoloration begins from a temperature of approximately 70 C 158 F Be careful of the effects of heat moisture and light etc on the roll paper Operating Temperature and Humidity 5 C 80 30 C 80 40 C 50 40 C 30 5 C 30 80 50 30 5 C 41 F 30 C 86 F 40 C 104 F Humidity Temperature ...

Page 127: ...J 100 Special AC adapter type and Power Cord 26AD J 100 V 2 wire Cord 26AD U 120 V 3 wire Cord 26AD E 230 V round Pin Cord AC Power Supply 100 AC100V 50 60Hz 120 AC120V 60Hz 230 AC230V 50 60Hz Character Set J Japanese domestic supports Kanji codes F foreign Interface R Serial RS 232C P Compatible with Centronics parallel Specifications ...

Page 128: ... 6 inch Can be set by commands Min 1 203 inch Paper Thermal roll paper 58 φ83 mm φ83 mm See paper specifications Interfaces RS 232C Centronics Factory Option Input Buffer 72 Bytes 8K Bytes Set by the operation panel Power Supply AC120V 10 60Hz Factory Option Voltage AC230V 10 50 60Hz Power 42W ASCII Slide Pattern Consumption Printing Weight Approx 2 3 kg Main unit only External 128 359 5 162 5mm D...

Page 129: ...5 µ m Roll Diameter ø83 mm or less Printing Surface Outside of roll front Specified Papers Mitsubishi Paper Co Ltd F220VP Shinoji Paper Co Ltd PD160R PD160R N Nihon Paper Co Ltd TF 50KS E2C 2 Print Area 3 Head and Cutter Positions p o ß J b u w b h u æ41mm æ12mm Paper Feed Direction Specifications Head Position Cutter Position Paper Exit Approx 41mm Approx 12mm ...

Page 130: ...9 Chapter 9 Appendix 120 External View 12 359 162 ...

Page 131: ...Information Systems Division CBM Bldg 5 68 10 Nakano Nakano ku Tokyo 164 0001 Japan Head Office Tel 81 3 5345 7540 Fax 81 3 5345 7541 PC74903 10 02 Printed in Japan ...

Reviews: