citEcar Bubble Buddy Owner'S Manual Download Page 23

23 


5,4


CIRCUIT BRKR 

OPEN 

Circuit breaker or fuse 

open in WalkAway™ 

circuit. 

1. Breaker/fuse tripped or open. 

2. Breaker/fuse defective. 

3. Relay/fuse sensor line broken. 

5,5


MAIN DROPOUT 

Main contactor open. 

1. Main contactor defective. 


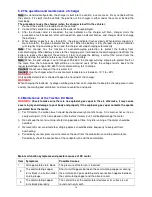
A built-in Status LED is visible through a window in the label on top of the controller. When the controller 

detects a fault, the Status LED flashes the 2-digit fault code. The code is flashed continuously until the fault 

is corrected. For example, code “3,2”—welded main contactor—appears as: 


¤ ¤ ¤   

  ¤ ¤                ¤ ¤ ¤     ¤ ¤                ¤ ¤ ¤     ¤ ¤               

etc. 

( 3 , 2 )   

       ( 3 , 2 )   

    ( 3 , 2 )   


The codes are listed in the Troubleshooting Chart. Only one fault is indicated at a time, and faults are not 

queued up. If multiple faults are active simultaneously, the code of the highest priority fault is flashed. After 

all  faults  have  been  cleared,  the  code  of  the  last  active  fault  will  continue  to  flash  for  one  minute.  This 

feature is designed to help service personnel identify intermittent faults when no programmer is available. 

These  same  fault  codes  will  also  be  flashed  by  the  external  fault  LED  (connected  to  Pin  22),  if  one  is 

included in the system.   


5.6 Maintenance of Rear Axle:   

      While using your vehicle, the rear axle should be maintained daily, periodically and randomly. 

1

. Periodic maintenance means the driver should do some daily maintenance before, during or after driving 

to prevent anything unexpected from happening. The maintenance is focused on cleaning and examination 

as followed: 

1)  Clean the dust and mud on the cover to keep the axle clean. 

2)  Make sure all the connections are in good condition, in case there may be any damage to any contact 

sticks or there is any travel in the contact. 

3)  Make sure the gear oil is full, if not add some. 

4)  Check to see if there is any link in the connection and transmission units or any unusual sound inside 

the axle; 

5)  Check  the  brake  drum,  the  exterior  temperature  and  smell,  it  should  be  adjusted  and/or  repaired 

immediately if there is any problem. 

6)  Check to make sure the breather valve is ventilated or not, in case the oil leaks. 

7)  Check if the there is any section in the parking brake cable broken or loosen, replace with a new one if 

needed. 


2

. Periodic maintenance: The axle should receive first grade maintenance, second grade maintenance and 

third grade maintenance 

First grade maintenance focuses on lubrication, fixation and gear oil replacement. 

Second grade maintenance focuses on checking adjustment and gear oil replacement. 

Third grade maintenance focuses on the whole part cleaning, assembly and gear oil replacement. 

Maintenance in each grade should follow the requirements as listed below. 


Summary of Contents for Bubble Buddy

Page 1: ...1 citEcar Bubble Buddy Owner s Manual Sold and Distributed by citEcar LLC www citEcarEV com Phone 866 542 8677 Fax 843 556 4080...

Page 2: ...formation Particularly important information is distinguished by the following notations WARNING Fail to follow Warning instructions could result in severe injury to the vehicle occupants bystanders o...

Page 3: ...Maintenance of Charger 18 5 3 Maintenance of the Traction Motor 18 5 4 Maintenance of the Speed Controller 19 5 5 Diagnostics and Troubleshooting 21 5 6 Maintenance of Rear Axle 23 5 7 Wheel Replacem...

Page 4: ...lowed WARNING Please always be sure of whether there is any restriction in the area where you intend to use the vehicle to avoid any unpleasant experience IMPORTANT LABELS SAFETY LABEL Read carefully...

Page 5: ...5 Fig 2 Fig 3...

Page 6: ...e Fig 1 Fig 2 Chassis number of the vehicle The position where the chassis number is located is shown in the picture below 2 Controls 1 Schematic Figure of controls There are two types of dashboards o...

Page 7: ...turn the key counterclockwise to OFF position CAUTION When the Key is on ON position the key cannot be pulled out Don t try to pull out the key when it s on ON position Forward Reverse switch This is...

Page 8: ...vehicle and Fig 2 is for SE style vehicle How to engage and disengage the parking brake Fig 1 Fig 2 To engage the parking brake For LE style vehicle step down the parking brake pedal by foot until it...

Page 9: ...before the vehicle will run COMBINATION SWITCH The combination switch includes a left lever and a right lever The left lever of the switch is used to switch on off the lighting system including headl...

Page 10: ...op position to reset the wiper For the operation of the wiper switch for SE style vehicle please refer to Fig 2 4 push the wiper level to the bottom to switch off the wiper 5 push the wiper lever to t...

Page 11: ...before you start driving the vehicle ONLY authorized people should drive this vehicle from the driver s side ONLY Do not drive this vehicle on a public road before it s registered and has the license...

Page 12: ...en driving the vehicle will cause the motor to burn With the Forward Reverse switch on the Neutral position turn the power key to ON position CAUTION The car will not run if you press down the F R swi...

Page 13: ...he main battery cable from the controller 2 Checking the terminals and nuts The connection of the battery should always be kept in good condition Please check every week as to whether any battery cabl...

Page 14: ...water so skin contact should be avoided Step by step watering procedure 1 Open the vent caps and look inside the filling wells 2 Check electrolyte level the minimum level is at the top of the plates...

Page 15: ...Equalizing section for the proper procedure 3 Take specific gravity readings again If any specific gravity reading still registers lower than the factory specification of 1 277 007 then one or more of...

Page 16: ...5 98 7 97 11 96 23 92 35 87 47 83 30 1 124 5 91 7 88 11 81 23 63 35 44 47 26 20 1 098 5 83 7 77 11 66 23 32 34 97 46 63 10 1 073 5 75 7 67 11 51 23 02 34 52 46 03 7 Battery Installation WARNING When...

Page 17: ...sible damage to the charger or vehicle 4 After the charger turns off disconnect the plug on the AC charging cable from the AC power outlet first and then disconnect the DC output plug from the vehicle...

Page 18: ...ll automatically start to charge Caution Do not use charger if there is water in it Caution Use the charger when the environment temperature is between 10 to 45 WARNING Only qualified electrician is a...

Page 19: ...made to open repair or otherwise modify the controller Doing so may damage the controller and will void the warranty Cleaning It is recommended that the controller be kept clean and dry and that its f...

Page 20: ...wire connecting the acceleration pedal and the controller KSI is disconnected C The contacting point of the contactor becomes stuck D The controller of the motor is damaged The vehicle can only move...

Page 21: ...he Faults menu and read the displayed fault information In this example the display shows No Known Faults indicating that the controller has not detected any problems Step 3 Select the Monitor menu an...

Page 22: ...n contactor driver shorted 3 3 PRECHARGE FAULT Internal voltage too low at startup 1 External short or leakage path to B is on external B connection 2 Controller defective 3 4 FIELD MISSING Field wind...

Page 23: ...ally and randomly 1 Periodic maintenance means the driver should do some daily maintenance before during or after driving to prevent anything unexpected from happening The maintenance is focused on cl...

Page 24: ...ed Remove the impurity replace the gear 6 Axle 1 strikes heavily Adjust or replace with a new one 7 The rear axle is out of shape check to see if it is overloaded Replace the rear axle Lack of breakin...

Page 25: ...the cross sequence pattern 3 Remove the jack If the tire is flat remove the wheel and inflate the tire to the maximum recommended pressure for the tire Immerse the tire in water to locate the leak an...

Page 26: ...following Before running in you should check the capacity of battery electrolyte and brake oil If any insufficiency is found you should fill it accordingly The tire pressure shall comply with the rat...

Page 27: ...touching point Y Motor 13 Check if any water got in Check if it becomes too hot Y 14 Check to see if the carbon brush should be replaced Y 15 Check to see if the accelerator pedal works well and if it...

Page 28: ...the tow switch into TOW position on the controller cover 4 Check the tire pressure to make sure its pressure is set to recommended pressure 5 Clean the exterior of the vehicle and apply the rust inhi...

Page 29: ...29...

Page 30: ...you do use one it must be heavy duty 10 gauge as the extension cord will determine how many amps the charger will receive Parking Brake All vehicles have a parking brake hand or foot Driving with par...

Reviews: