


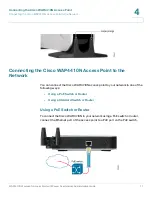


Connecting the Cisco WAP4410N Access Point
Placement Options
WAP4410N Wireless-N Access Point with Power Over Internet Administration Guide
16
4
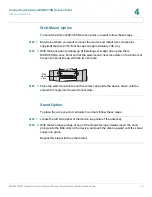
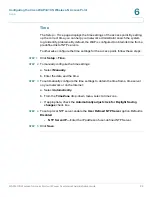
Wall-Mount Option
To mount the Cisco WAP4410N access point on a wall, follow these steps.
STEP 1
Determine where you want to mount the device and install two screws (not
supplied) that are 2-15/16 inches apart (approximately 7.46 cm.).
STEP 2
With the back panel pointing up (if installing vertically), line up the Cisco
WAP4410N Access Point so that the wall-mount crisscross slots on the bottom of
the access point line up with the two screws.
STEP 3
Place the wall-mount slots over the screws and slide the device down until the
screws fit snugly into the wall-mount slots.
Stand Option
To place the access point vertically in a stand, follow these steps.
STEP 1
Locate the left side panel of the device (opposite of the antenna).
STEP 2
With the two large prongs of one of the stands facing outward, insert the short
prongs into the little slots in the device, and push the stand upward until the stand
snaps into place.
Repeat this step with the other stand.
251580
Wall
mount
slots
2-15/16


