background image


Linksys E4200


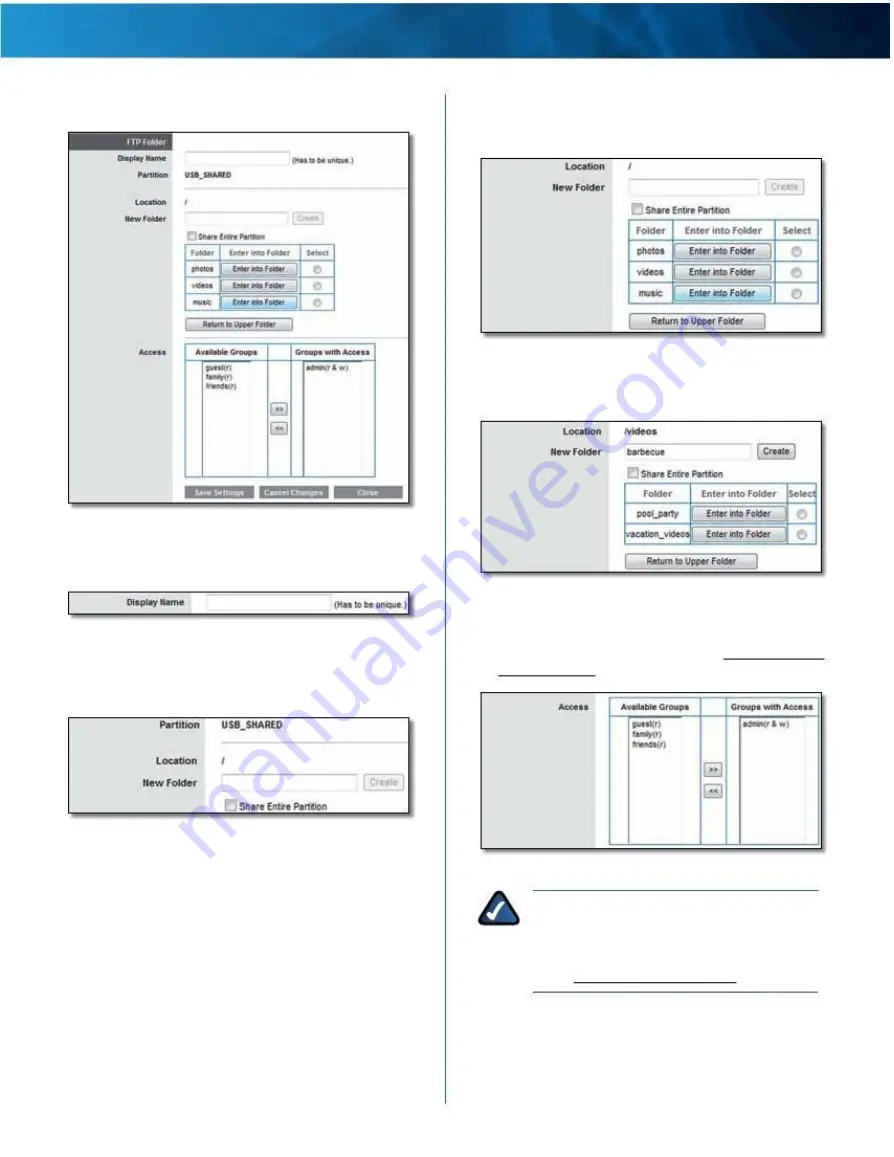
Create an FTP Folder 

Chapter 2: Advanced Configuration


3 . To specify a folder for FTP client access, click Select . To 

display subfolders, click Enter into Folder . To return to 
the previous folder, click Return to Upper Folder . 


FTP Folder > Select Folder or Enter into Folder 


To create a new folder, enter its name in the New Folder 
field . Then click Create . 


FTP Server > FTP Folder 


1 . In the Display Name field, enter a name for the FTP 

folder . 


FTP Folder > Create New Folder 


FTP Folder > Enter Display Name 


2 . The Partition name is displayed . If the FTP folder 

should include the entire partition, select Share Entire 
Partition and go to step 4 . 

4 . To allow a group to access the FTP folder, select it 

from the Available Groups column, and then click the 
>> button . (To create groups, go to “Create or Edit a 
Group Account” on page 31 .) 


FTP Folder > Share Entire Partition 


FTP Folder > Groups with Access 


NOTE: 

By default, the disk can be accessed 

without a password . If you want to specify 
which groups can access the FTP folder, select 
Disabled for the Anonymous Disk Access option . 
Go to “Storage > Administration” on page 29 . 


5 . Click Save Settings to apply your changes, or click 

Cancel Changes to clear your changes . Click Close to 
exit this screen and return to the FTP Server screen . 


Maximum Performance Wireless-N Router 

28


Summary of Contents for Linksys E4200

Page 1: ...User Guide Linksys E4200 Maximum Performance Dual Band N Router ...

Page 2: ...ty VPN 21 Passthrough Storage Di k 21 or 23 Server Storage FTP 26 Server Storage 27 Administration Access Restrictions Parental Controls Internet Access P ic 29 32 Applications and Gaming Single Port Forwarding 36 Applications and Gaming Port Range Forwarding 36 Applications Gaming Port Range Triggering 37 Applications and Gaming DMZ Applications and Gaming 37 QoS Administration 38 Management Admi...

Page 3: ...Connect and Access USB Storage 49 Overview 49 Add or Remove USB Storage Quick 49 Access Windows 49 7 Windows 50 Vista Windows X 52 Mac OS X 53 How to Manage Access to USB 55 Storage 58 Appendix C Specifications 61 Maximum Performance Wireless N Router ii ...

Page 4: ...imultaneous yet separate Wireless N networks one using the 5 GHz radio frequency band and one using the 2 4 GHz band For example use the Wireless N 2 4 GHz network to surf email and print while keeping the less crowded Wireless N 5 GHz network free for time sensitive traffic like Voice over IP VoIP calls online gaming and high definition video For more information refer to Simultaneous Networks on...

Page 5: ...er that port The green light turns on when the Internet port is connected to a 10 100 1000 Gigabit port Wi Fi Protected Setup Button If you have client devices such as wireless printers that support Wi Fi Protected Setup then you can use Wi Fi Protected Setup to automatically configure wireless security for your wireless network To use Wi Fi Protected Setup Wi Fi Protected Setup on page 12 USB Por...

Page 6: ...Each of these has its own unique lower level tabs NOTE Within this User Guide each screen is identified by its top and lower level tab names For example Setup Basic Setup is the screen accessed via the Setup top level tab and its Basic Setup lower level tab If you change any settings on a screen you must click Save Settings to apply your changes or click Cancel Changes to clear your changes These ...

Page 7: ...d by your ISP Subnet Mask This is the router s subnet mask as seen from the Internet Enter the subnet mask provided by your ISP Select your language To use a different language select one from the drop down menu The language of the browser based utility will change five seconds after you select another language Internet Setup The Internet Setup section configures the router to your Internet connec...

Page 8: ... its Internet connection and automatically reconnect if the connection is down To use this option keep the default Keep Alive In the Redial Period field specify how often the router should check the Internet connection The default is 30 seconds Internet Connection Type PPTP If your PPTP connection supports DHCP or a dynamic IP address then select Obtain an IP Address Automatically If you are requi...

Page 9: ...field blank MTU MTU is the Maximum Transmission Unit It specifies the largest packet size permitted for Internet transmission Select Manual if you want to manually enter the largest packet size that is transmitted To have the router select the best MTU for your Internet connection keep the default Auto Size When Manual is selected in the MTU field this option is available Leave this value in the 1...

Page 10: ...as a media server or print server To reserve an IP address for a specific device select it from the list of devices or manually enter the Media Access Control MAC address of the device DHCP Reservation The DHCP Reservation screen appears and displays a list of DHCP clients with the following information Client Name Interface IP Address and MAC Address Basic Setup DHCP Reservation Select Clients fr...

Page 11: ...y TZO then select TZO com The features available on the DDNS screen will vary depending on which DDNS service provider you use Username Enter the username for your DynDNS account Password Enter the password for your DynDNS account Host Name Enter the host name for your DynDNS account System Select the DynDNS service you use Dynamic Static or Custom The default is Dynamic Mail Exchange Optional Ent...

Page 12: ... default Enabled When Network Address Translation NAT is disabled dynamic routing is available Dynamic Routing RIP Dynamic routing uses the Routing Information Protocol RIP This option enables the router to automatically exchange routing tables with the other router s The router determines the network packets route based on the fewest number of hops between the source and the destination Enabled D...

Page 13: ... the Internet WAN WAN stands for Wide Area Network Click Show Routing Table to view the static routes you have already set up Chapter 2 Advanced Configuration Advanced Routing Routing Table Routing Table The Routing Table screen appears For each route the Destination LAN IP address Subnet Mask Gateway Hop Count and Interface are displayed Advanced Routing Routing Table Click Refresh to update the ...

Page 14: ...GHz network Wireless A devices support only the 5 GHz band so they should join the 5 GHz network For the 5 GHz network configure all computers and other wireless devices with the same 5 GHz Network Name and wireless security settings For the 2 4 GHz network configure all computers and other wireless devices with the same 2 4 GHz Network Name and wireless security settings NOTE You should use the s...

Page 15: ...then select Disabled 2 4 GHz Wireless Settings Basic Wireless Settings Manual 5 GHz Wireless Settings Network Mode Select the wireless standards your network will support Basic Wireless Settings Manual 2 4 GHz Wireless Settings Mixed If you have Wireless A and Wireless N 5 GHz devices in your network keep the default Mixed Wireless A Only If you have only Wireless A devices select Wireless A Only ...

Page 16: ... want to broadcast the router s SSID then select Disabled Wi Fi Protected Setup Wi Fi Protected Setup is a feature that makes it easy to set up your wireless network If you have client devices such as wireless printers that support Wi Fi Protected Setup then you can use Wi Fi Protected Setup Three methods of Wi Fi Protected Setup are available Use the method that applies to the client device you a...

Page 17: ...A Strong Strong Basic Wi Fi Protected Setup Enter Router PIN on Client Device a On the client device enter the PIN listed on the router s Wi Fi Protected Setup screen It is also listed on the bottom of the router b After the client device has been configured click OK on the router s Wi Fi Protected Setup screen within two minutes For each wireless network the Network Name SSID Security and Passphr...

Page 18: ...Personal NOTE If you select WPA2 Personal as your Security Mode each device in your wireless network MUST use WPA2 Personal and the same passphrase WPA2 WPA Enterprise Mixed Mode This option features WPA2 WPA used in coordination with a RADIUS server This should only be used when a RADIUS server is connected to the router NOTE If you select WPA2 WPA Enterprise Mixed Mode as your Security Mode each...

Page 19: ...y WPA2 Enterprise RADIUS Server Enter the IP address of the RADIUS server RADIUS Port Enter the port number of the RADIUS server The default is 1812 Shared Key Enter the key shared between the router and the server WPA Enterprise This option features WPA used in coordination with a RADIUS server This should only be used when a RADIUS server is connected to the router NOTE If you select WPA Enterpr...

Page 20: ...still wish to proceed without wireless security NOTE When wireless security is disabled anyone can access your wireless network at any time Wireless Security Disabled Wireless Security RADIUS RADIUS Server Enter the IP address of the RADIUS server RADIUS Port Enter the port number of the RADIUS server The default is 1812 Shared Secret Enter the key shared between the router and the server Encrypti...

Page 21: ... notebook in the bedroom The Guest Access feature is represented by the purple waves between the router and the notebook in the living room Wireless Guest Access Guest Access Allow Guest Access To allow Internet access through a guest network keep the default yes Otherwise select no Guest Network Name The default is the name of your wireless network followed by guest Guest Password The default is ...

Page 22: ...When a guest wants Internet access in your home provide these instructions 1 On the guest computer connect to the wireless guest network named on the Guest Access screen 2 Open a web browser 3 On the login screen enter the password displayed on the Guest Access screen 4 Click Login Wireless Wireless MAC Filter Wireless MAC Filter Enabled Disabled To filter wireless users by the MAC addresses of th...

Page 23: ...ve to MAC Address Filter List for any device you want to add to the MAC Address Filter List Then click Add To update the on screen information click Refresh To exit this screen and return to the Wireless MAC Filter screen click Close MAC 01 32 Enter the MAC addresses of the devices whose wireless access you want to control Chapter 2 Advanced Configuration Maximum Performance Wireless N Router 20 ...

Page 24: ...rom using a URL or Internet IP address to access the local server Select this option to enable the filter This option is disabled by default Filter IDENT Port 113 This filter keeps port 113 from being scanned by devices from the Internet This option is enabled by default Web Filters Proxy This filter blocks the use of Internet proxy servers To deny proxy requests select this option Proxy access is...

Page 25: ... it to the Blocked List column To remove an application from the Blocked List column select it and click the button Blocked Applications 9 If the application you want to block is not listed or you want to edit a service s settings enter the application s name in the Application Name field Enter its range in the Port Range fields Select TCP Transmission Control Protocol UDP User Datagram Protocol o...

Page 26: ...ou want to specify which groups can access the shared folders select Disabled for the Anonymous Disk Access option Go to Storage Administration on page 29 Storage Disk Disk Management If a formatted disk is connected to the router then its name is displayed For each partition of the disk the Partition File System Capacity and Free Space information are displayed Safely Remove Disk Before you physi...

Page 27: ...with multiple partitions then the formatting will delete them and create a single partition The Claim Disk screen appears Claim Disk Enter a partition s name Enter a name for the partition Click Format and follow the on screen instructions Disk Shared Folder 1 In the Display Name field enter a name for the shared folder Shared Folder Enter Display Name 2 The Partition name is displayed If the shar...

Page 28: ...re partition then select the folder you do want to share Folder The available folders are listed by Folder name Shared Folder Groups with Access NOTE By default no password is needed for read and write access to the disk If you Enter into Folder To display subfolders click this option Select To specify a folder click Select Return to Upper Folder To return to the previous folder click this option ...

Page 29: ...hen select the appropriate interval 2 Hours default 6 Hours 12 Hours 24 Hours or 48 Hours Scan All To scan all media files now click this option For each media folder the Name Partition and Folder location are displayed Scan To scan a folder now click Scan Delete To delete a folder click Delete Add a Media Folder Storage Media Server UPnP Media Server Setup Media Server Name Enter the display name...

Page 30: ...folders click this option Go to FTP Summary on page 27 Media Folder Create New Folder 4 Click Save Settings to apply your changes or click Cancel Changes to clear your changes Click Close to exit this screen and return to the Media Server screen Storage FTP Server The options on the various Storage screens are available when a USB storage device is connected to the USB port of the router Use the F...

Page 31: ... folder should include the entire partition select Share Entire Partition and go to step 4 4 To allow a group to access the FTP folder select it from the Available Groups column and then click the button To create groups go to Create or Edit a Group Account on page 31 FTP Folder Share Entire Partition FTP Folder Groups with Access NOTE By default the disk can be accessed without a password If you ...

Page 32: ... Folder name Information Storage Administration Enter into Folder To display subfolders click this option Select To specify a folder for FTP client access click Select Return to Upper Folder To return to the previous folder click this option Administration Information Access Specify which groups have read and write or read only access to the FTP folders To create groups go to Create or Edit a Grou...

Page 33: ...bled Create New Group To create a new group of users click this option Go to Create or Edit a Group Account on page 31 Edit To change the description or access rights of a group click Modify Go to Create or Edit a Group Account on page 31 Delete To delete a group click this option Create or Edit a User Account User Management By default the router creates two users admin and guest The users are li...

Page 34: ...evel of access read and write or read only Click Create Modify to apply your changes or click Cancel to clear your changes Click Close to exit this screen and return to the Administration screen 6 Click Save Settings to save the policy s settings or click Cancel Changes to clear the changes NOTE If you have already set up Parental Controls and now want to use Internet Access Policy then you will b...

Page 35: ...2 If you select Internet Access Policy go to Internet Access Policy on page 33 Parental Controls Target Devices Parental Controls Target Devices Restrict Internet access on Parental Controls manages the computers or other devices on this list Add If you want to apply Parental Controls to more computers or other devices click Add and a new Parental Controls screen appears Parental Controls Set up p...

Page 36: ...y To view all the policies click Summary and the Summary screen appears URL 1 8 In each field enter a website address that you want to block For example to block http www example com enter example com in a field NOTE When you set up Parental Controls for the first time and click Save Settings you will be asked to set up a password that protects access to Parental Controls Follow the on screen inst...

Page 37: ...ters To assign a static IP address to a computer go to DHCP Reservation on page 7 To look up the MAC address of a computer go to DHCP Client Table on page 37 After making your changes click Save Settings to apply your changes or click Cancel Changes to clear your changes Then click Close to exit this screen and return to the Internet Access Policy screen Website Blocking by URL Address 8 You can f...

Page 38: ...s to clear the changes NOTE If you have already set up Parental Controls and now want to use Internet Access Policy then you will be asked to enter the password for Parental Controls before you can click Save Settings Chapter 2 Advanced Configuration Maximum Performance Wireless N Router 35 ...

Page 39: ...n the Basic Setup screen go to DHCP Reservation on page 7 If you need to forward all ports to one computer click the DMZ tab Applications and Gaming Single Port Forwarding Single Port Forwarding Pre defined applications are available for the first five entries For each entry complete the following Application Name Select the appropriate application To IP Address Enter the IP address of the server ...

Page 40: ...g port numbers of the outgoing traffic Check the Internet application s documentation for more information Forwarded Range Enter the starting and ending port numbers of the incoming traffic Check the Internet application s documentation for more information Enabled Select Enabled to activate port triggering Any device whose port is being forwarded should have its DHCP client function disabled and ...

Page 41: ...ions by prioritizing wireless traffic To use this feature the wireless client devices in your network must support WMM To disable this option select Disabled Otherwise keep the default Enabled No Acknowledgement If you want the router to re send data if an error occurs keep the default Disabled If you do not want the router to re send data if an error occurs select Enabled Internet Access Priority...

Page 42: ... Enter a Name Enter a name for this game Port Range Enter the port range that the game will use For example if your game uses a single port 4000 then enter 4000 to 4000 as the port range If you need services for a game that uses ports 4000 to 5000 then enter 4000 to 5000 as the port range You can define up to three ranges for this bandwidth allocation Port numbers can range from 1 to 65535 Check y...

Page 43: ... Summary This lists the QoS entries you have created for your applications and devices Priority This column displays the bandwidth priority of High Medium Normal or Low Name This column displays the application game device or port name Information This column displays the port range or MAC address entered for your entry If a predefined application or game was selected there will be no valid entry ...

Page 44: ... Any IP Address To specify an external IP address or range of IP addresses select and complete the IP address range fields Remote Management Port Enter the port number that will be open to outside access To access the router you will need to enter the router s password Management Router Access To ensure the router s security you will be asked for your password when you access the router s browser ...

Page 45: ...et keep the default Enabled With logging enabled you can choose to view temporary logs When you wish to view the logs click View Log UPnP Universal Plug and Play UPnP allows the appropriate operating system to automatically configure the router for various Internet applications such as online gaming and VoIP calls Log Management UPnP UPnP If you want to use UPnP keep the default Enabled Allow User...

Page 46: ...e Factory Defaults screen allows you to restore the router s configuration to its factory default settings NOTE Do not restore the factory defaults unless you are having difficulties with the router and have exhausted all other troubleshooting measures Once the router is reset you will have to re enter all of your configuration settings Administration Factory Defaults Factory Defaults Diagnostics ...

Page 47: ...settings After you upgrade its firmware you will have to re enter all of your configuration settings Firmware Upgrade Before upgrading the firmware download the router s firmware upgrade file from the website www linksys com support Please select a file to upgrade Click Browse and select the firmware upgrade file Start Upgrade After you have selected the appropriate file click this option and foll...

Page 48: ...splayed Domain Name The Domain Name of the router is displayed DHCP Server DHCP Server The status of the router s DHCP server function is displayed Start IP Address For the range of available IP addresses the starting IP address is displayed End IP Address For the range of available IP addresses the ending IP address is displayed DHCP Client Table Click this option to view a list of computers or o...

Page 49: ...Name SSID The name of the wireless network also called the SSID is displayed Channel Width The radio channel width used by Wireless N devices is displayed Channel The router s operating radio channel is displayed Security The wireless security method used by the wireless network is displayed SSID Broadcast The status of the SSID Broadcast option is displayed On Off To allow the lights on the route...

Page 50: ...ice Provider ISP so you no longer need to connect manually The DSL telephone line does not fit into the router s Internet port The router does not replace your modem You still need your DSL modem in order to use the router Connect the telephone line to the DSL modem and then insert the setup CD into your computer Click Set up your Linksys Router and follow the on screen instructions When you open ...

Page 51: ...ties Click Advanced system settings Click the Computer Name tab The workgroup name is displayed If they differ then change the workgroup name of the router Follow these instructions 1 Access the web based utility of the router Refer to How to Access the Browser Based Utility on page 3 2 Click the Storage tab Maximum Performance Wireless N Router Appendix A Troubleshooting 3 Click the Administratio...

Page 52: ...hots are shown for Windows 7 and similar screens appear for non Windows 7 users 1 Right click your desktop Select New and click Shortcut Add or Remove USB Storage Add USB Storage 1 Make sure your computer has a wired or wireless connection to the router 2 Connect an external USB hard disk drive or USB flash drive to the USB port of the router Windows Explorer Icon NOTE If your USB storage device i...

Page 53: ...go to Start All Programs Accessories Windows Explorer 2 In the Address field enter the default IP address of the router 192 168 1 1 Select Go Network 2 Double click the server name NOTE If you used the setup software for installation then the server name is the name of your wireless network up to 15 characters If not the server name is Cisco followed by the last five digits of the router s serial ...

Page 54: ...Map a Drive 1 On your desktop click the Windows Explorer icon Windows Explorer Icon Select Drive Letter NOTE If the Windows Explorer icon is not displayed then go to Start All Programs Accessories Windows Explorer 2 In the Address field enter the default IP address of the router 192 168 1 1 NOTE If the login screen appears enter your account username and password Click OK 5 Click Finish Enter Loca...

Page 55: ... Mapped Drive Windows Vista Access the USB Storage Device 1 On your desktop double click the Computer icon Map a Drive 1 On your desktop double click the Network icon Network Icon Computer Icon NOTE If the Computer icon is not displayed then go to Start All Programs Accessories Windows Explorer 2 In the Address field enter the default IP address of the router 192 168 1 1 NOTE If the My Computer ic...

Page 56: ...rk Drive 2 Double click the mapped drive to access it 4 From the Drive drop down menu select an available drive letter Double Click Mapped Drive Windows XP Select Drive Letter Access the USB Storage Device 1 On your desktop double click the My Computer icon NOTE If the login screen appears enter your account username and password Click OK 5 Click Finish My Computer Icon NOTE If the My Computer ico...

Page 57: ...vice Name Disk of the router In the Address field enter Cisco followed by the last five digits of the router s serial number If you used the setup software for installation then enter the name of your wireless network up to 15 characters in the Address field 3 Right click the folder you want to map and click Map Network Drive Double Click Shared Folder NOTE If the login screen appears enter your a...

Page 58: ...rt All Programs Accessories Windows Explorer 2 Double click the mapped drive to access it Select Go Network 2 Double click the server name NOTE If you used the setup software for installation then the server name is the name of your wireless network up to 15 characters If not the server name is Cisco followed by the last five digits of the router s serial number Double Click Server Name NOTE It ma...

Page 59: ...ces 2 Select Connected servers Double Click Shared Folder NOTE If you have disabled the Anonymous Disk Access option then click Connect As On the login screen enter your account username and password Click OK 4 The shared folder opens Select Connected Servers 3 The shared folder is displayed on the desktop To access it double click the icon Double Click Shared Folder Icon Access Shared Folder Maxi...

Page 60: ...in Items window 1 Go to the Apple menu and select System Preferences Go to Apple System Preferences 2 Click Accounts Drag Shared Folder 5 The folder appears in the list of Login Items Click the red x to close the window Click Accounts Close Window 3 Click Login Items Click Login Items Maximum Performance Wireless N Router 57 ...

Page 61: ...are If you did not run the setup software then enter the default admin 3 Click OK to continue 3 Click Create Share for the appropriate partition The Shared Folder screen appears Disk Shared Folder 4 In the Display Name field enter a name for the shared folder Login Screen Create a Shared Folder 1 Click the Storage tab Shared Folder Enter Display Name 5 The Partition name is displayed If the shared...

Page 62: ...ck the Administration tab The Administration screen appears Shared Folder Create New Folder 7 To allow a group to access the shared folder select it from the Available Groups column and then click the button To create groups go to Create a Group Account on page 53 Shared Folder Groups with Access NOTE By default no password is needed for read and write access to the disk If you want to specify whi...

Page 63: ...In the User Management section on the Storage Administration screen click Create New User Administration User Management Appendix B How to Connect and Access USB Storage 2 The User Account screen appears In the Name field enter a name for the user Administration User Account 3 In the Full Name field enter the actual name of the user 4 In the Description field enter keywords to describe the user 5 ...

Page 64: ...ondensing Storage Humidity 5 to 90 Noncondensing Specifications are subject to change without notice Number of Antennas 6 Total 3 Internal Antennas per Each 2 4 GHz and 5 GHz Radio Band Detachable y n Modulations Receive Sensitivity No 802 11b CCK QPSK BPSK 802 11g OFDM 802 11a OFDM 802 11n BPSK QPSK 16 QAM 64 QAM 2 4 GHz 802 11b 87 dBm 11 Mbps Typical 802 11g 77 dBm 54 Mbps Typical 802 11n 20 MHz...

Page 65: ... U S and other countries A listing of Cisco s trademarks can be found at www cisco com go trademarks Third party trademarks mentioned are the property of their respective owners The use of the word partner does not imply a partnership relationship between Cisco and any other company 2010 Cisco and or its affiliates All rights reserved ...

Reviews: