background image

Uk

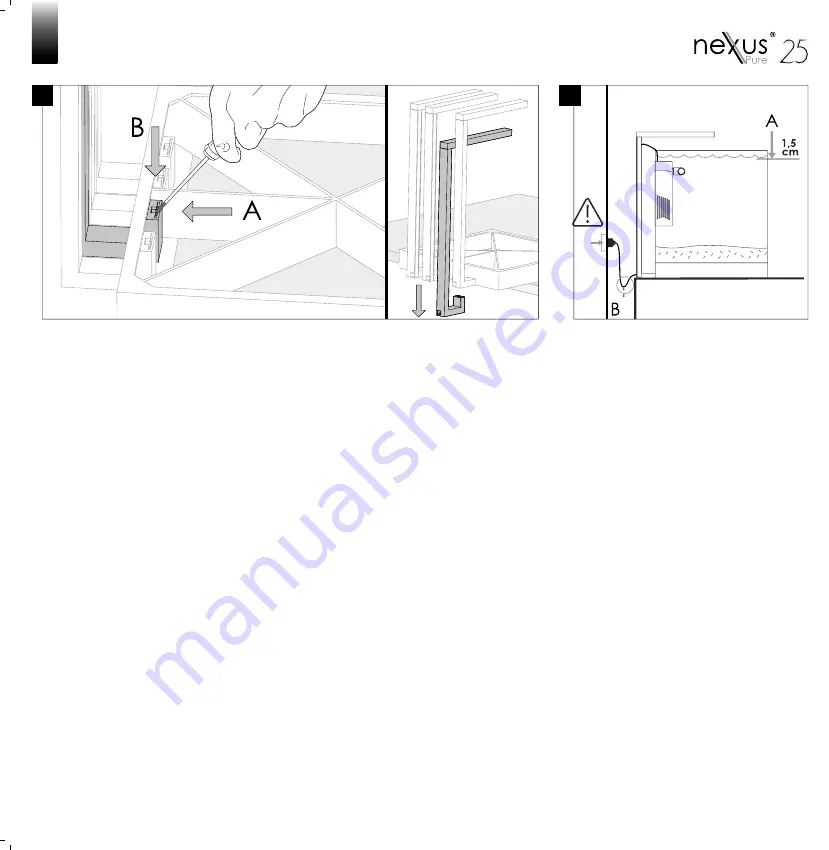
 • Place the uprights on the edge of a table or hold the complete support in one 

hand. With the other hand, insert a screwdriver into the lowest part of the clip. 

Push the clip 

(A)

 horizontally to unlock and push and then, without letting go, push it 

down until the upright is released from the base 

(B)

.

To install the new lamp, push the upright into the base until it clips securely into place.

Fr 

• Placez les hampes au bord d’une table ou prenez tout le support d’une main. A 

l’aide de l’autre main, introduisez un tournevis sur la partie la plus profonde du clip. 

Poussez  le  clip 

(A)

  à  l’horizontale  afin  de  le  libérer  et,  sans  le  lâcher,  le  repousser 

ensuite vers le bas jusqu’à ce que la hampe se détache de la base 

(B)

.

Pour remonter le nouveau luminaire, introduisez la hampe sur la base jusqu’à la clipper 

et qu’elle soit sûre.

De

 • Stellen Sie die Holme am Rand eines Tisches auf oder nehmen Sie das gesamte 

Gestell in einer Hand. Setzen Sie mit der anderen Hand einen Schraubenzieher am 

untersten Teil des Clips an. 

Schieben  Sie  den  Clip 

(A)

  zur  Seite,  um  ihn  zu  öffnen,  und  schieben  Sie  ihn 

anschließend, ohne ihn zu weiten, nach unten, bis der Holm sich vom Sockel 

(B) 

löst. 

Um ein neues Leuchtmittel zu montieren, führen Sie den Holm in den Sockel ein, bis 

dieser einrastet und gehalten wird.

Nl

 • Leg de staven op de rand van een tafel of neem de gehele steun in de hand. 

Steek met de andere hand een schroevendraaier in het diepere gedeelte van de 

klem. 

Duw  de  klem 

(A)

  in  horizontale  richting  om  te  ontgrendelen  en  duw  deze  daarna 

zonder los te laten naar onder tot de staaf loslaat van de bodem 

(B).

Steek de stang in de bodem om nieuwe verlichting te installeren, totdat deze vastkle-

mt en vast zit.

6

Uk

 • The water level 

(A)

 must be kept at 

1,5  cm  below  the  top  of  the  tank  and 

the filter must remain in the water to cool 

and  lubricate  its  pump.  All  cables  shall 

have a drip curve 

(B)

 before connecting 

to the power supply.

Fr

  •  Le  niveau  d’eau 

(A)

  doit  être 

maintenu  à  1,5cm  en-dessous  de  la 

limite du réservoir et le filtre doit toujours 

rester  dans  l’eau,  afin  de  lubrifier  et 

réfrigérer  sa  pompe.  Tous  les  câbles 

doivent  être  munis  d’une  courbe 

d’écoulement 

(B)


avant 

d’être 

branchés au secteur.

De

 • Der Wasserstand 

(A)

 muss stets 1,5 

cm  unter  der  Beckenoberkante  liegen 

und  der  Filter  muss  für  die  Schmierung 

und  Kühlung  seiner  Pumpe  immer  im 

Wasser bleiben. Alle Kabel müssen eine 

Abtropfschlaufe 

(B)

 haben, bevor sie an 

die  Stromversorgung  angeschlossen 

werden.

Nl 

•  Het  waterniveau 

(A)

  moet  1,5  cm 

onder de rand van de tank blijven en de 

filter  blijft  in  het  water  voor  het  smeren 

en  koelen  van  de  pomp.  Alle  kabels 

moeten een druppel curve 

(B) 

hebben 

voordat deze worden aangesloten aan 

de voeding.

7

5

Uk • Fr • De • Nl

Uk • INSTALLATION | Fr • INSTALLATION

De • BINSTALLATION | Nl • INSTALLATIE

Summary of Contents for CLA20

Page 1: ...Guide d utilisation Gu a de uso Gebruiksaanwijzing Anv ndarguide Manuale d istruzioni Guia de utiliza o User guide Gebrauchsanleitung...

Page 2: ...Ihrem Aquarium haben werden Nl Gefeliciteerd met de aankoop van uw neXus pure Wij wensen u vele jaren aquariumplezier Pt Felicita es adquiriu um aqu rio neXus pure Desejamos lhe muitos anos de prazer...

Page 3: ...ticipe en la conservaci n del medio ambiente Su electrodom stico contiene materiales recuperables y o reciclables Entr guelo al final de su vida til en un Centro de Recogida Espec fico o en uno de nue...

Page 4: ...e n mero 351 255 340 450 E mail sav ciano pt I Questo apparecchio CIANO garantito contro i difetti di materiali o manodopera per un periodo di 24 mesi a partire dalla data d acquisto da parte dell ute...

Page 5: ...o apresenta fugas Nunca deslocar o aqu rio quando est cheio All electrical appliances of the aquarium Before installing and using the various bits of electrical equipment read carefully all the follo...

Page 6: ...various bits of electrical equipment read all the following safety notices and instructions carefully Carefully remove the components from the packaging Place the neXus pure on a solid stable surface...

Page 7: ...Nummer Nl Neem de basis van het aquarium en de kolommen en controleer onderaan hun respectievelijke nummers Klik elke kolom volledig in de basispositie met het overeenkomstige nummer Uk Remove the co...

Page 8: ...e inside of the column after making sure there is a sufficient length of cable between the tank and the column Fr Avant la premi re utilisation du filtre fourni vous devez laver les masses filtrantes...

Page 9: ...rd Nl Leg de staven op de rand van een tafel of neem de gehele steun in de hand Steek met de andere hand een schroevendraaier in het diepere gedeelte van de klem Duw de klem A in horizontale richting...

Page 10: ...nce du syst me de filtration De Alle elektrischen Komponenten des Aquariums m ssen vor jedem Eingriff ausgeschaltet werden Der Zugriff auf die Filtermasse des Filters erfolgt ber den oberen und untere...

Page 11: ...e n r akvariet r fullt Antes de instalar e utilizar os diferentes materiais el tricos ler atentamente todas as informa es e as instru es de seguran a seguintes Retirar cuidadosamente os elementos da e...

Page 12: ...e la base con el n mero correspondiente Se H ll i akvariets botten och i pelarna och notera tillh rande nummer p deras undersida F r in pelarna helt i det l ge i bottnen som har samma nummer 8 Pt INST...

Page 13: ...aqu rio e em frente haste B Passe o cabo pelo interior da coluna ap s garantir comprimento de cabo necess rio entre o tanque e a coluna It Prima di utilizzare per la prima volta il filtro fornito lav...

Page 14: ...tt bord eller h ll i hela basen med en hand Med andra handen f r du in en skruvmejsel i den djupaste delen av kl mman Skjut kl mman A horisontellt f r att frig ra l sningen och utan att sl ppa den Try...

Page 15: ...sostituendo le masse filtranti con delle nuove Acque colorate o con odore ed eccesso di detriti organici nell acqua sono indicatori della necessit di effettuare la manutenzione del sistema di filtragg...

Page 16: ...converter Class III LED Light System CIANO Aquarium S A Rua de Revinhade n 1055 4650 376 Felgueiras Portugal Tel 00351 255 340 450 e mail info ciano pt www ciano pt A40195 03 APP MY CIANO Available f...

Reviews: