background image

Page 62

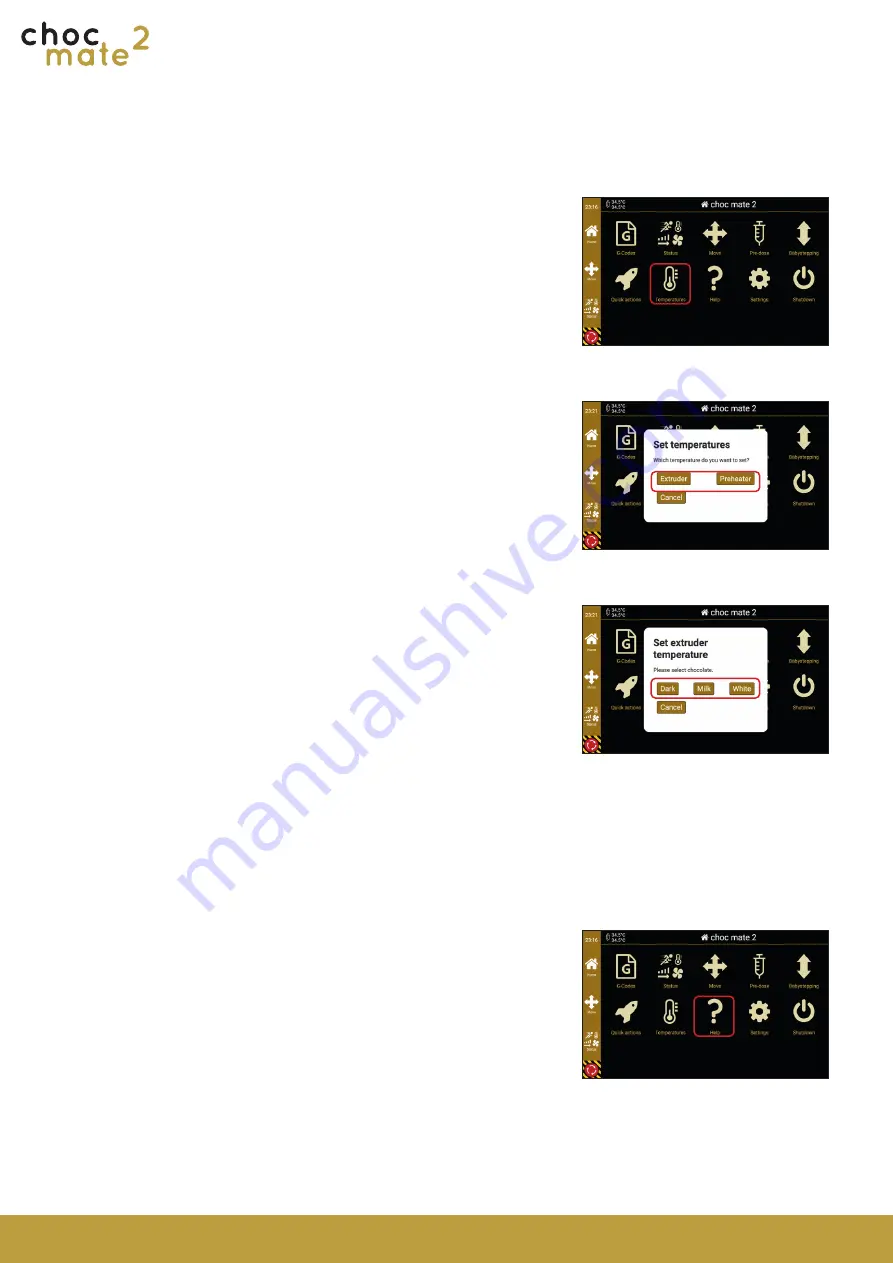
6.8.  Temperatures

6.9.  Help

Opens a window for setting the temperatures

In the first step, select whether you want to change 

the temperature of the extruder or the preheater. 

In the next step, select the desired type of chocolate. 

The respective temperatures are set and the process 

is confirmed by an information window. 

Opens a help page with the most important terms 

and commands. 

This page is for quick reference only. If necessary, 

use our user manual or our online help.

For individual temperatures see chapter 6.2.

Summary of Contents for Choc mate 2

Page 1: ...by User manual EN 2021 November 19th 2021 Version 0 6 ...

Page 2: ...n and creativity while using it Satisfied Share your experiences with colleagues friends and customers Also become part of our growing community and share your results on social media chocmated Problems Visit our help pages at https choc mate de or contact the support support chocolate3 de ...

Page 3: ...Page 03 As a supplement to these instructions please also take a look at our videos at https www choc mate de quick start ...

Page 4: ...ope of delivery 22 4 First commissioning 4 1 Location 24 4 2 Unpack 26 4 3 Structure 28 4 3 1 Guide attachment 28 4 3 2 Preparing and attaching the printing plate 28 4 3 3 Power supply 28 4 4 Switch on 29 4 5 Levelling the print bed 29 4 6 Switch off 29 4 7 Connection between printer and computer 30 4 7 1 Connection via USB stick 30 4 7 2 Wired via router 30 4 7 3 Wireless Wlan via router 31 4 7 4...

Page 5: ...8 Temperatures 62 6 9 Help 62 6 10 Settings 63 6 10 1 Console 63 6 10 2 Netzwork 64 6 10 3 WLAN Settings 64 6 10 4 Time setting 65 6 10 5 Language 66 6 10 6 Hardware Information 66 6 10 7 Information 66 7 Maintenance and cleaning 7 1 Levelling the print bed 68 7 2 Cleaning the individual parts 70 7 3 Aligning the buildplate 71 7 4 Cleaning the printhead 72 7 5 Cleaning the printer 74 7 6 Maintenan...

Page 6: ......

Page 7: ...1 Basic information ...

Page 8: ...ational language if these are not enclosed although the German instruc tions should always be regarded as the ori ginal Please keep the operating manual for future reference Chocolate 3D printer for commercial use The choc mate 2 is a 3D printer for cho colate or couverture with a print area of 340x232x160mm It has a heatable print head with two tempe rature control circuits The printer also has a...

Page 9: ...age use or disposal of this product The information contained in this document has been obtained from what we believe to be re liable sources However no warranty express or implied is made as to its accuracy The following risks exist when using the chocolate printer You will find the symbols at the ap propriate place in the manual 1 4 Hazard warnings Danger of burns from hot machine parts such as ...

Page 10: ...Page 10 1 5 Declaration of conformity from 2021 ...

Page 11: ...2 Safety instructions ...

Page 12: ...ctions are supported We strongly recommend choc OS which has been specially developed for the chocolate printer It is available after re gistration at https choc mate de app After uploading the files to the printer the model is made either from chocolate sticks available from chocolate or almost any other commercially available chocolate or couverture During the process the chocolate used is melte...

Page 13: ...le it is in operation The heating elements in parti cular can reach high temperatures Wait un til they have cooled down sufficiently before touching them Only operate the choc mate 2 using the touch display on the front or the on off switch on the top of the machine Do not make any changes or adjustments to the choc mate 2 that are not approved by the manufacturer Do not store any objects in or on...

Page 14: ... specifications in the data sheet Work on the electrical equipment of the choc mate 2 and the power supply may only be carried out by qualified electricians Always disconnect the 3D printer from the po wer supply by pulling the power cable before carrying out cleaning maintenance or repair work Check the condition of cables and insulation regularly and replace damaged parts imme diately Installati...

Page 15: ...uations or damage to property may occur as a re sult of the production process itself incorrect operation or technical defects The risk of dangerous situations is increased by Use of the choc mate 2 other than as in tended Improper operation of the 3D printer Operating the 3D printer in an unsafe or unsuitable condition Insufficient attention negligent handling and excessive soiling Therefore Only...

Page 16: ... alone is liable Operate the unit only at the mains voltage specified for the unit can be seen on the back of the unit or on the external power supply unit The unit may only be connected to the mains and switched on after all connections have been checked Some hazards are function related and the refore cannot be avoided by design In order to avoid injuries it is necessary that the user is aware o...

Page 17: ...The enclosed German version of these operating instruc tions is authoritative The actual scope of delivery may differ from the explanations and drawings described here in the case of special versions the use of additional order options or due to the latest technical changes If you have any questions please contact the manufacturer These operating instructions must be read ca refully before startin...

Page 18: ......

Page 19: ...3 Components overview ...

Page 20: ...e 8 Preheater 9 Power connector 10 Optical distance sensor 11 Nut for levelling the print bed 12 USB C port 13 Ethernet connection RJ45 14 Nozzle element 15 Piston 16 Print head door 17 Tube heater 18 Fixing screws door 19 Fixing screw pipe heater 20 Fixing screws nozzle element 21 Sliding element 22 Clamping screw sliding element 23 Clamping screws printhead guide ...

Page 21: ...Page 21 5 2 3 1 7 10 8 11 4 6 9 7 1 8 3 2 11 4 12 13 ...

Page 22: ...panner 0 9 mm 2 0 mm 2 5mm Cartridges Piston manual Spare screws nozzle element Pack of 4 white chocolate sticks Pack of 4 milk chocolate sticks Pack of 4 dark chocolate sticks Guide print head Optical distance sensor Dust protection cap RJ45 socket Nozzle element for 0 84 mm Nozzle element for 1 19 mm Nozzle element for 1 60 mm Nozzle 0 84 mm Nozzle 1 19 mm Nozzle 1 60 mm 1 1 1 1 1 1 4 2 3 1 1 5 ...

Page 23: ...4 First commissioning ...

Page 24: ...emergency it must be possible to dis connect the mains plug Select the operating mode so that children cannot reach the product Do not place the appliance in the immediate vicinity of open fire sources such as cookers deep fryers or burning candles Make sure that the power cord is not crushed or damaged by sharp edges when placing the product Place the printer on a level stable base such as a tabl...

Page 25: ...he unit or in its immediate vicinity and never pour liquids over the unit Liquids could get into the unit affec ting safety and damaging the unit There is a risk of fire or life threatening electric shock If this should happen switch off all poles of the corresponding mains socket e g by swit ching off the automatic circuit breaker and the residual current circuit breaker Then dis connect the main...

Page 26: ...e below 10 C e g immediately after delivery in cold weat her there is a risk of condensation of moistu re from the warm ambient air onto sensitive electronic components This can lead to da mage to the control electronics during com missioning due to a short circuit It is essential to allow the 3D printer to reach ambient tem perature at the installation site for 24 hours before putting it into ope...

Page 27: ...rom the packaging and put it down Remove the front and rear foam by pulling on it while holding the print bed 2 Remove the packaging material from the Z switch 6 and the adhesive tape from the printhead 1 At tention The flap of the printhead 16 cannot be ope ned yet The Z button 6 can be magnetically attached about 5 cm below the power switch 5 ...

Page 28: ...the print head Push it all the way down and lightly tighten the two screws 23 at the back Remove the protective film from both sides of build plate 3 Place the buildplate 3 centered on the print bed 2 Connect the supplied mains cable to the power sup ply unit Plug the mains cable into a power socket Connect the hollow plug to the socket 9 on the prin ter ...

Page 29: ...mple tely The print bed is already levelled at the factory Ho wever the levelling can become misaligned during transport Check the levelling as described in chapter 7 1 To do this select Home Shutdown Yes Shutting down takes about one minute Afterwards you can safely pull out the mains plug Caution Do not simply disconnect the power supply always shut down the printer first ...

Page 30: ...puter to a USB stick and then copied from the USB stick to the choc mate The printer can be operated individually or in a network We recommend that you connect it to a network with Internet access Without a network connection only files on the choc mate or copied to the choc mate via USB stick can be printed If the choc mate is connected to a network files can be transferred from any PC smart phon...

Page 31: ...a router Navigate to Home Settings WLAN Select your network from the list Tap Password Enter the password for your network If necessary further settings can also be made here See also chapter 6 10 3 Save the settings and tap Connect ...

Page 32: ...e the mode to Always enable AP to always enable the Access Pont Enable AP when not connected And to activate the access point only if no WLAN connection is possible otherwise The wireless network of the access point is named by default ChocMate2 corresponds to the last 6 characters of the serial number The default password is 123456 Navigate to Home Settings WLAN More in the left sidebar The seria...

Page 33: ...5 Operating the printer ...

Page 34: ...all steps without changing the indicated position It is used to correct errors in the dis tance between the nozzle and the print sur face Retraction Refers to the process of retracting the piston to prevent material from oozing Open extruder Moves the piston and the threaded rod to the upper most position This is the only way to open the print heads door 16 This procedure should be carried out eve...

Page 35: ...and the time the chocolate has already been preheated Now insert either an empty cartridge with nozzle or a full cartridge with nozzle into the print head as in structed Homing We recommend carrying out the procedure imme diately so that it cannot be forgotten later For homing a cartridge with nozzle must be inser ted and the printhead must be completely closed A magnetic buildplate must be placed...

Page 36: ... the two screws 20 again See also chapter 5 9 3 Apply some neutral cooking oil evenly and thinly to the top of the buildplate 3 Place a foil in the middle of the buildplate 3 and smooth it out From the centre brush out as many air bubbles as possible Place the buildplate 3 centered on the print bed 2 The magnets will align it automatically For a particularly precise alignment you can align the bui...

Page 37: ...e moved all the way up Open the print head and screw the prepared piston 15 onto the threaded rod from below Fit one of the sealing rings supplied to the piston 15 in each of the two grooves provided Make sure to screw the piston on completely ot herwise the height of the empty point of the car tridge may not be correct ...

Page 38: ... diameter of the nozzle element 14 used or replace it with one of a corresponding diameter To do this place the nozzle on the tip of the cartridge and screw it down slightly Now place a chocolate stick in the cartridge with the pointed side down and press it all the way down Preheating takes at least 45 minutes Only after this time the chocolate is soft liquid and the prin ting process can be star...

Page 39: ...axis must always be rehomed as soon as the distance between the printing surface and the nozzle changes Reason for this can be A new cartridge A new nozzle A different printing plate A different object to be printed If this distance has changed or could have changed the homing process must be re peated for the Z axis Place the Z button 6 centrally under the nozzle The Z button 6 is held in the cen...

Page 40: ...ut of the nozzle After that you should only proceed in slow mode Initially you can proceed in larger steps As soon as the piston gets closer to the chocola te the steps should become smaller Navigate to Home Pre dosing Move the piston down until the first chocolate comes out Remove the wire by pulling it upwards Now slowly dispense another 1 2 mm of chocolate from the cartridge until an even flow ...

Page 41: ...again after remo ving the cartridge If the new temperature is lower than the pre vious temperature wait until the temperature has dropped far enough before inserting the cartridge Preheating takes about 45 minutes Only after this time is the chocolate soft liquid An individual temperature can be set via Home Status Preheater Insert a chocolate stick into a clean cartridge and close it with a seali...

Page 42: ...ture approx 19 C The essential ingredient of chocolate or cou verture is the fat cocoa butter Cocoa butter forms different crystal structures during crys tallisation Only one of them is stable and pro duces a satisfactory result Therefore cho colate must always be used tempered or pre crystallised We strongly recommend making a sample The sample should start to crystallise after approx 20 seconds ...

Page 43: ...most important settings you will also see information about the printing progress Pay particular attention to the first layer as this is literally the foundation for successful printing A non optimal ambient temperature can be compensated with restrictions by adjusting the print speed Both the blob during pre dispensing and the purge line at the beginning of the print can be used to check the cons...

Page 44: ...creases the distance Arrow down Increases the distance Depending on the deviation you can proceed in steps of 0 1 mm or 0 01 mm As the printer works with a command memory it may take a short time until the changes are imple mented We recommend that you do not pause the printing process as a pause will impair the printing result In individual cases the printing process can be inter rupted by tappin...

Page 45: ...e buildplate 3 in a cool place To remove the print objects grab the film on the bu ildplate 3 and pull it to the side and slightly upwards at a very flat angle The print objects should now come off slowly If the angle is too steep there is a risk that the print objects will break If the objects have not yet completely detached from the film the film can be detached by bending it from the underside...

Page 46: ...ns Open ex truder We recommend always using clean and dry nozzles cartridges and piston Especially when changing the chocolate type all three elements should be replaced Move the piston 15 all the way up if not already done Open the extruder door 16 and remove the cartrid ge together with the nozzle upwards Now fill it up or replace the cartridge with a full one If necessary wait until the chocola...

Page 47: ... In the next step the piston 15 moves down a little This makes it easier to reach Remove the piston 15 by turning it clockwise vie wed from above attach a fresh piston 15 if neces sary and confirm To keep the print head 1 clean it may help to wrap a piece of paper around the piston 15 while removing it The piston 15 moves up again and the print head 1 can be closed again ...

Page 48: ...te size as well After changing the nozzle the Z axis must be referenced again Navigate to Quick Actions Change nozzle and fol low the steps shown Loosen the screws 20 and remove the nozzle ele ment 14 to the side Replace the matching nozzle element 14 from the side and tighten the two screws 20 Replace the nozzle on the cartridge by unscrewing and screwing it back on a Change with cartridge remove...

Page 49: ...rews 20 and remove the nozzle ele ment 14 downwards Replace the nozzle by unscrewing and screwing it back on Replace the matching nozzle element 14 from be low and tighten the two screws 20 b Change with inserted cartridge ...

Page 50: ...accessed ei ther via the IP address see 6 10 2 or via http ChocMate2 local where corresponds to the last 6 characters of the serial number Log in as follows User user Password user You can upload files to the choc mate by dragging them onto Upload Gcode or clicking on it and selec ting the appropriate file http ChocMate2 local or for example http 192 168 178 33 ...

Page 51: ...tructure the files You will find the complete instructions under Instruc tions Note that many functions are not available to the user user For further configuration options please contact the manufacturer Note We recommend that you only change set tings using the touch display built into the printer and only start print jobs from there The serial number can be found on your invoice the packaging o...

Page 52: ...ders Remove the cover on the USB socket 12 on the prin ter and plug in the stick not included Navigate to Settings Import and select the appro priate device Usually it should be USB 1 Select the desired file by tapping on the icon on the left If you import the print file it will also be available on the machine in the future A group can be selected into which the print file is imported ...

Page 53: ...Page 53 If printing is started directly from the USB stick it is only stored temporarily The USB stick can be removed after starting ...

Page 54: ......

Page 55: ...6 Printer menu ...

Page 56: ... tapping the command again In principle successful entries are confir med by a flashing of the title bar The layout consists of a sidebar a header and a display area There are pages and windows Windows only overlay the underlying page By swiping to the left or right you can quickly switch between the most recently accessed pages Note The emergency stop does not ful fil the classic emergency stop f...

Page 57: ...tap ping on the individual buttons the temperatures can be changed Under Speed the print speed can be set as a percen tage with 100 being the speed set in gcode Under Flow the material feed can be set as a per centage 100 corresponds to the material feed set in the gcode All other buttons are links to the respective pages ...

Page 58: ...r part the distance to be travelled can be selected per tap The button can be used to trigger a homing of all axes Axes X Y and Z All motors can be switched off via the button The individual axes can now be moved carefully by hand Re homing of all axles is necessary before further use Note the movement only works if all axes are re ferenced ...

Page 59: ... the left si debar In the lower part the distance to be travelled can be selected per tap The single arrow can be used to move slowly The double arrow can be used to move quickly Note Always extrude in small increments and slowly if in doubt Only use the fast stage if you are sure that no chocolate will be extruded during the movement ...

Page 60: ...Page 60 6 6 Babysteppping 6 5 Pre dose Opens a window for pre dosing chocolate see also chapter 5 6 Opens the page for correcting the nozzle buildplate distance See also chapter 5 8 2 ...

Page 61: ...Z axis after changing the nozzle are also queried Open extruder Moves the piston upwards to open the extru der Change nozzle Moves the printhead to a position that facili tates nozzle replacement Clean piston Guides the user through the necessary steps to remove clean the piston Go to middle Moves the printhead to the centre Home Executes a homing of the selected axes Only individual axes can be r...

Page 62: ...der or the preheater In the next step select the desired type of chocolate The respective temperatures are set and the process is confirmed by an information window Opens a help page with the most important terms and commands This page is for quick reference only If necessary use our user manual or our online help For individual temperatures see chapter 6 2 ...

Page 63: ...ial commands can be triggered or read out Caution Use the command line with caution and only if you know exactly what you are doing It can be used to override security mechanisms Button for sending individual commands Button for sending predefined commands Buttons to show hide certain commands and to pause the display ...

Page 64: ...URL bar of the browser To connect to an existing network select it by tap ping it In addition to the password other settings such as the authentication method the DNS server and the gateway can also be set here Contact your system administrator if necessary After entering the necessary information tap Save and then Connect It may take a few minutes for the connection to be established If no connec...

Page 65: ...point WLAN Password Password of the access point WLAN Channel Channel of the access point WLAN Region Affects the channels available in your coun try Mode Influences whether or when the access point is activated The built in Raspberry Pi does not have a time me mory If the power supply is interrupted and there is no internet connection the time is reset The locale changes the formatting in which t...

Page 66: ...e changed but only changes part of the displayed dialogues To adjust the full language contact the manufacturer or dea ler We recommend leaving the language at factory settings Shows information on the current status of the sys tem Shows information about the current version and up dates if available ...

Page 67: ...7 Maintenance and cleaning ...

Page 68: ... print bed After transport in case of problems with the first layer and at regular intervals the level ling of the print bed should be checked and corrected if necessary Note If the levelling is poor make sure that the print head does not scrape over the bu ildplate This process takes some time and practice The more accurately you do it the fewer pro blems you will have when printing afterwards Th...

Page 69: ...bed to the centre Now carefully move the print head 1 all the way to the left and check the distance there as well If necessary adjust the distance with the knurled screw on the left This causes the entire print bed to tilt to the left or right Repeat the process until the dis tance is the same along the entire width of the print bed Finally check one more time a 3 screen across the entire print b...

Page 70: ...r replaced regularly We recommend replacing the film instead of cleaning it as creases and scratches can cause problems with printing The piston sealing rings cartridge and nozzle can also be cleaned in the dishwasher Pre washing by hand is recommended The buildplate is not dishwasher safe Compressed air may be useful for cleaning or drying the individual parts Please also note the maintenance sch...

Page 71: ...ss which tends to warp with temperature changes e g hot water This can be easily corrected by cooling the outward curved side or heating the inward curved side Warm or cold water or a hairdryer are suitable Check again that the buildplate is now straight in X and Y direction ...

Page 72: ...ing on the cables Please also note the maintenance schedule under 7 6 7 4 Cleaning the printhead Open the door 16 of the extruder 1 remove the nozzle element 14 if necessary and shut down the printer Disconnect the power supply Remove the two screws 18 The screws are symmetrically located on the left and right side of the print head Loosen the screw 19 and push the tube 17 up a little Clean all pa...

Page 73: ...nd temperature sensor can be carefully re moved towards the back Clean them with a damp cloth and some soap The extruder door with heating block can be cleaned under running water if necessary Allow all parts to dry completely before reassemb ling the printhead 1 Reassemble in reverse order Make sure that the cables of the tube 17 point to wards the remaining cables in the left rear corner Caution...

Page 74: ...ork can be carried out by yourself Follow the instructions below and the maintenance schedule Warning Shut down and disconnect the prin ter from the power supply before starting any maintenance work At least every two years the unit must be fully serviced by trained personnel The technical protective devices must be checked as well as the proper condition of mechanical com ponents We offer a maint...

Page 75: ...table for lubri cating the linear guides 7 6 1 Lubricating the linear guides Daily Weekly Every 6 Month Every 2 years Cleaning the nozzle cartridge and piston x Replacing the foil x Cleaning the buildplate x Cleaning the print head If required Cleaning the linear guides x Cleaning the printer If required Levelling the print bed if required or after 3 months Lubricating the linear guides x Cleaning...

Page 76: ...Let the spindle dry completely and reinstall it in re verse order Remove the print head guide 7 and the piston 15 Unscrew the spindle upwards in an anti clockwise di rection Note Do not remove the sliding element 22 from the spindle 7 6 2 Cleaning the extruder spindle ...

Page 77: ...ity The necessary ten sion causes them to elongate over time Up to a certain point this can be compensated for by re tensioning The straps should be tight and produce a deep tone when plucked In no case should play should be present when moving back and forth The belts are replaced during maintenance every two years Check the tension of the Y axis by moving the print bed 2 all the way forward and ...

Page 78: ......

Page 79: ...8 Creating print files choc OS ...

Page 80: ...ne credit corre sponds to one created print file We recommend using choc OS to create all print files The use of other software so called slicers is possible even if they are not optimised for printing with chocolate The use of third party software is at the risk of the customer Some functions may not be available In principle two modes are available Bar Mode For printing not necessarily connected...

Page 81: ... saved in Presets Production Outline provides a 2D curve for down load This can be used e g for adjustments or packa ging Quantity allows you to set how many duplicates are printed in a job Fill bed places as many copies of the same object as possible in the available print area By clicking Prepare G Code and then confirming the actual file is created At this point one credit is consumed The file ...

Page 82: ......

Page 83: ...9 Additional information ...

Page 84: ... 483x468x718 mm WxLxH Active 483x545x718 mm Print bed moves back and forth WxLxH Shipping box 600x600x670mm WxLxH Weight 11 kg Shipping weight 20 kg Temperature Storage temperature 0 40 C Ambient temperature 18 22 C Heating max 45 C Power supply Power supply MeanWell GST60A24 Input 90 264VAC 47 63Hz Output 60W 2 5A 24V DC Insulation class I Fuse protection Short circuit Overload Overvoltage Temper...

Page 85: ...ter in its original pa ckaging To simplify the process there is a command that moves all axes to the appropriate posi tion so that it fits back into the original packa ging You can find it under Quick Commands Transport Final decommissioning If the choc mate 2 is no longer to be used or if it is damaged beyond repair take the choc mate 2 out of service 3D printer components can contain valua ble e...

Page 86: ... Operation You must not disconnect the unit from the mains during operation This can lead to data loss software and hardware damage Other The information contained in these operating instructions is correct at the time of going to press However we reserve the right to make changes at any time without notice If there is new software for your machine that affects the operating instructions e g chang...

Page 87: ...m internal or external storage media The software installed on the unit product ex works is functional and of the quality usual for this type Possible errors cannot be com pletely ruled out technically in the develop ment of software However the software supplied is only defective if it is not usable for normal use with the device product A merely insignificant reduction in quality shall not be ta...

Page 88: ...Page 88 ...

Reviews: