Chimei TL-24L6000T User Manual Download Page 24


............................................................................................................................................................. 23


Other Information

Trouble-shooting 


Only under the TV mode. This product requires an optional LCD TV box to enable the TV function.


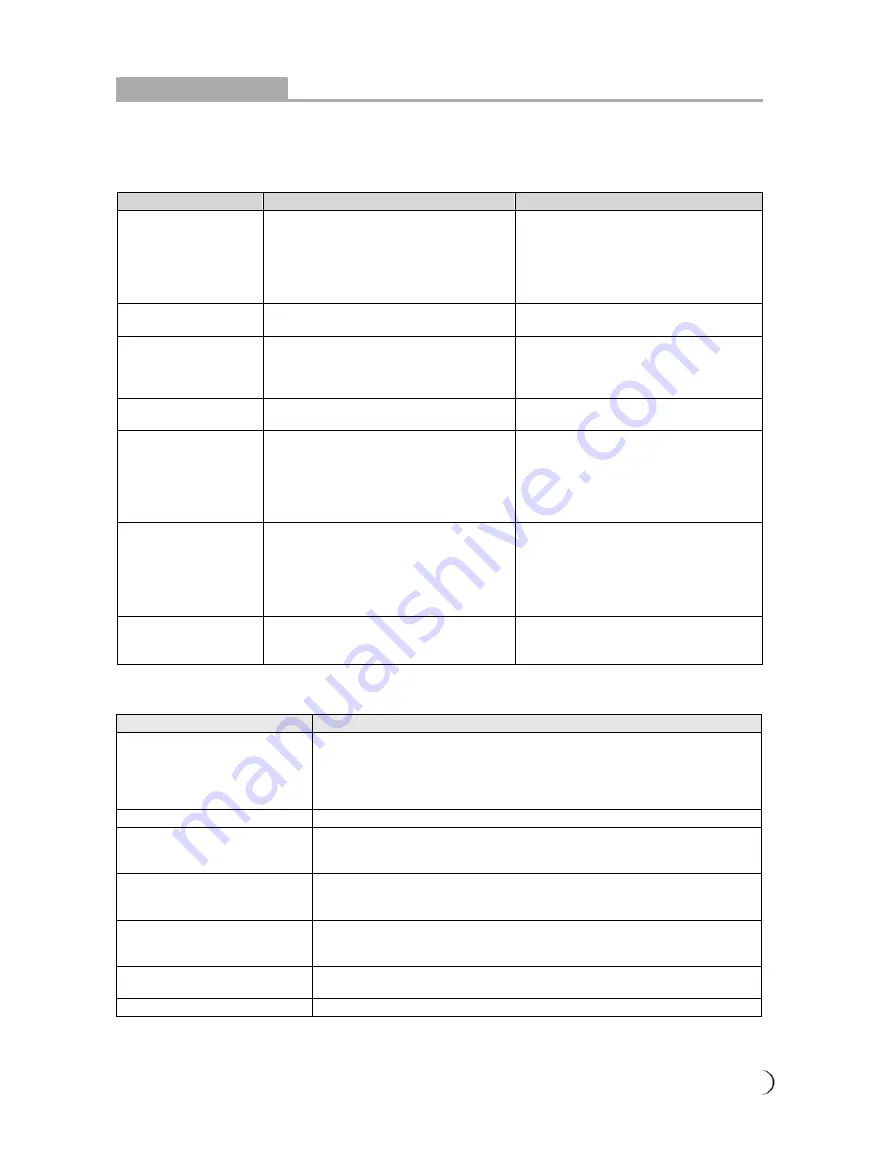
The following table contains the common problems and the solutions to these problems. Please check 
this list before you contact technicians. 


Problems 

Reasons 

Solutions 

No picture 

1. Did you connect the power cord? 
2. Did you turn on the power? 
3. Is the signal cable connected 

correctly? 

4. Is the screen in energy-saving 

mode? 

1. Connect power cord correctly. 
2. Turn on power. 
3. Connect signal cable correctly. 
 
4. Press any button on the computer. 

Abnormal colors 

1. Is the signal cable connected 

correctly? 

1. Connect signal cable correctly. 

Twisted picture 

1. Is the signal cable connected 

correctly? 

2. Is signal input over the maximum of 

frequency range? 

1. Connect signal cable correctly. 
2. Please use the signal within the 

frequency range. 

Picture too dark 

1. Are brightness and contrast set at the 

lowest level? 

1. Adjust brightness and contrast. 

Audio only, no images

1. Is input signal connected correctly? 
2. Is the TV signal too weak? 

1. Please check if input signal is 

connected correctly. 

2. Please check if signal is connected 

correctly. 

3. The TV-RF signal needs to be over 

50 dB. 

Picture only, no audio 

1. Is the signal cable connected 

correctly? 

2. Is volume at the minimum level? 
3. Is audio signal cable not connected?
4. Is the TV signal too weak? 

1. Connect signal cable correctly. 
2. Adjust volume to proper level. 
3. Connect audio signal cable 

correctly. 

4. The TV-RF signal needs to be over 

50 dB. 

Cannot use remote 
control 

1. Is the battery dead? 
2. Is there any disturbance from static 

or thunder? 

1. Please change battery. 
2. Turn off the power and wait for 10 

seconds; and then restart the power.


The following table contains common problems and solutions to these problems.


Problems 

Possible solutions 

Can’t receive enough 
channels with the antenna. 

Check the cable connection. Make sure it is connected firmly. 
Please use multi-directional outdoor antenna. (If your TV is subject to 
the influence of nearby mountains or buildings) 
Please use the automatic scanning function to increase the number of 
channels not included in memory. 

No colors 

Please adjust the color setup. 

Blinking picture accompanied 
by ghost image 

Check the connection of antenna/signal cable. 
Check if channel is in play mode. 
Press signal source and change input mode. 

Broken lines or segments 

Adjust antenna. 
Keep the TV away from noise sources: Such as automobiles, neon 
lights, and hair dryers. 

Certain TV channels are 
blocked (Hope to acquire 
some channels) 

Please use the automatic scanning function to increase the number of 
channels not included in memory. 

Overlapping images or ghost 
images 

Please use multi-directional outdoor antenna. (If your TV is subject to 
the influence of nearby mountains or buildings) 

Cannot use a function 

If the item you choose turns gray, that item cannot be selected. 


If you have further questions after reading the above descriptions, please contact your local 
distributor’s “Customer Service Centre”. 

Summary of Contents for TL-24L6000T

Page 1: ......

Page 2: ...ice 05 Descriptions and accessories 06 Operation of Multimedia LCD Display Connectors and sockets 07 Control panel 12 Remote Control 13 Favorite Channels 15 LCD Display Menu Advanced LCD Display menu...

Page 3: ...plied with the apparatus When a cart is used use caution when moving the cart apparatus combination to avoid injury from tip over 4 When transporting the Multimedia LCD Display be sure to carry it by...

Page 4: ...cord immediately 5 Prevent the power cord from being pressed or kinked by a foreign object Do not bundle or roll up the power cord to avoid dissipation interruption Keep your Multimedia LCD Display aw...

Page 5: ...available in the market we cannot provide guarantee for the LCD Display panel free from bright spots Your understanding will be appreciated 3 As this model features a self protection mechanism users h...

Page 6: ...al solid waste disposal authority 1 If any of following occurs unplug the Multimedia LCD Display and contact your distributor or qualified service personnel from the original manufacturer to repair th...

Page 7: ...C Anti tip Precaution In order to prevent this equipment from falling over in case of unexpected natural disasters or serious accidents you are advised to use the anti tip auxiliary screw holes for se...

Page 8: ...gnals come through HDMI input the DVI connection wire for HDMI shall be used and the sound connection shares the VGA sound input terminal VGA terminal VGA terminal and Audio Input Can be connected to...

Page 9: ...erminal Connects to devices with the AV terminal composite signal and audio R right L left output Connects to devices with composite S Video Y C terminal and audio R right L left output Component Comp...

Page 10: ...09 Operation of Multimedia LCD Display Connectors and sockets Antenna Connectors Port Functions Analog signal input Connected to analog TV antenna Analog signal input Antenna...

Page 11: ...he power and press the other end to turn off the power 3 Press the POWER button on the front lower right of the TV to turn on or off Multimedia LCD Display When the power is ON the LED indicator will...

Page 12: ...anel of the Multimedia LCD Display to select the TV mode 2 Press the Menu button to open the OSD On Screen Display screen 3 Press the button to select TV Then press the button to move to the Channel S...

Page 13: ...ENU mode the function works as Up and Down buttons of the selection function VOL ADJUST W X Volume Adjustment Use the VOLUME button to adjust the volume of the Multimedia LCD Display Under the MENU mo...

Page 14: ...d 8 RETURN Return to the previous channel 9 ENTER When entering CH 1 to CH 9 you may just enter number 1 to 9 and wait for a few seconds for auto changing or you may simply press number 1 to 9 then th...

Page 15: ...ncluding Vivid Movie Sport Game User modes 17 MTS The MTS modes include STEREO MONO SAP If no second language is available to be chosen from the received signals the MONO audio output will apply 18 EP...

Page 16: ...trol and move to the position to be remembered 4 Press the button to finish favorite channel adding 5 The position will display the channel that you previously set The position not set will display 0...

Page 17: ...ions PICTURE According to the type of TV program you are watching it provides more picture modes and functions for adjusting color and brightness ADVANCE According to the type of program you are watch...

Page 18: ...5 Press the menu button to exit the screen Menu Descriptions Contrast Press the WX buttons to increase or decrease the picture contrast Brightness Press the WX buttons to make the picture brighter or...

Page 19: ...rm Super Contrast Press the WX buttons to adjust the contrast of picture Off Low Middle High PC DVI VGA model does not support the function Opening Super Contrast function may cause slight brightness...

Page 20: ...uttons on the remote control to adjust the value of the item 5 Press the menu button to exit the screen Menu Descriptions Balance Press the WX buttons to adjust the balance between left and right spea...

Page 21: ...just the value of the item 5 Press the menu button to exit the screen Menu Descriptions Channel Scan In the Channel Scan option press the Enter button to execute the auto channel scan The auto channel...

Page 22: ...djustment you can use this function to fine tune V Position Press the ST buttons to adjust the screen location vertically If the vertical position is still misplaced after automatic adjustment you can...

Page 23: ...anguage Press the WX buttons to select language English Traditional Chinese OSD Background Press the WX buttons to adjust the OSD background Opaque Half transparent Noise Reduction Press the WX button...

Page 24: ...st volume to proper level 3 Connect audio signal cable correctly 4 The TV RF signal needs to be over 50 dB Cannot use remote control 1 Is the battery dead 2 Is there any disturbance from static or thu...

Page 25: ...system Audio system Stereo Mono SAP PC Support Timing VGA DVI 720x400 70Hz 640x480 60Hz 800x600 60Hz 1024x768 60Hz 1920x1080 60Hz native HDMI Scanning format Video 1280x720p 60Hz 1920x1080i 60Hz 1080...

Reviews: