Chimei TL-24L6000T User Manual Download Page 15


14 ................................................................................................................................................................ 

Multimedia LCD DISPLAY installation & operation
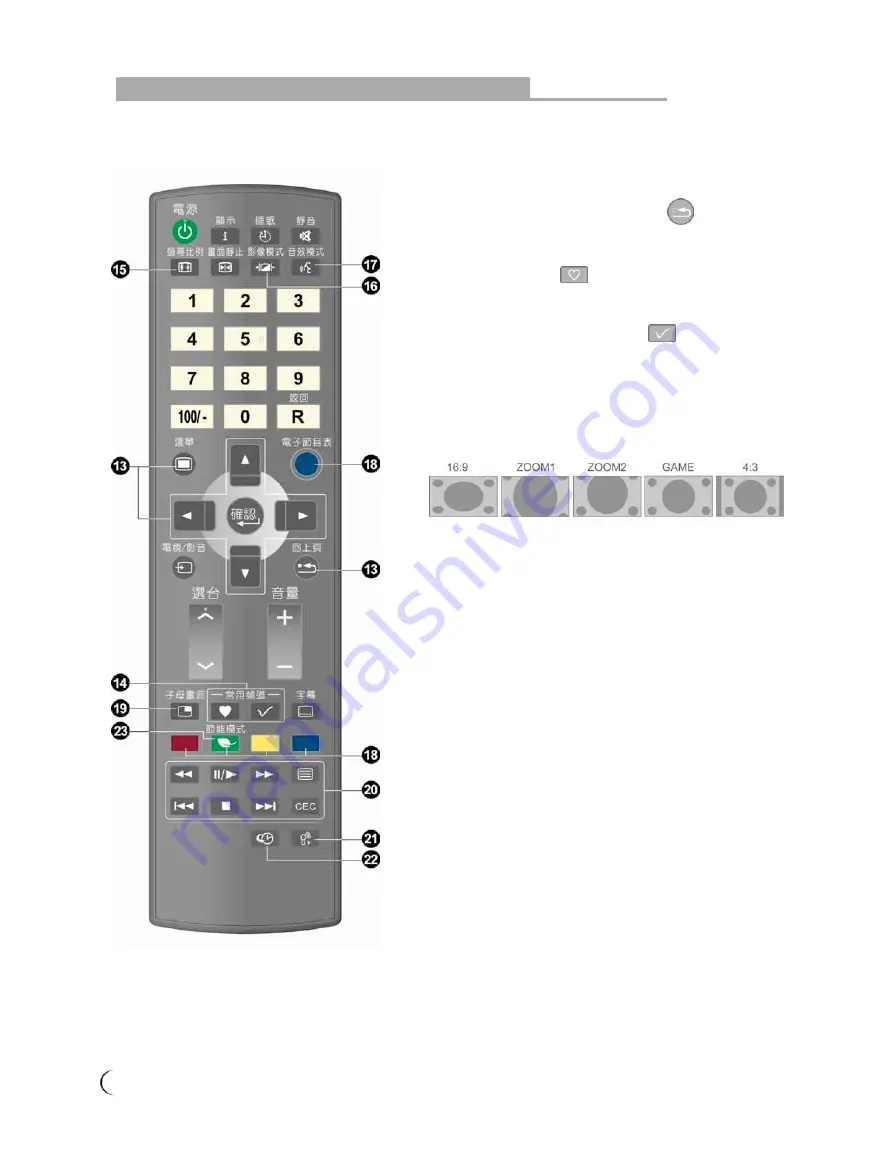
Remote Control 


13.<MENU> and Adjustment button 

STWX

 and 

Back 

This allows you to activate the menu of the 
Multimedia LCD Display. Press again to exit the 
menu. Use the 

STWX

 button to select the menu 

item and adjust its setting. Press the “

” button to 

return to the last page. 

 
14. Favorite  Channels 


To display the “Favorite Channels” in order of your 
previous setup. 

Favorite channel editing button


.


For adding, deleting, or changing channels 


Refer to Page 16 for more information about operation. 

15. ASPECT


The ASPECT modes include: 


16:9/Zoom 1/Zoom 2/Game/4:3. 


16. PICTURE 

For advanced picture setup, including 
Vivid/Movie/Sport/Game/User modes.


17. MTS


The MTS modes include STEREO/MONO/SAP. 
If no second language is available to be chosen 
from the received signals, the MONO audio output 
will apply. 

18. 

EPG


(This function is only available for models with digital 
TV function)


19.

 PIP (Picture in picture) 

Display PIP Function Menu.


(Only for PIP function supported devices)


Not available for this model.


20. CEC <Consumer Electronics Control> 

Linked with a CEC function supported device to take 
control for operation. 
(Only for CEC function supported devices) 

21. Reserved 

22. Time-Shift 

To record real-time while watching the TV. 
(Only for Time-shift function supported devices) 

23. Energy  Saving  Mode 

Power Saving function. The screen brightness will 
decrease dramatically on this mode. It includes: 
On/Off. 
(Only for energy-saving function supported devices) 


Summary of Contents for TL-24L6000T

Page 1: ......

Page 2: ...ice 05 Descriptions and accessories 06 Operation of Multimedia LCD Display Connectors and sockets 07 Control panel 12 Remote Control 13 Favorite Channels 15 LCD Display Menu Advanced LCD Display menu...

Page 3: ...plied with the apparatus When a cart is used use caution when moving the cart apparatus combination to avoid injury from tip over 4 When transporting the Multimedia LCD Display be sure to carry it by...

Page 4: ...cord immediately 5 Prevent the power cord from being pressed or kinked by a foreign object Do not bundle or roll up the power cord to avoid dissipation interruption Keep your Multimedia LCD Display aw...

Page 5: ...available in the market we cannot provide guarantee for the LCD Display panel free from bright spots Your understanding will be appreciated 3 As this model features a self protection mechanism users h...

Page 6: ...al solid waste disposal authority 1 If any of following occurs unplug the Multimedia LCD Display and contact your distributor or qualified service personnel from the original manufacturer to repair th...

Page 7: ...C Anti tip Precaution In order to prevent this equipment from falling over in case of unexpected natural disasters or serious accidents you are advised to use the anti tip auxiliary screw holes for se...

Page 8: ...gnals come through HDMI input the DVI connection wire for HDMI shall be used and the sound connection shares the VGA sound input terminal VGA terminal VGA terminal and Audio Input Can be connected to...

Page 9: ...erminal Connects to devices with the AV terminal composite signal and audio R right L left output Connects to devices with composite S Video Y C terminal and audio R right L left output Component Comp...

Page 10: ...09 Operation of Multimedia LCD Display Connectors and sockets Antenna Connectors Port Functions Analog signal input Connected to analog TV antenna Analog signal input Antenna...

Page 11: ...he power and press the other end to turn off the power 3 Press the POWER button on the front lower right of the TV to turn on or off Multimedia LCD Display When the power is ON the LED indicator will...

Page 12: ...anel of the Multimedia LCD Display to select the TV mode 2 Press the Menu button to open the OSD On Screen Display screen 3 Press the button to select TV Then press the button to move to the Channel S...

Page 13: ...ENU mode the function works as Up and Down buttons of the selection function VOL ADJUST W X Volume Adjustment Use the VOLUME button to adjust the volume of the Multimedia LCD Display Under the MENU mo...

Page 14: ...d 8 RETURN Return to the previous channel 9 ENTER When entering CH 1 to CH 9 you may just enter number 1 to 9 and wait for a few seconds for auto changing or you may simply press number 1 to 9 then th...

Page 15: ...ncluding Vivid Movie Sport Game User modes 17 MTS The MTS modes include STEREO MONO SAP If no second language is available to be chosen from the received signals the MONO audio output will apply 18 EP...

Page 16: ...trol and move to the position to be remembered 4 Press the button to finish favorite channel adding 5 The position will display the channel that you previously set The position not set will display 0...

Page 17: ...ions PICTURE According to the type of TV program you are watching it provides more picture modes and functions for adjusting color and brightness ADVANCE According to the type of program you are watch...

Page 18: ...5 Press the menu button to exit the screen Menu Descriptions Contrast Press the WX buttons to increase or decrease the picture contrast Brightness Press the WX buttons to make the picture brighter or...

Page 19: ...rm Super Contrast Press the WX buttons to adjust the contrast of picture Off Low Middle High PC DVI VGA model does not support the function Opening Super Contrast function may cause slight brightness...

Page 20: ...uttons on the remote control to adjust the value of the item 5 Press the menu button to exit the screen Menu Descriptions Balance Press the WX buttons to adjust the balance between left and right spea...

Page 21: ...just the value of the item 5 Press the menu button to exit the screen Menu Descriptions Channel Scan In the Channel Scan option press the Enter button to execute the auto channel scan The auto channel...

Page 22: ...djustment you can use this function to fine tune V Position Press the ST buttons to adjust the screen location vertically If the vertical position is still misplaced after automatic adjustment you can...

Page 23: ...anguage Press the WX buttons to select language English Traditional Chinese OSD Background Press the WX buttons to adjust the OSD background Opaque Half transparent Noise Reduction Press the WX button...

Page 24: ...st volume to proper level 3 Connect audio signal cable correctly 4 The TV RF signal needs to be over 50 dB Cannot use remote control 1 Is the battery dead 2 Is there any disturbance from static or thu...

Page 25: ...system Audio system Stereo Mono SAP PC Support Timing VGA DVI 720x400 70Hz 640x480 60Hz 800x600 60Hz 1024x768 60Hz 1920x1080 60Hz native HDMI Scanning format Video 1280x720p 60Hz 1920x1080i 60Hz 1080...

Reviews: