Page 17
'Gateway’
Allows the user to change the Gateway address interface for the local connection.
‘Enable TCP/UDP User
Command Acknowledge’
If enabled, replies with a two byte acknowledge if a user command is sent to the
microDAQ over TCP or UDP.
Ethernet Initialisation Check
Timeouts(0-30 sec)
At bootup the Ethernet module performs two checks for auto negotiation and link
check status. This timeout can be controlled via this text box. If Ethernet comms are
not going to be used then this value can be set at 0 to speed up startup time.
Auto Broadcast UDP message
on boot (port 10001)
If checked, auto broadcasts a UDP message on port 10001 on startup which details
the microDAQs serial number, IP address, etc. in an ASCII, comma separated list.
(should not be used if remote UDP address/port has been configured and auto
streaming has been set – via TCP rate on Standard tab)
BRP, TSEG1, TSEG2, SJW
Register values for the CAN module within microDAQs microcontroller.
Table 5.9, Advanced communication settings
5.7.3 Miscellaneous
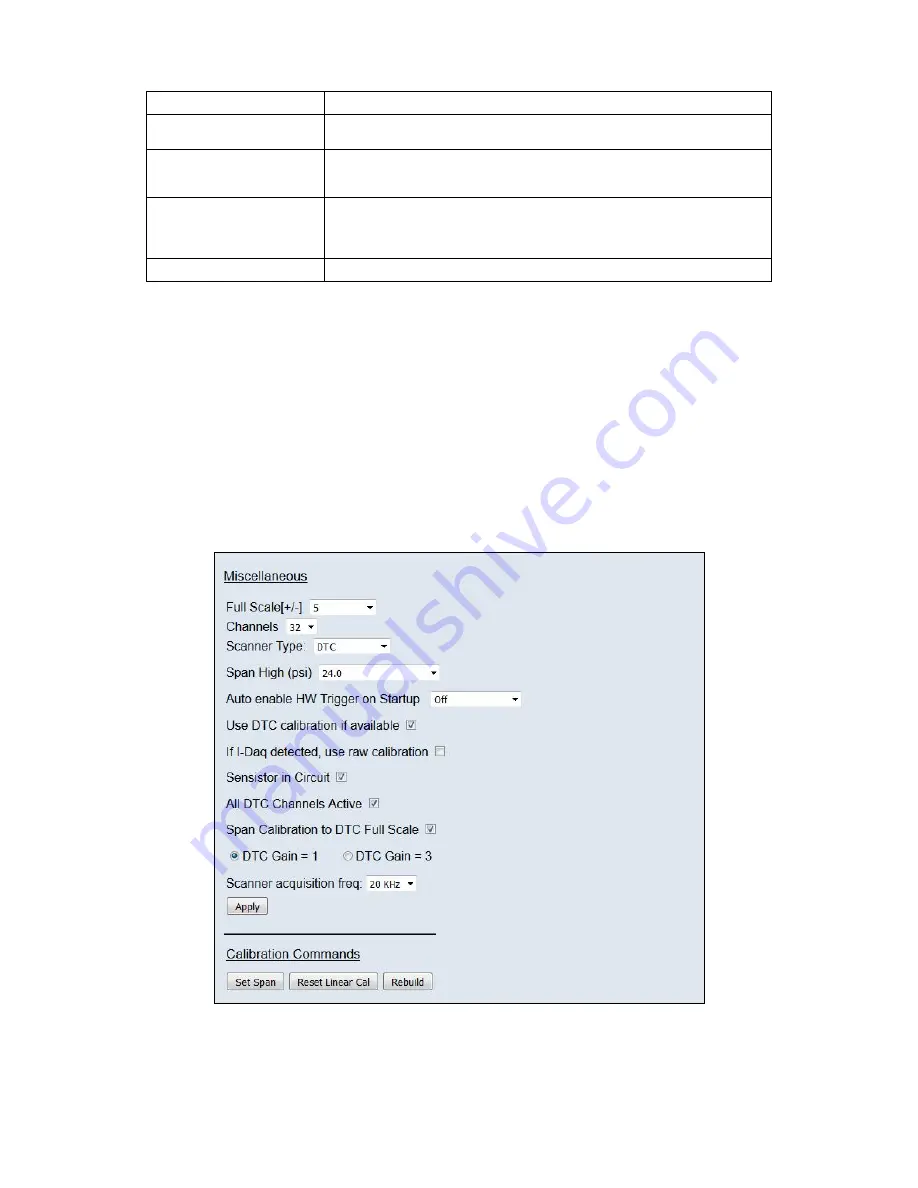
The remaining parameters are edited via the Miscellaneous group shown in Figure 5.7. The
scanner type should always be set to the type of scanner installed in the microDAQ to ensure
proper operation of the system. If the microDAQ is a DTC variant and DTC mode is to be used, the
'Use DTC' checkbox should be checked. If the microDAQ is an I-daq variant then the ‘use raw
calibration’ checkbox can be ticked to apply a linear calibration function on boot up. The DTC
scanner's options of sensistor and gain configuration may also be selected from this tab. 'All DTC
Channels Active', defaults the number of active channels to all on a DTC scanner, overriding the
number in the setup. The scanner acquisition frequency can be toggled between 20KHz & 50KHz.
The latter should be used in most cases to allow for faster data streaming, however 20KHz is
provided for older scanners that only have Gen1 headers.
Figure 5.11, Miscellaneous group.


