background image

Alternatively, you can change state, from DVR to Live or vice versa, by Right-Click in the window. 

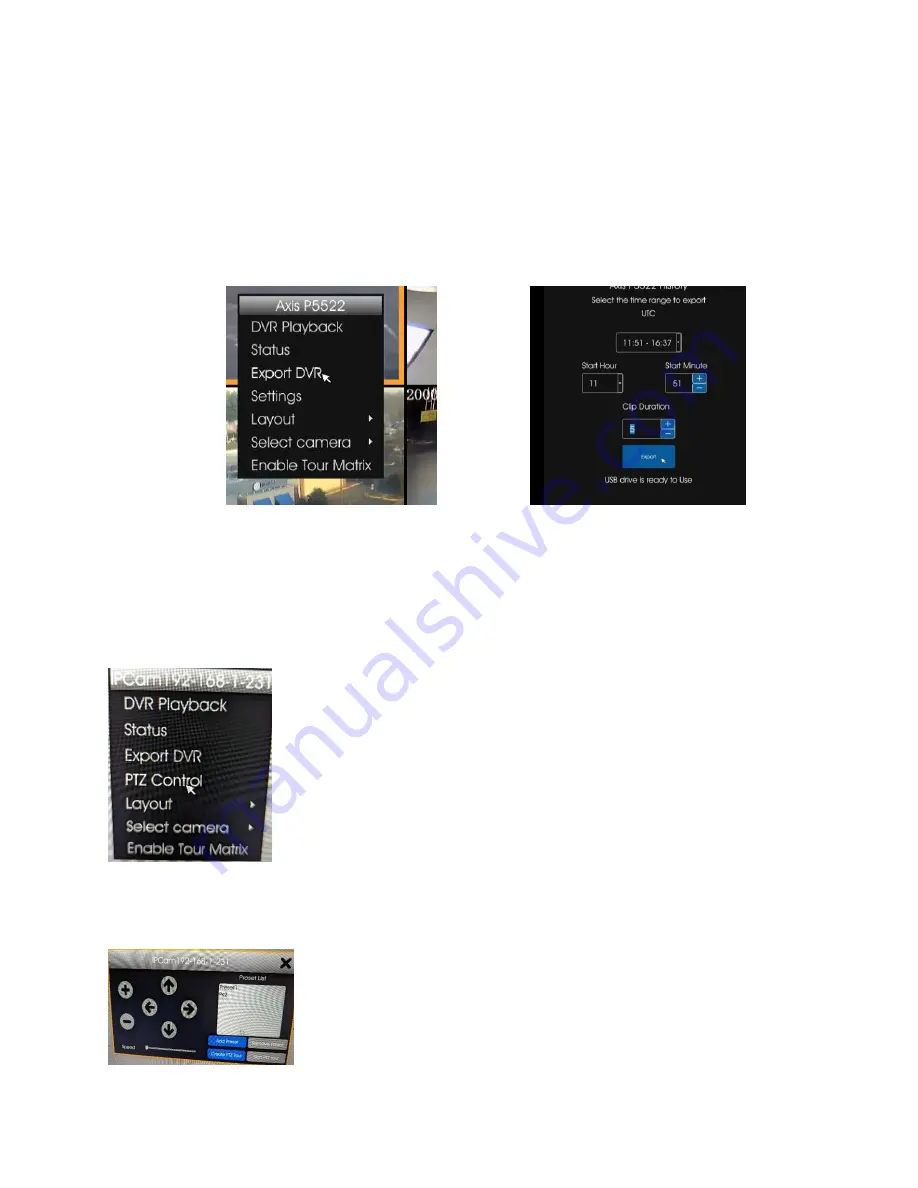
Local DVR Export to Thumb Drive: 

To Export DVR footage to an external drive for later playback, please follow these steps: 


Plug a FAT-

32 formatted, thumb drive in to the USB port on the front panel’s USB port.  

NOTE: USB storage must 

be formatted to FAT32 to be compatible.  FAT32 requires that the storage device cannot exceed 32GB.  If your 

device is larger than 32GB you will need to be partitioned it before you can format it to FAT32.


Click and highlight the correct camera. Right-

click the mouse to bring up the menu and select “Export DVR”. 

Select the date in the calend

ar, the start time, and the duration.  Click “Export” to complete the back up.


PTZ Control 

 Preset and Tours 

To move the Pan Tilt Zoom (PTZ) cameras and set up presets you will need to follow these steps. 


Access the PTZ menu by Right-Clicking on the mouse and select the PTZ menu. 


Then you can use the arrows and +/- to move the camera around and zoom in / out.   

o


To create a preset (steps of the PTZ tour), you move the camera to position and name that position 

(preset) by clicking Add Preset. 


Once you have created all the presets, you can set the preset order and duration (dwell time) for each preset. 


Summary of Contents for G1104-8-6T

Page 1: ...teway has connectors on both sides The primary connectors are found on the back panel To install the Gateway make the following connections to the Gateway Ethernet cable to the router Note Do not connect the CV4IP to a POE port on a router switch Power is provided by the included power supply Providing power via a POE port to the WAN connection on the device will damage the Gateway HDMI supported ...

Page 2: ...era s Video Settings to work with the Gateway The parameters are o Bitrate to less than 4Mbps o Frame rate to a multiple of 5 fps to a maximum of 30 fps o GOV length to 2X the frame rate OR i frame interval of 2 seconds o Resolution up to 8MP o Profile Main preferred or High The optimal settings are 4MP resolution 10 fps 20 GOV and a bitrate of 2500 If you are adding cameras with different setting...

Page 3: ...se the Validation Tool can be found at www check video com support ONVIF Device Manager An alternative to CheckVideo s IP Camera Validation tool is ONVIF Device Manager If your camera s management tools do not display the option to change all of the settings required by CheckVideo and you were not successful changing those settings with the Camera Validation tool you may find the ONVIF Device Mana...

Page 4: ...this point all cameras visible on the Gateway s network will appear at the top of Assign IP Cameras image carousel The default camera name is created using the local internal IP address of that camera If a background image could be obtained via the ONVIF credentials the camera view will appear If not a blue box will appear This does not mean that there is anything necessarily wrong It is possible ...

Page 5: ...ated click Verify to complete assignment of camera to the Gateway Once all cameras have been assigned to the Gateway go to Devices Configure Device Select the CV4IP from the dropdown and begin setting the Event zones schedule and notifications for each camera Remember to Save at the completion of each camera s configuration Local Video Matrix Setup Once the cameras are assigned to the CV4IP in the...

Page 6: ...ew camera settings including resolution and frame rate Configure PTZ camera settings for those discovered via ONVIF PTZ controls are found under Settings There are several display options available outside of the Menu To view a camera in full screen single window Double Left Click To exit full screen Double Left Click Digital Zoom on an object Left Click and hold to drag the red box over the objec...

Page 7: ... FAT32 Click and highlight the correct camera Right click the mouse to bring up the menu and select Export DVR Select the date in the calendar the start time and the duration Click Export to complete the back up PTZ Control Preset and Tours To move the Pan Tilt Zoom PTZ cameras and set up presets you will need to follow these steps Access the PTZ menu by Right Clicking on the mouse and select the ...

Page 8: ...click Save Tour Then Start PTZ Tour to begin the camera to move through the presets Click Stop PTZ Tour to stop the camera from moving automatically o NOTE You can also control PTZ functions and setup tours in the camera menu itself ...

Reviews: