background image


To discover cameras, enter the correct ONVIF user name and password for cameras on your network and click 

“Find Cameras”. If there are different username/password combinations enter each in turn and click Find Cam-

eras to discover additional cameras. If the camera does not support ONVIF or if ONVIF discovery is blocked by 

the network, you can use the + icon to add cameras by IP address or RTSP URL. 


Validation Tool User Guide: How to Steps 

o


Once cameras are discovered, this Tool will help test compatibility and configure new and existing 3

rd


party cameras.  Detailed instruction for how to use the Validation Tool can be found at 

www.check-

video.com/support

. 

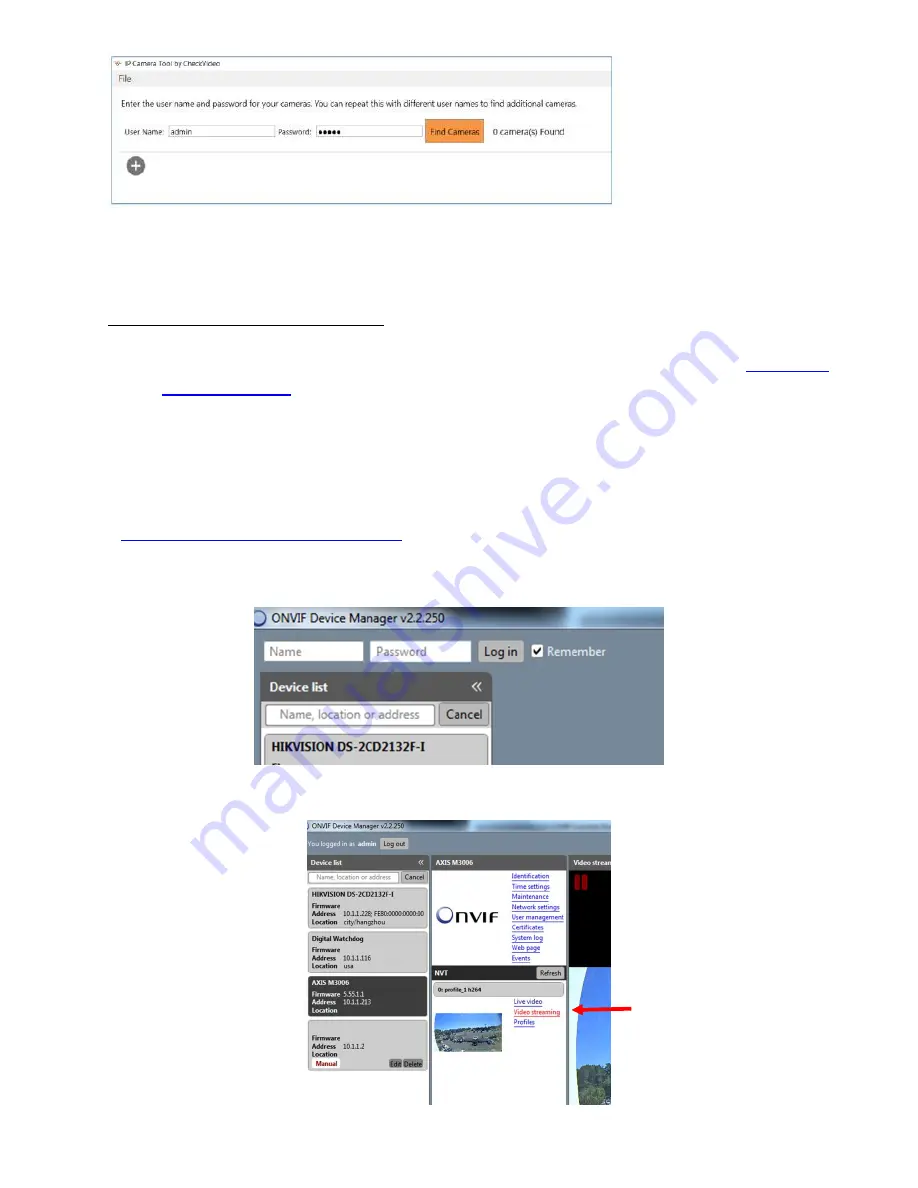
ONVIF Device Manager: 

An alternative to CheckVideo

’s

 IP Camera Validation tool is ONVIF Device Manager.  

If your camera’s management tools 

do not display the option to change all of the settings required by CheckVideo and you were not successful changing 

those settings with the Camera Validation tool , you may find the ONVIF Device Manager helpful.  You can install this 

tool fro

http://sourceforge.net/projects/onvifdm/

Once installed, start the program and enter the 3

rd


party camera’s 

admin access credentials in to the ONVIF Device Manager interface.  You can get these credentials from the camera 

manufacturer. 


Select the camera from the list of visible cameras on the left side of the screen.  Click on the Video Streaming link. 


Summary of Contents for G1104-8-6T

Page 1: ...teway has connectors on both sides The primary connectors are found on the back panel To install the Gateway make the following connections to the Gateway Ethernet cable to the router Note Do not connect the CV4IP to a POE port on a router switch Power is provided by the included power supply Providing power via a POE port to the WAN connection on the device will damage the Gateway HDMI supported ...

Page 2: ...era s Video Settings to work with the Gateway The parameters are o Bitrate to less than 4Mbps o Frame rate to a multiple of 5 fps to a maximum of 30 fps o GOV length to 2X the frame rate OR i frame interval of 2 seconds o Resolution up to 8MP o Profile Main preferred or High The optimal settings are 4MP resolution 10 fps 20 GOV and a bitrate of 2500 If you are adding cameras with different setting...

Page 3: ...se the Validation Tool can be found at www check video com support ONVIF Device Manager An alternative to CheckVideo s IP Camera Validation tool is ONVIF Device Manager If your camera s management tools do not display the option to change all of the settings required by CheckVideo and you were not successful changing those settings with the Camera Validation tool you may find the ONVIF Device Mana...

Page 4: ...this point all cameras visible on the Gateway s network will appear at the top of Assign IP Cameras image carousel The default camera name is created using the local internal IP address of that camera If a background image could be obtained via the ONVIF credentials the camera view will appear If not a blue box will appear This does not mean that there is anything necessarily wrong It is possible ...

Page 5: ...ated click Verify to complete assignment of camera to the Gateway Once all cameras have been assigned to the Gateway go to Devices Configure Device Select the CV4IP from the dropdown and begin setting the Event zones schedule and notifications for each camera Remember to Save at the completion of each camera s configuration Local Video Matrix Setup Once the cameras are assigned to the CV4IP in the...

Page 6: ...ew camera settings including resolution and frame rate Configure PTZ camera settings for those discovered via ONVIF PTZ controls are found under Settings There are several display options available outside of the Menu To view a camera in full screen single window Double Left Click To exit full screen Double Left Click Digital Zoom on an object Left Click and hold to drag the red box over the objec...

Page 7: ... FAT32 Click and highlight the correct camera Right click the mouse to bring up the menu and select Export DVR Select the date in the calendar the start time and the duration Click Export to complete the back up PTZ Control Preset and Tours To move the Pan Tilt Zoom PTZ cameras and set up presets you will need to follow these steps Access the PTZ menu by Right Clicking on the mouse and select the ...

Page 8: ...click Save Tour Then Start PTZ Tour to begin the camera to move through the presets Click Stop PTZ Tour to stop the camera from moving automatically o NOTE You can also control PTZ functions and setup tours in the camera menu itself ...

Reviews: