background image

QUICK REFERENCE GUIDE  |  

ONLINE POS TERMINAL

  |  19

SETTLE OPEN TRANSACTIONS

 — QUICK BATCH VIEW

Remember:

 You must settle transactions in order to receive funding.  

Debit and gift card transactions are settled automatically at 5 a.m. EST. 
Credit card transactions can be auto-settled or settled manually.  
Unsettled transactions will remain in an 

open

 status view for four months.

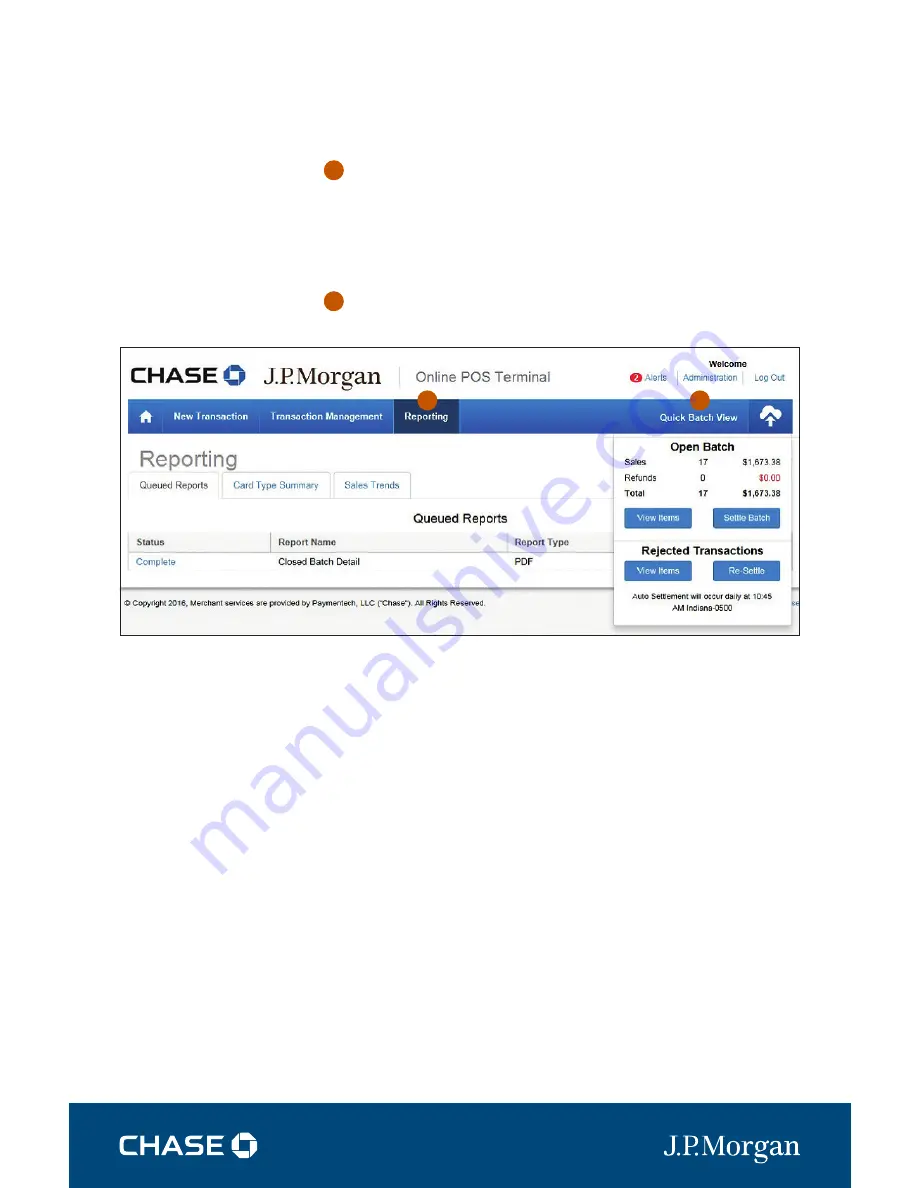
QUICK BATCH VIEW — NEW WITH ONLINE POS!

REPORTING

New with Online POS Terminal — if you did not enable  

Auto Settlement

, you can select the 

Quick Batch View/Cloud Icon


to manually settle your batch.

6

3

3

6

NOTE:

You can 

View Items

,  

and select 

Settle Batch


to quickly close your 
batch. You can view 

Rejected Transactions

,  

and 

Re-Settle 

Transactions

 too.

Summary of Contents for iPP 320 PIN Pad

Page 1: ...pleased to announce an enhanced version of our iTerminal Product that will support card present EMV chip card transactions PIN debit and select mobile wallets This guide can be used to set up the Online POS Terminal explain the iPP 320 PIN Pad features and familiarize you with the new web application revised transaction flow iPP 320 PIN Pad ...

Page 2: ...S iPP 320 PIN Pad SOFTWARE SECURITY The software on this terminal has been secured This will protect it from both inadvertent overwriting and malicious tampering If you need help with changes or updates please contact a representative at our service desk ...

Page 3: ...date to Java 8 4 Login 6 Navigating the Online POS Terminal 7 Setup 8 Process a Transaction 15 Print Email or Text Receipts 17 Process a Refund or Credit Transaction 18 Auto Settle and Settle Open Transactions 19 Back Office 20 Reporting 24 Support 30 CONTENTS ...

Page 4: ...t time users 3 Log in using chase com OnlinePosTerminal and follow the instructions Bookmark this link for future easy access 4 Enter credentials if you are a current iTerminal user enter your existing User Name and Password and click Secure Login 5 If you are a new client please enter the User Name and Temporary Password you received via email 6 Follow the Login and Setup directions on the follow...

Page 5: ...ll Java version 2 Click the Blue Box when completed 5 Select Launch OPT to log in to Online POS Terminal 4 Select 1 Java Download follow prompts click on Download Install Successful when complete 6 You will be presented the Secure Login screen Follow the instructions on the next page to log in ...

Page 6: ...ter your User Name and Temporary Password you received via email 3 Click the Secure Login button 4 You will be instructed to enter a new Password and answer Security Questions as a first time user For future access create a bookmarked link to the Online POS Terminal using chase com OnlinePosTerminal after you complete the Java Walkthrough ...

Page 7: ...fund transactions if the batch is closed REPORTING View or print reporting ALERTS We send you alerts if your PIN pad needs a new software release You will also receive an alert if a transaction is rejected ADMINISTRATION Here you configure your sale refund receipt and settlement settings This is in the Setup Instructions QUICK BATCH VIEW Click the Cloud Icon to manually settle your batch We recomm...

Page 8: ...chant ID MID or Terminal ID TID you can select which ID you want as your default ID Highlight the Merchant DBA Name and click Save Changes 7 GEAR ICON If you have more than one Merchant ID or Terminal ID click on the Gear Icon and select DBA Name in the drop down menu to set as your default ID 7 ...

Page 9: ...y clicking the New Transaction tab ENTRY MODE Click on Entry Mode to choose the iPP 320 PIN pad or Manual Entry from the drop down menu Choose iPP 320 PIN pad to process chip magnetic stripe and contactless card transactions Select Manual Entry if you need to manually enter card information 1 A 1 A ...

Page 10: ...rmissions to perform the following actions for both first time setup as well as on the fly adjustments GENERAL Allows you to change the default Merchant ID MID and Terminal ID TID combination 5 A A 5 ç NOTE The Default Merchant ID you set under the Gear Icon earlier is displayed here A NOTE You can set your Default ID in Administration too ...

Page 11: ...RENCE GUIDE ONLINE POS TERMINAL 11 SETUP ADMINISTRATION ADMINISTRATION TRANSACTIONS Select Hide or Show display to determine which fields will appear on your Sale Screen 5 B 5 B è NOTE Click Update when complete ...

Page 12: ... REFERENCE GUIDE ONLINE POS TERMINAL 12 SETUP ADMINISTRATION ADMINISTRATION RECEIPTS Add a Logo change the Header and Footer information that prints on your receipts 5 C 5 C è NOTE Click Update when complete ...

Page 13: ...ION NOTE We recommend enabling Auto Settlement Your daily batch will be closed and settled automatically ADMINISTRATION SETTLEMENT Enable or disable Auto Settlement and adjust the Time and Time Zone of when to Auto Settle 5 D 5 D è NOTE Click Update when complete ...

Page 14: ... To view PIN Pad information you can choose a Device Name for your iPP 320 and perform EMV Software Downloads you receive software updates through the Alerts link too 5 E 5 E é NOTE If you have more than one iPP 320 PIN pad create a Device Name so you always know what device is connected to your PC ...

Page 15: ...ring the setup process 1 2 3 4 PROCESS A TRANSACTION NEW TRANSACTION SALE You are now ready to process a transaction Be sure you selected your Entry Mode See page 9 1 Click the New Transaction tab 2 Select the transaction type for example Sale 3 Complete the required Sale Information fields marked with an 4 Click Checkout when complete 1 ...

Page 16: ... sure you selected your Entry Mode iPP 320 under the Gear Icon The iPP 320 PIN Pad Display Screen will ask your client to choose their method of entry Insert Chip Card Transaction Swipe Swipe Card no chip Tap Contactless Card or Mobile Wallet Below are the screen images that your customer will see when using the iPP 320 ...

Page 17: ...n Complete see below You have several receipt options You can send a digital receipt to your customer using a mobile phone number and or email address You can also print your merchant copy and or customer receipt copies The Epson T20 thermal receipt printer offers speed cost savings and convenience Contact us to discuss purchasing one for your business today 1 è è é ...

Page 18: ... Select the Refund tab 3 Complete the required Refund Information fields marked with an 4 Click the Checkout button to complete the transaction 1 1 é NOTE Select Manual Entry under Entry Mode if you need to manually enter the card information If the customer is still present swipe insert or tap their card using the iPP 320 PIN Pad é 1 2 3 4 ...

Page 19: ...an be auto settled or settled manually Unsettled transactions will remain in an open status view for four months QUICK BATCH VIEW NEW WITH ONLINE POS REPORTING New with Online POS Terminal if you did not enable Auto Settlement you can select the Quick Batch View Cloud Icon to manually settle your batch 6 3 3 6 NOTE You can View Items and select Settle Batch to quickly close your batch You can view...

Page 20: ...MENT TRANSACTION MANAGEMENT View transactions in your open batch or search for transactions already settled Use the Transactions drop down to look up All Open Pending or Rejected items Search transactions by Date Range Account Number Last 4 digits or Amount Range 2 2 è è è è è ...

Page 21: ...MINAL 21 BACK OFFICE CALENDAR TRANSACTION MANAGEMENT Use the Date Range to pull up the calendar and select the date you want to review By selecting today s date you will see any open transactions in the open batch if not yet settled 2 2 è ...

Page 22: ...2 BACK OFFICE VOID TRANSACTION MANAGEMENT If the transaction is in an open batch you can use Void to remove it without charging your customer 2 2 ç NOTE If the batch is still open you can void a transaction by highlighting it and selecting Void ...

Page 23: ...CTION MANAGEMENT If the transaction is in a closed batch you will see Refund on this screen You can refund the entire amount or refund a portion of the original purchase 2 2 è NOTE If the batch is closed you can refund a transaction by highlighting it and selecting Refund ...

Page 24: ... GUIDE ONLINE POS TERMINAL 24 REPORTING UNDER THE TRANSACTION MANAGEMENT TAB TRANSACTION MANAGEMENT REPORT If you choose the Report button versus Search you can create and view reporting for your search results 2 2 è ...

Page 25: ...UNDER THE TRANSACTION MANAGEMENT TAB TRANSACTION MANAGEMENT REPORT If you choose Report you will be asked to select the Report Type Select CSV comma separated values to export transactions to Excel or if you only want to print the report select PDF 2 2 è è ...

Page 26: ...QUICK REFERENCE GUIDE ONLINE POS TERMINAL 26 REPORTING UNDER THE TRANSACTION MANAGEMENT TAB TRANSACTION MANAGEMENT REPORT Access Batch History by selecting DATE RANGE BATCH RANGE 1 2 1 2 ...

Page 27: ...S TERMINAL 27 REPORTING UNDER THE REPORTING TAB REPORTING QUEUED REPORTS After you create reporting the report will show as Queued under Queued Reports When the report is ready for you to access the status will show as Complete 3 3 è ...

Page 28: ...QUICK REFERENCE GUIDE ONLINE POS TERMINAL 28 REPORTING UNDER THE REPORTING TAB REPORTING CARD TYPE SUMMARY You can get a quick glance of card type activity by day week month or quarter 3 3 è ...

Page 29: ...QUICK REFERENCE GUIDE ONLINE POS TERMINAL 29 REPORTING UNDER THE REPORTING TAB REPORTING SALES TRENDS Select Sales Trends to view your transaction activity Search by Date Range 3 3 è è ...

Page 30: ...e 2 Select Reload Page 3 Repeat previous steps to complete the transaction SUPPORT If you need further assistance and would like help from a member of our Support Group call 1 800 503 1132 If you have a question about fees or need general support for your existing processing account you can call Chase Merchant Services at 1 888 886 8869 è ...

Page 31: ...IC18 1017 0918 2018 Paymentech LLC All rights reserved POS 0512 09 18 ...

Reviews: