background image

11

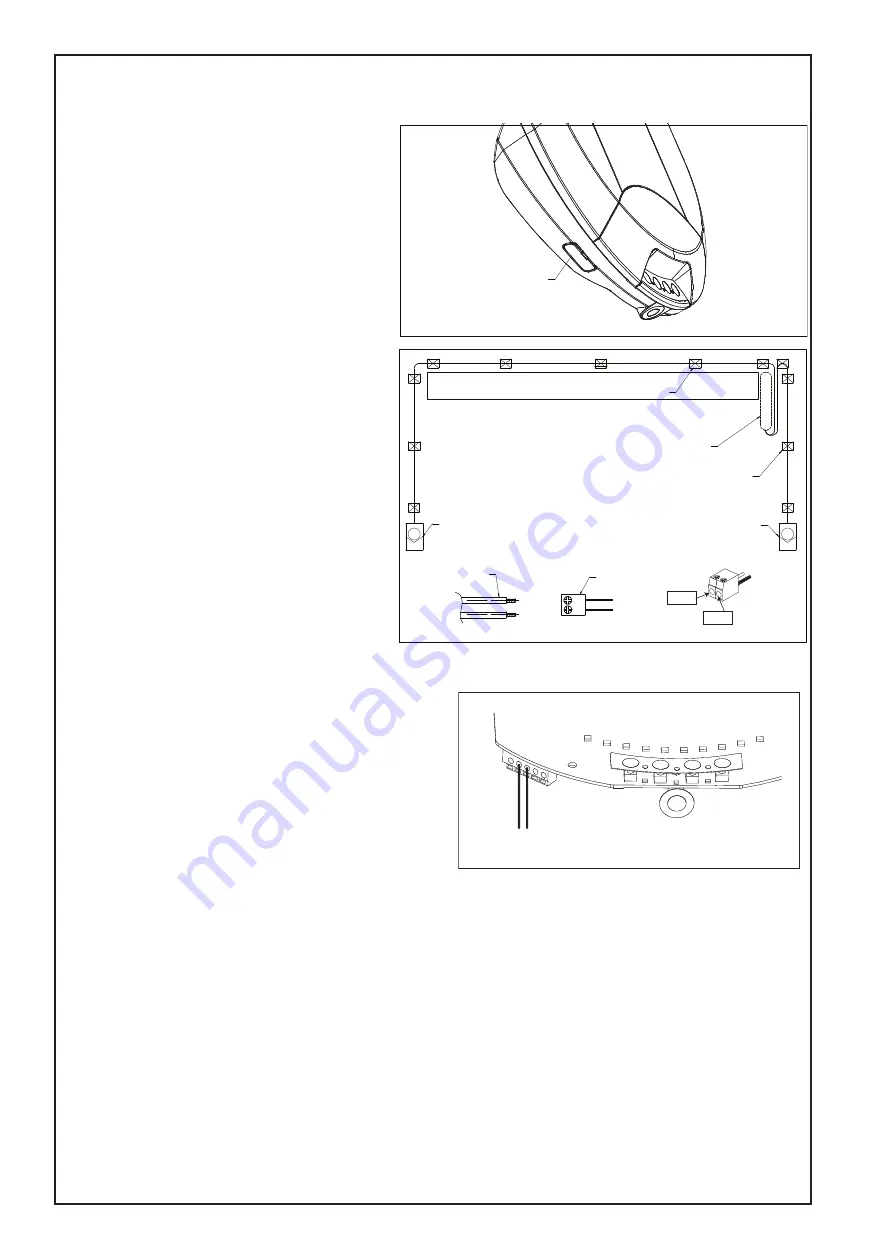
Connect cable to the Opener:

Disconnect the mains Power from the Opener.

At the Powerhead Control Panel remove the

plastic break out (see fig 3) to expose the “External

Accessory Terminal Block”.

Twist both WHITE wires together and both GREY

wires together.

Connect the WHITES to the white mark screw

terminal of the 2-way connector, and the GREYS

to the grey mark screw terminal (see fig 4)
Push the 2-way connector into the control panel

quick release terminals B & C (see fig 5).

Ensure the White wires go to B and the Grey wires

go to C.

Loop and secure the excess cabling above the

opener assembly.

Test the Safety Beam operation:

Remove all obstacles from the path of the door.

Connect the mains Power to the opener.

1. Using a remote control, check the Opener

operates in both directions.
2. Obstruct the beams with the door fully OPEN,

the door should not move and the Courtesy light

will Flash 10 times.
3. Obstruct the beams with the door travelling

DOWN, the door should STOP and return to the

UP position. The Courtesy light will Flash 10 times
4. Obstruct the beams with the door travelling UP, the door

should continue to the OPEN position.

Status indicators on the Safety Beams:

Normal Operation --

Red leds “ON” constantly.

Low standby Mode --

Red leds “OFF”. (Leds

activate when door
moves.)

Safety Beams misaligned-

Red leds “FLASH”.

Safety Beams obstructed--

Red leds “FLASH”.

For further diagnostics, refer to the TROUBLESHOOTING section at the rear of the Opener Handbook.

Emergency Overide:
NOTE: The door canʼt be closed using the MyQ app if an obstruction of Safety Beam failure has occurred.

However, if needed, the door can be closed by using the programmed button of a Keyless Entry Keypad (E840C)

or the Control button located on the bottom of the opener.

Follow the process below:

With the door open Press the programmed button once and release.
Press and “HOLD” the button again, and continue to HOLD untl the door has completely closed.

NOTE: If the button is released at any point during the downward movement, the door will stop and return

to the OPEN position. In this case repeat the previous process again. The “DOOR CLOSE” process will

need to be performed each time the door needs to be CLOSED, until the obstruction is removed or repairs

are made to the Safety Beam System.

DN

UP

P

S

1

2

3

A

B

C

B

D

Grey x 2

White x 2

CABLE END

3 X CABLE TIE MOUNT
WITH CABLE TIE

OPENER

BEAM 1

BEAM 2

1 X 2-WAY CONNECTOR
WITH LEADS AND CABLE
COLOUR MARK

3 X CABLE TIE MOUNT
WITH CABLE TIE

White x2

Grey x2

Plastic Breakout

fig. 4

fig. 5

SAFETY BEAMS (CONTINUED)

fig. 3

Summary of Contents for CR700MYQ

Page 1: ...contains IMPORTANT SAFETY information DO NOT PROCEED WITH THE INSTALLATION UNTIL READING THE INSTRUCTIONS THOROUGHLY Garage Roller Door Opener Installation and Operating Instructions Owners Copy Pleas...

Page 2: ...Warranty Registration Register your warranty at chamberlaindiy com au warranty or chamberlaindiy co nz warranty...

Page 3: ...the following instructions may result in serious injury or property damage Read and follow all instructions carefully The garage door opener is designed and tested to offer safe service provided it is...

Page 4: ...ill bit 6 Philips head screwdriver 7 Marker pen 8 Rope DOOR REQUIREMENTS 3 Ensure that there is at least 45 mm from the edge of the curtain to the edge of the bracket If the roller door drum wheel is...

Page 5: ...rogram UP indicator 3 Diagnostic code indicator Number 2 7 Control Button Used to activate the door when remote controls are not available Open Stop Close 8 Courtesy Light turns on during operation an...

Page 6: ...the door as shown If the door curtain does not have a handle you will need to follow these instructions Use a marker pen to mark the two hole positions Drill two 5 5 mm holes through the two marked po...

Page 7: ...d down firmly the opener will make a clicking noise To re engage the opener Pull the release cord down firmly the opener will make a clicking noise Disable all locks and remove any ropes connected to...

Page 8: ...6 LEFT RIGHT HAND INSTALLATION 11 LEFT handing must be changed during limit setting refer to section 13 RIGHT factory default setting Inside garage looking out...

Page 9: ...Bolt and door mounting bracket from the wall Install the opener Slide the opener over the door axle and engage the drive legs into the door drum wheel either side of a spoke Refit the door mounting br...

Page 10: ...d setting LED 2 will flash and for Left Hand setting LED 1 will flash 2 To change to the opposite setting simply press the S button and the opposite LED will flash 3 When the correct hand setting is s...

Page 11: ...less than 1 5 m out of the reach of children Read the safety instructions page 1 for further details concerning safety FIXING WARNING LABELS Operate the door in the down direction The door must rever...

Page 12: ...rage door and at a height of no greater than 100 mm off the garage floor The brackets are designed to be used for Wall or Floor fixing with a variety of hole combinations to achieve the desired result...

Page 13: ...ty Beams Normal Operation Red leds ON constantly Low standby Mode Red leds OFF Leds activate when door moves Safety Beams misaligned Red leds FLASH Safety Beams obstructed Red leds FLASH For further d...

Page 14: ...door or with any door controls including remotes Smartphones Tablets or any internet device that has a Chamberlain MyQ app installed Power Pack It is important to use the AC DC PowerPack supplied wit...

Page 15: ...It is easy to do from a computer or your internet enabled smartphone or tablet See step 3 for downloading the Chamberlain MyQ app and steps 5 and 6 for using the app To add the Chamberlain Internet Ga...

Page 16: ...See Creating a Passcode below Default Chamberlain MyQ App Security Settings Launching App high security is initially set to ON You must enter your email and password credentials every time the app is...

Page 17: ...ted if you logout restarting the app will require the creation of a new passcode Add delete rename a device a garage door opener Go to Places tap the gear in the upper left corner of the screen To Add...

Page 18: ...passcode PIN you must enter this twice The 4 digit passcode now replaces email and password for security Add delete rename a device a garage door opener Go to Places tab Menu button Manage Places Sele...

Page 19: ...d only when ALERTS are activated Gateway Diagnostics Status LEDs What do the LEDs on the Chamberlain Internet Gateway signify The GREEN LED must be on continuously after power and network connections...

Page 20: ...DN buttons for 3 seconds When the Courtesy light flashes TWICE release both buttons Press and release the P button to accept this setting Auto close is NOT recommended for households with young child...

Page 21: ...but a closed door cannot be OPENED to the pre set position To activate the ventilation mode 1 Start with the door fully CLOSED figure 1 Drive the opener UP and stop at the position required for you wi...

Page 22: ...ton on the opener until the courtesy light flashes twice and continue holding for approximately 8 seconds until the courtesy light flashes twice again 2 Release the button all remote codes are now era...

Page 23: ...nsion 15 kg Max door area 16 m2 Standby Power 1watt Drive DC gear motor permanent lubrication Max Drum Rotations 41 2 Memory Registers 64 Operating Frequency 433 30 433 92 434 54 MHz Operating Tempera...

Page 24: ...larity of the battery Assemble the transmitter again following the steps in reverse REPLACE BATTERIES IN REMOTES To prevent SERIOUS INJURY OR DEATH observe the following instructions for the battery N...

Page 25: ...pair the door 7 The LED Indicators on the control panel are flashing in sequence Check the diagnostic code on page 24 25 8 The door opens but will not close or reverses while closing Is something obst...

Page 26: ...t would interrupt the sensors path while closing No RPM pulses have been detected Check the door manually for balance binding or obstructions Internally the possible cause may be the motor logic board...

Page 27: ...pliance with the instructions regarding specifications installation operation maintenance and testing of the Unit or of any product with which the Unit is used 2 any attempt by a person other than a P...

Page 28: ...amberlain Group Inc TM Trademark of The Chamberlain Group Inc Registered Trademark of The Chamberlain Group Inc Warranty Registration Register your warranty at chamberlaindiy com au warranty or chambe...

Reviews: