background image

Tips for Success 

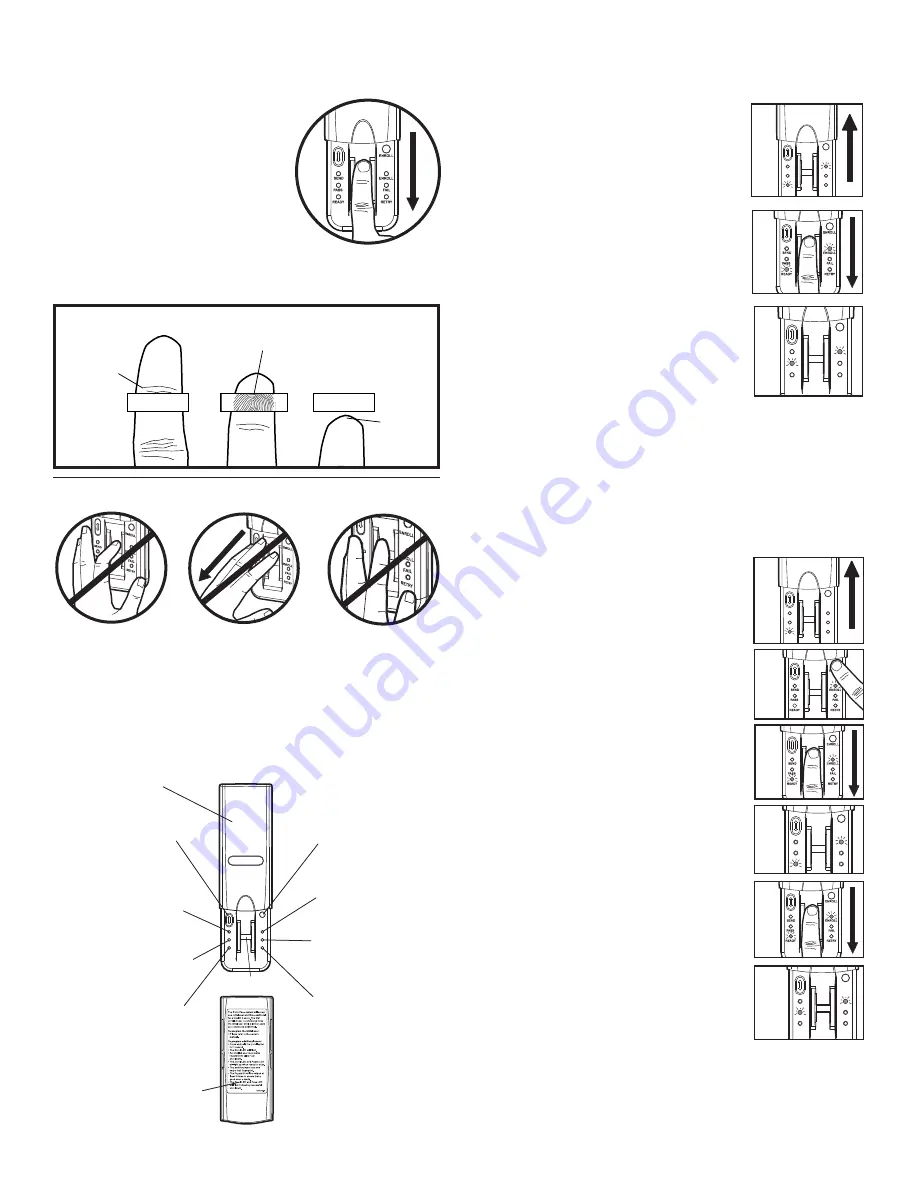
CORRECT 

1. Make sure finger is clean and dry. Place 

finger flat above the sensor strip with 
the top knuckle above the sensor. 

2. Swipe finger straight down keeping 

firm contact with the sensor. The 
swipe should be a slow, constant 
speed. 

SPECIAL NOTES: 

Use the same finger for every swipe. It is 

important to swipe finger slowly and firmly as this is the reason 
most swipes fail. 

S

w

ipe finger straight do

w

keeping firm contact 

w

ith 

Start s

w

ipe 

w

ith 

the sensor. 

the top kn

u

ckle 

a

b

o

v

e the 

sensor strip. 

Sensor Strip 

Sensor Strip 

The scan 
sho

u

ld end 

at the tip of 
finger. 

INCORRECT 

• Do not bend finger during swipe as this will only scan the tip 

of your finger. 

• Swipe finger straight down, not at an angle. 

• Swipe flat, not tilted or rolled to one side. 

Reference 

Co

v

er 

Resend button:

W

hen 

pressed the door 

w

ill stop if 

Enroll button:

W

hen

mo

v

ing 

u

p or re

v

erse if 

pressed the 

u

nit 

w

ill go

mo

v

ing do

w

n. 

into Enroll mode. 

Send LED (yellow):

 Lit 

after a passed fingerprint 

Enroll LED (yellow):


scan and indicates that the 

Lit 

w

hen the 

u

nit is in 

Resend 

bu

tton is acti

v

Enroll mode. 

and can 

b

u

sed to stop 

ENROLL 

SEND 

ENROLL 

Fail LED (red):

 Lit 

w

hen

or re

v

erse door tra

v

el. 

PA S S 

FAIL 

READY 

RETRY 

a scanned fingerprint 

Pass LED (

g

reen):

 Lit 

w

hen 

does not match a 

a scanned fingerprint 

stored print. 

Sensor Strip

matches a stored print. 

Retry LED (yellow):

 Lit 

w

hen another s

w

ipe is

Ready LED (

g

reen):

 Lit 

re

qu

ired. 

w

hen 

u

nit is ready to scan 

fingerprint. 

Extra directions are located 
on the inside of co

v

er. 

Step 3 Enroll Initial User 

NOTE: 

The unit requires 3 passed swipes to enroll a user. 

1. Open cover to turn unit on. Wait until 

Enroll LED and Ready LED are lit (not 

flashing). 

ENROLL 

SEND 

ENROLL 

PASS 

FAIL 

READY 

RETRY 

2. Swipe finger 

slowly 

and 

firmly 

down the 

sensor strip until three passed swipes are 
made. 

NOTE: 

The Pass LED will light for a passed 

swipe. The Retry LED will light if another 
swipe is needed. Swipe slowly and with 
more pressure if this occurs. 

ENROLL 

3. After the third passed swipe, the Enroll 

SEND 

ENROLL 

and Pass LED will flash. Enrollment is 

PASS 

READY 

FAIL 

RETRY 

complete. 

NOTE: 

If cover is already open, press either the Resend or the 

Enroll button to turn unit on. If the Ready LED is lit, refer to 
Factory Reset in the Erase/Reset section. 

Step 4 Enroll Additional User(s) 

NOTE: 

The device can store up to four fingerprints at a time. 

An enrolled user must swipe finger first to enroll new user. 

1. Open cover and wait until Ready LED 

is lit. 

ENROLL 

SEND 

ENROLL 

PASS 

FA IL 

READY 

RETRY 

2. Press and hold Enroll button until 

Enroll LED starts to flash. 

3. While the Enroll LED is flashing, an

enrolled user must 

slowly 

and 

firmly 

swipe finger. 

4. The Enroll LED and Ready LED will 

ENROLL

light when ready for new user to 
swipe finger. 

SEND 

ENROLL 

PASS 

FAIL 

READY 

RETRY 

5. New user should swipe finger 

slowly 

and 

5

firmly 

down the sensor strip until three 

passed swipes are made. 

6. The Enroll LED and Pass LED will 

ENROLL 

flash when new user is enrolled. Unit 

SEND 

ENROLL

will return to Ready mode. 

PASS 

FAIL 

READY 

RETRY 

NOTE: 

If cover is already open, press either the Resend or the 

Enroll button to turn unit on. The Pass LED will light for a 
passed swipe. The Retry LED will light if another swipe is 
needed. 

Summary of Contents for 942FPC

Page 1: ...se a 120Vac polarized outlet for the receiver which is OUT OF THE REACH OF CHILDREN Plug receiver into selected outlet Return power to the opener Actuator Cover Power Indicator Light Terminals Bell Wire Channels SMART Indicator Light Connect Bell Wire To Garage Door Opener Terminals SMART Actuator Bell Wire To prevent possible SERIOUS INJURY or DEATH from electrocution Be sure power is not connect...

Page 2: ...ial User NOTE The unit requires 3 passed swipes to enroll a user 1 Open cover to turn unit on Wait until Enroll LED and Ready LED are lit not 1 flashing ENROLL SEND ENROLL PASS FAIL READY RETRY 2 Swipe finger slowly and firmly down the 2 sensor strip until three passed swipes are made NOTE The Pass LED will light for a passed swipe The Retry LED will light if another swipe is needed Swipe slowly a...

Page 3: ...ton at 1 second intervals for up to 5 seconds until the door moves Programming is complete NOTE If unit will not program to opener repeat the steps above or refer to Troubleshooting 2 ENROLL SEND ENROLL PASS FAIL READY RETRY 3 4 ENROLL SEND ENROLL PASS FAIL READY RETRY 5 Step 6 Operation 1 Open cover and wait until Ready LED 1 is lit ENROLL SEND ENROLL PASS FAIL READY RETRY 2 Swipe finger slowly a...

Page 4: ...Enroll LED and Fail LED and must be repeated If enrolling new user and all LEDs flash and unit returns to Ready mode The memory is full In order to add new user the memory needs to be erased Refer to Erase User or Factory Reset If the unit does not wake A button may be stuck Press Enroll and Resend buttons to ensure free movement The batteries may need to be replaced If the Fail LED flashes during...

Page 5: ...longueur du fil de sonnerie dépendra de l endroit où on installera le récepteur Réinstaller le couvercle de l actuateur 6 Choisir une prise de courant polarisée de 120 Vcc pour le récepteur et qui est HORS DE LA PORTÉE DES ENFANTS Brancher le récepteur dans la prise choisie Rétablir le courant de l ouvre porte de garage Couvercle Témoin d alimentation d actuateur Bornes Circuits du Témoin fil de s...

Page 6: ...sages réussis 1 Ouvrez le couvercle pour allumer l appareil Patientez jusqu à ce que les LED Enroll 1 Inscrire et Ready Prêt s allument elles ne doivent pas clignoter ENROLL SEND ENROLL PASS FAIL READY RETRY 2 Faites glisser votre doigt lentement et fermement sur le capteur de bande jusqu à ce que trois passages réussis soient réalisés 2 REMARQUE La LED Pass Réussi s allume lorsqu un passage est r...

Page 7: ...ez le bouton 5 Resend Renvoyer à 1 seconde d intervalle pendant 5 secondes jusqu à ce que les lumières du dispositif d ouverture clignotent ou que la porte bouge La programmation est terminée REMARQUE Si l appareil ne se programme pas au dispositif d ouverture répétez les étapes ci dessus ou reportez vous à la section Dépannage Étape 6 Fonctionnement 1 Ouvrez le couvercle et patientez jusqu à ce q...

Page 8: ...lisateur initial La procédure d inscription initiale a échoué signalé par les LED Enroll Inscrire et Fail Échec qui s allument et doit être répétée Si à l inscription d un nouvel utilisateur toutes les LED clignotent et l appareil revient en mode Ready Prêt La mémoire est pleine Pour ajouter un nouvel utilisateur la mémoire doit être effacée Reportez vous à l étape Suppression d utilisateur ou Res...

Reviews: