O2X
DUO
- 13
Air calibrating a sensor
The most important thing to keep in mind while performing an air calibration is to
create a constant environment. The electrode/cell cartridge must be dry with no water
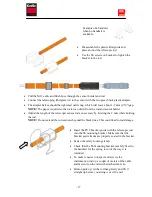
drops on the membrane or luminophore. Fill a bucket halfway with water. Place the
sensor ~1-1.5 ft above the water surface to create a humid environment and cover the
bucket with a towel. If rain and/or strong winds are present, the calibration procedure
could be disturbed. In this case shield the equipment so that it is protected from the rain
or wind. An open plastic bag over the sensor may slow the calibration time down, but
is otherwise a good way to help maintain constant conditions.
•
Select the O2X DUO sensor in the Main Menu by using the or buttons.
•
Press ENTER for approximately five seconds to enter the Sensor Menu.
•
Select the “Calibration” press ENTER.
•
Enter the current air pressure in mBar. It is sufficient to specify the pressure
within 10 mBar (see table below for conversion from inHg to mBar).
•
Select “Calibrate”. Press ENTER.
•
Use the arrows to select “Air” (three choices can be made, Air/No/Zero). Press
ENTER.
•
Wait for the sensor to be calibrated. A successful calibration will take anywhere
between 3 to 15 minutes for the sensor to stabilize. A dialog box saying
"Calibration done" will come up after successful calibration. Press “Enter” to
return to the calibration menu.
The following appear in the Calibration menu as read-only:
•
Temp (info): Displays the current temperature of the sensor.
•
Test (info): Displays the current measured dissolved oxygen value.
Immediately after calibration and before the sensor is placed in the liquid, this
value should closely equal the solubility value. A reading outside of an
acceptable range may indicate that the electrode needs to be replaced.
•
Set value: Ideal solubility value calculated using temperature and air pressure.


