O2X
DUO
- 12 -
11.
Calibration
It is important that the instrument has been turned on for about 30 minutes prior to
calibration so that the sensor and electronics can stabilize.
Zero Calibration
The sensor is zero calibrated at the factory, and does not need to be zero calibrated. We
do however recommend to do a new zero calibration when replacing the electrode since
half the job is then already done.
For Clark electrode:
Remove the electrode before performing a zero calibration.
Refer to “Section 8 – Changing or installing a New Electrode”.
For Optical cell:
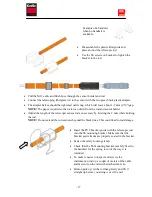
Remove the black protective cover around the new cell contact. Use
the jumper to close the circuit, see fig. Plug in the cell.
Zero calibrating a sensor:
•
Select the O2X DOU sensor in the Main Menu by using the or buttons.
•
Press ENTER for approximately five seconds to enter the Sensor Menu.
•
Use the arrows to select the “Calibration” sub menu, and press ENTER.
•
Select “Calibrate”. Press ENTER.
•
Use the arrows to select “Zero” (three choices can be done, Air/No/Zero). Press
ENTER.
•
Wait for the zero calibration to finish (usually takes about ten seconds). A
dialog box saying "Calibration done" will come up after successful calibration,
Press Enter to return to the previous menu.
For Clark electrode:
Install the electrode before performing an air calibration. Refer
to “Section 8 – Changing or installing a New Electrode”. Continue with
“Air
calibrating a sensor”
For Optical cell:
Disconnect the jumper again. Put the jumper on one of the pins for
future usage. Mount the protective cover. Plug in the cell.


