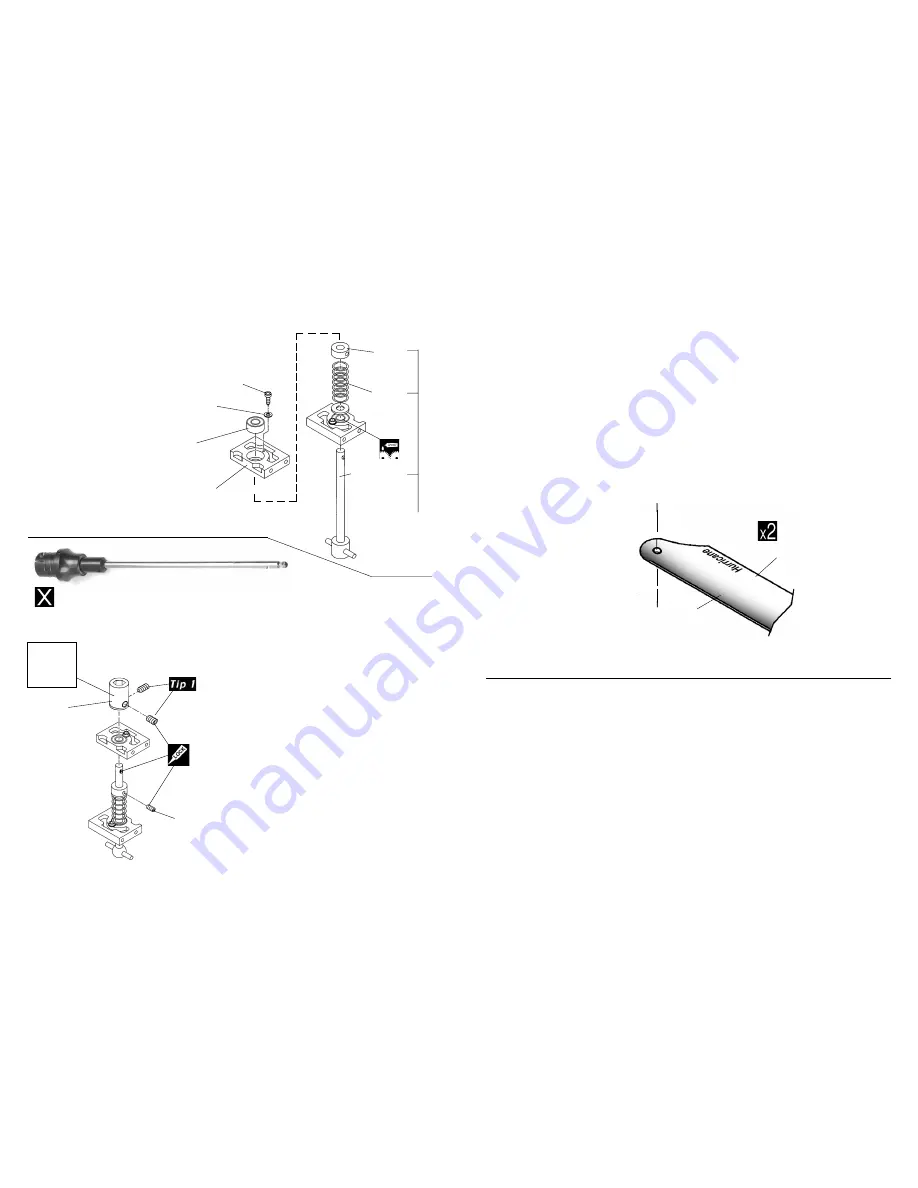
From parts bag 2: The
Start Shaft Guide Blocks
are pre-assembled. Slide
the Starter Shaft through
one of the block assem-
blies with the M5x11 Ball
Bearing facing up then
slide the M5 Flat Washer,
spring and finally the
M5x10 Collar.
M5x10
Collar
M2x5 Self
Tapping Screw
Spring
M2x5 Flat
Washer
5x11 Ball
Bearing x 2
[CNBB1150]
Start Shaft Guide
Blocks x 2
[HI3007]
Starter Shaft
Set
[HW3005A]
Step 9
Starting Shaft Bearing Blocks
Step 10 Starting Shaft & Hex Coupler
From parts in bag 2: After sliding the top bear-
ing block in place, attach the hex starter adapter
CN0402 to the starting shaft using threadlock on
both 4x4mm set screws. Align one set screw to fit
into the machined indentation in the hardened
start shaft. For added strength apply a locktight
to the shaft before the hex coupler is attached.
Apply some lubricant on the shaft after assembly
to ensure smooth vertical movement inside the
inner races of the bearings when engaging and
disengaging the start system. Position the M5
collar so the end of the start shaft clears the fan,
verify after installing the lower frames.
Hex Start
Adapter
[CN0402]
M4x4 Set
Screw x 2
(med hex key)
Optional:
Aluminum
Start Cone
#CN2209
3x4mm Set
Screw
(small hex key)
When removing the hex start extension after
the engine has started, it is recommended that
you use a two step procedure.
Step #1: Lift the hex extension upwards just
enough to disengage the start shaft while
keeping the extension inserted in the hex
coupler (CN0402).
Step #2: After the coupler has stopped turning,
then remove the extension completely.
Engine Start Procedure with Hex Coupler
Starter Shaft
One way Hex Starter Extension
(Optional Part #CN0427)
35
The Main Rotor Blades included in
Raven 50
the kit are pre-finished and balanced carbon rotor blades. Care
must be taken in handling composite blades to keep them in excellent condition. Do not compress any portion
of the blade from the trailing edge to the center spar as it is hollow. In the event of a crash-landing discard rotor
blades, scuffs or marks on the blade tips maybe the only visible damage however there is no method for inspect-
ing the internal structure of the rotor blades for stress cracks which can cause total blade failure at an unpredict-
able time. Also, do not store rotor blades indoors in direct sunlight or near heat sources for any period of time.
Simply wipe blades clean after flying.
Blades rotate clockwise, so observe the leading edge. To install the blades, slide the root into the rotor grip
and insert one 4x30mm Socket Cap Screw through the top grip and secure using one 4mm Locknut. Repeat for
opposite rotor blade. Blade bolt tension will affect how the blades perform. To set proper tension, start from
loose blades (bolt is loose enough for the blade to pivot freely from the grip) and tighten the bolts a little at a
time until the blades will hold straight as the helicopter is tipped on its side. Slightly tighter is good. Too tight
and a vibration will occur, too loose and a tail boom strike can happen. Tail blades can be set the same way.
Trailing Edge
of Blade
Leading Edge
of Blade
Raven 30
CN2400
Hurricane Carbon 3D Symmetrical 550mm
CN2414
Hurricane Carbon Sport Semi-Symm 550mm
CN265501
Rotortech Carbon 3D Competition Symmetrical 550mm
CN265522
Rotortech Carbon 3D Sport Symmetrical 550mm
CN260853
Rotortech Carbon Tail Blades Symmetrical 85mm
Raven 50
CN2412
Hurricane Carbon 3D Symmetrical 600mm
CN2413
Hurricane Carbon Sport Semi-Symm 600mm
CN266001
Rotortech Carbon 3D Competition Symmetrical 600mm
CN266022
RotorTech Carbon 3D Sport Symmetrical 600mm
CN260853
Rotortech Carbon Tail Blades Symmetrical 85mm
The Raven 50 contains symmetrical rotor blades for sport and aerobatic flying. For your convienence
you can also use semi-symmetrical for smooth aerobatics and scale flying.
Step 45B Care and installation of Hurricane Carbon Blades - Raven 50
R-50
Step 45C Replacement High Performance Rotorblades Main & Tail


