background image


________


8


________


SP 

EXEMPLES DE 
MONTAGE 

MONTAGEBEISPIELE 

EJEMPLOS DE 
MONTAJE 

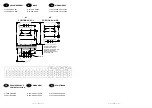
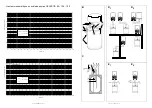
D1 Ballon au sol 
D2 Ballon au mur


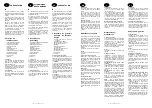
Ce ballon est livré pour être monté 

verticalement, raccordements vers le haut. 


Il est cependant possible de le monter 

verticalement, raccordements vers le bas, 

ce qui nécessite une adaptation (voir 

schéma p.12). 


Type de raccordements 

(page 3)


E1 

Ce montage de base permet le soutirage 

d’ECS uniquement à travers le ballon. 


En conséquence, après l’arrêt de 

l’installation, il faut attendre le réchauffage 

du ballon pour pouvoir disposer d’eau 

chaude sanitaire. 


E2 

En réalisant un deuxième piquage d’ECS 

à la sortie de la chaudière, cela permet 

d’obtenir sur une partie choisie de 

l’installation, de l’eau chaude ne passant 

pas par le ballon. En conséquence, il est à 

tout moment possible de disposer de l’eau 

chaude à ces postes de puisage. 


Il est nécessaire de rajouter à l’installation 

un clapet anti-retour entre le piquage et le 

ballon. Ce clapet doit être monté passant 

dans le sens chaudière vers ballon. 

D1 Boiler auf Boden 
D2 Boiler an der Wand


Dieser Boiler ist für eine vertikale Montage 

vorgesehen, wobei die Anschlüsse oben 

angebracht sind. 


Es ist jedoch möglich, ihn vertikal mit nach 

unten gerichteten Anschlüssen zu 

montieren (Adaptation seihe Zeichnung 

Seite 12). 


Hydraulische Anschlüsse 
 
E1 

Es handelt sich um die Grundmontage, 

die die Entnahme von warmem 

leitungswasser nur ürber den Boiler 

ermöglicht. 


Daher muß nach Ausschalten der Anlage 

bis zum vollständigen Erwärmen des 

Boilers gewartet werden, um wieder über 

warmes Leitungswasser zu verfügen. 


E2 

Durch eine zusätzliche Warmwasseranz-

weigung am Heizungsauslauf ist es 

möglich, in einem bestimmten Bereich der 

Anlage Warmwasser zu erhalten, das 

nicht durch den Boiler läuft. An diesen 

Zapfstellen kann also jederzeit über 

Warmwasser verfügt werden. 


Hierzu wird zusätzlich ein Rücklaufventil 

zwischen Anzweigstelle und Boiler 

installiert. Dieses Ventil muß in Richtung 

Heizkessel. Boiler montiert werden. 

D1 Acumulador colocado en el suelo 
D2 Acumulador colocado en la pared


Este acumulador se instala verticalmente, 

conexiones hacia arriba. Sin embargo, 

puede instalarse verticalmente, 

conexiones hacia abajo, modificando la 

configuración de éstas (ver esquema 

página 12). 


Tipos de empalmes hidraulicos 


E1 

Esta instalación básica permite sacar 

agua caliente sanitaria únicamente por el 

acumulador. 


Por consiguiente, una vez desconectado 

el aparato, es necesario esperar el 

recalentamiento del agua de la cuba para 

obtener agua caliente sanitaria. 


E2 

Al añadir una segunda toma de agua 

caliente sanitaria a la salida de la caldera, 

es posible obtener, en una parte 

específica de la installación, agua caliente 

sanitaria sin que pase por la cuba. Por co 

siguiente, eso permite obtener agua 

caliente en estos puntos de extracción a 

cada momento. 


Es necesario instalar una válvula anti-

retorno entre la toma directa y la cuba. 

Esta válvula debe estar instalada en 

dirección hacia la cuba (circulación del 

agua desde la caldera hacia la cuba). 


________


13


________


NL 

GB 

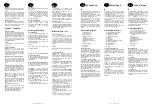
Installing the Celectic with 
bottom connections 


Whilst the Celectic is designed for vertical 

fixing only, it is quite straightforward to 

convert from top outlet connections, 

supplied as standard, to bottom outlet 

connections by carrying out the following 

modifications. 


1

 – Completely dismantle the X pipe. 


2

  – Loosen the nuts on connections (1) 

and (4) on the jig plate (do not disconnect 

completely). Disconnect the hot water 

outlet regulator connection (A) and the 

tube (B) from the cylinder. 


3

 – Turn the inlet elbow, the flexible tube, 

and the hot water outlet regulator, through 

180° to face away from the cylinder. 


4

 – Turn the entire assembly through 180° 

and connect the inlet elbow between (1 

and A). The flexible tube between (3 and 

B) and the hot water outlet regulator 

between (4 and C). Tighten connections 

(1 and 4) on the jig plate. 


5

  – Put back the Y pipe (provided as an 

accessory) in place of the X pipe. 


NB :

 Ensure that all washers are in place 

correctly and that all joints are tight. Check 

for leaks. 

Caso di un montaggio con 
raccordi verso il basso 
 

1

 – Smontare completamente il tubo X  


2

 – Allentare i dadi 1 e 4 senza smontarli ; 

e svitare i dadi A e B 


3

  – Girare il complesso pompa  – tubo  – 

piastrina. 


4

  – Montare di nuovo il complesso sullo 

scaldabagno ; stringere i dadi 1 e 4. 


5

  – Rimontare il tubo Y (fornito in 

accessorio) al posto del tubo X. 


6

  – Assicurarsi che tutti i giunti siano a 

posto. 


Opstelling aansluitingen 
naar beneden 
 

1

 – De X buis in z’n geheel demonteren. 


2

 – Los de moeren 1 en 4 zonder deze te 

demonteren, en los de moeren A en B 


3

  – Draai het geheel  pomp  – buis  – 

platine. 


4

  – Hermonteer het geheel op de boiler. 

De moeren 1 en 4 vastvijzen. 


5

 – De buis Y weer monteren op de plaats 

van buis X (als hulpstuk leveren). 


6

  – Zich ervan verzekeren dat de 

dichtingen wel degelijk afsluiten. 


13 


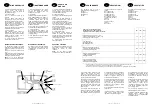
lnstalling the Celectic with 
bottom connections 
 

Caso di un montaggio con 

raccordi verso il basso 

Opstelling aansluitingen 
naar beneden 

Whilst the Celectic is designed for 
vertical fixing only, it is quite 
straightforward to convert from top outlet 
connections, supplied as standard, to 
bottom outlet connections by carrying 
out the following modifications. 

1 -  

Completely remove tube 

X


2 -  

Completely unscrew the brass 
nuts 

and 

B

 (do not unscrew the 

plastic coupling, it is fixed with 
seal paste). 

3 -  

Turn over the pump-tube-plate 
unit. 

4 -  

Refit tube 

Y

 (supplied as an 

accessory) in place of tube 

X

.


5 -  

Screw nuts 

and 

B

 back on

6 -  

Check that all the seals are 
properly in place. 


NB : Ensure that all washers are in 
place correctly and that all joints 
are tight. Check for leaks.


1 -  

Smontare totalmente il tubo 

X

2 -  

Svitare completamente i dati 
ottone 

B

 (non svitare i 

manicotti di plastica, sono 
montati con pasta di tenuta). 

3 -  

Capovolgere I'insieme pompa 
tubo piastra. 

4 -  

Rimontare il tubo 

Y

 (fornito in 

accessorio) al posto del tubo 

X

.


5 -  

Ristringere i dadi 

B. 

6 -  

Accertarsi Che tutti i giunti siano 
ben sistemati.


1 -  

De buis 

X

 volledig demonteren

 . 

2 -  

De moeren 

en 

B

 van messing 

volledig losdraaien (de plastic 
bussen niet losdraaien, 
aangezien deze met afdichtkit 
zijn aangebracht). 

3 -  

Het samenstel pomp buis plaat 
omdraaien 

4 -  

De buis 

Y

 (als accessoire 

geleverd) in de plaats van buis 

monteren. 

5 -  

De moeren 

en 

weer 

aandraaien.


6 -  

De goede plaatsing van alle 
pakkingen controleren. 


Summary of Contents for 100 I

Page 1: ... ISTRUZIONI PER L INSTALLAZIONE ISTRUZIONI PER L USO INSTALLATIEBOEKJE GEBRUIKSBOEKJE F D SP GB I NL BP 64 78403 CHATOU CEDEX Tél 33 1 34 80 59 00 Fax 33 1 34 80 59 09 http www chaffoteaux maury com Ref 1005338 k CELECTIC BALLON DURCHLAUFERHITZER ACUMULADOR HOT WATER CYLINDER SERBATOIO PER ACCUMULO BOILER 80 I 100 I 150 I NOTICE D INSTALLATION NOTICE D EMPLOI MONTAGE UND GEBRAUCHSANLEITUNG INSTRUC...

Page 2: ...STAND AAN DE MUUR GB REQUIRED SPACE FOR INSTALLATION I DIMENSIONI NL AFMETINGEN ________ 19 ________ ________ 2 ________ F ENCOMBREMENT D MAßE SP DIMENSIONES A1 POSITION AU SOL A1 AUF DEM BODEN A1 COLOCADO EN EL SUELO A2 POSITION AU MUR A2 AN DER WAND A2 COLOCADO EN LA PARED A2 POSITION AU MUR A1 POSITION AU SOL A G C F D E B G C M D F H I L J K J L M 3 4 G Douilles à souder Ø18 20 Schweißhülsen Ø...

Page 3: ...ion disponible en mCE ________ 3 ________ B D2 C E2 D1 E1 3 2 1 4 6 10 5 7 9 8 6 5 3 2 1 8 4 13 7 12 ________ 18 ________ Hauteur manométrique en sortie de pompe CELECTIC 80 100 150 0 7 0 6 0 5 0 4 0 3 0 2 0 1 0 0 100 200 300 400 500 600 700 800 900 1000 1100 1200 1300 1400 1500 1600 1700 1800 1900 2000 Débit en l h UP 15 50 CY UP 15 60 CY Pression disponible en Mb 7 6 5 4 3 2 1 0 0 100 200 300 40...

Page 4: ...oiler demonteren rep B Een annsluitstuk plaatsen van het type sproeislang met een buis incaoutchoucc ________ 4 ________ SP D F PRESENTATION ALLGEMEINES BESCHREIBUNG PRESENTACION B Le ballon CELECTIC est un système de production d eau chaude accumulée à partir des chaudières mixtes Chaffoteaux et Maury Le ballon est équipé d une pompe d un boîtier électrique de raccordement d un groupe de sécurité...

Page 5: ...komende koud water door 4 automatisch door de ketel welke op temperatuur gebracht wordt in de boiler ________ 16 ________ SP D F Réglages L aquatast du ballon est réglé de façon à obtenir de l eau chaude sanitaire à 65 C environ Ainsi sur les chaudières équipées d une consigne ECS de 60 C il est nécessaire de régler la température de l eau chaude sanitaire au maximum de façon à ce qu elle soit sup...

Page 6: ... Fase Fuse Fusibile Zekering Switch with indicator light Interruttore con spia Schakelaar met lampje ________ 6 ________ SP D F PERFORMANCES LEISTUNGEN PRESTACIONES Le CELECTIC fonctionne avec les chaudières suivantes CELTIC 2 30 Rsc b CELTIC 2 20 Rsc b CELTIC 2 23 HPS CELTIC 2 20 FF Rsc b CELTIC 2 23 FF HPS CELTIC 2 20 Turbo HPS CELTIC 2 24 Rsc b SIAM CF SIAM FF GM 2 20 Rsc b NECTRA Der CELECTIC ...

Page 7: ...aastst worden muurkast keuken kelder onder voorbehoud dat de montageinstrukties gerespekteerd worden ________ 14 ________ SP D F MISE EN SERVICE INBETRIEBNAHME PUESTA EN MARCHA 1 Placer l interrupteur de la chaudière en position arrêt afin d éviter le démarrage de celle ci en phase de remplissage et de purge 2 Remplir le ballon Ouvrir le robinet eau froide de la chaudière Ouvrir un robinet d eau c...

Page 8: ...L I GB Installing the Celectic with bottom connections Whilst the Celectic is designed for vertical fixing only it is quite straightforward to convert from top outlet connections supplied as standard to bottom outlet connections by carrying out the following modifications 1 Completely dismantle the X pipe 2 Loosen the nuts on connections 1 and 4 on the jig plate do not disconnect completely Discon...

Page 9: ... it is possible to convert the connections to bottom outlets by following the instructions given on page 12 Type of hot water outlet connections E1 This installation shows the Celectic systems with the hot water outlets being served by the stored water from the cylinder This type of installation is particularly suitable where larger quantities oh hot water are required for example properties with ...

Page 10: ...terverwarmer M G 18x20 16 X 18 mini 4 Cold water inlet Ingresso acqua fredda Aankomst koud water M G ________ 10 ________ SP D F INSTALLATION INSTALLATION INSTALACION L appareil comporte une patte de fixation pour le 80 et 100 litres et deux pattes pour le 150 litres La fixation de l appareil au mur se fait en utilisant des fixations adaptées à la nature de la paroi Le poids de l appareil à vide e...

Page 11: ...terverwarmer M G 18x20 16 X 18 mini 4 Cold water inlet Ingresso acqua fredda Aankomst koud water M G ________ 10 ________ SP D F INSTALLATION INSTALLATION INSTALACION L appareil comporte une patte de fixation pour le 80 et 100 litres et deux pattes pour le 150 litres La fixation de l appareil au mur se fait en utilisant des fixations adaptées à la nature de la paroi Le poids de l appareil à vide e...

Page 12: ... it is possible to convert the connections to bottom outlets by following the instructions given on page 12 Type of hot water outlet connections E1 This installation shows the Celectic systems with the hot water outlets being served by the stored water from the cylinder This type of installation is particularly suitable where larger quantities oh hot water are required for example properties with ...

Page 13: ...L I GB Installing the Celectic with bottom connections Whilst the Celectic is designed for vertical fixing only it is quite straightforward to convert from top outlet connections supplied as standard to bottom outlet connections by carrying out the following modifications 1 Completely dismantle the X pipe 2 Loosen the nuts on connections 1 and 4 on the jig plate do not disconnect completely Discon...

Page 14: ...aastst worden muurkast keuken kelder onder voorbehoud dat de montageinstrukties gerespekteerd worden ________ 14 ________ SP D F MISE EN SERVICE INBETRIEBNAHME PUESTA EN MARCHA 1 Placer l interrupteur de la chaudière en position arrêt afin d éviter le démarrage de celle ci en phase de remplissage et de purge 2 Remplir le ballon Ouvrir le robinet eau froide de la chaudière Ouvrir un robinet d eau c...

Page 15: ... Fase Fuse Fusibile Zekering Switch with indicator light Interruttore con spia Schakelaar met lampje ________ 6 ________ SP D F PERFORMANCES LEISTUNGEN PRESTACIONES Le CELECTIC fonctionne avec les chaudières suivantes CELTIC 2 30 Rsc b CELTIC 2 20 Rsc b CELTIC 2 23 HPS CELTIC 2 20 FF Rsc b CELTIC 2 23 FF HPS CELTIC 2 20 Turbo HPS CELTIC 2 24 Rsc b SIAM CF SIAM FF GM 2 20 Rsc b NECTRA Der CELECTIC ...

Page 16: ...komende koud water door 4 automatisch door de ketel welke op temperatuur gebracht wordt in de boiler ________ 16 ________ SP D F Réglages L aquatast du ballon est réglé de façon à obtenir de l eau chaude sanitaire à 65 C environ Ainsi sur les chaudières équipées d une consigne ECS de 60 C il est nécessaire de régler la température de l eau chaude sanitaire au maximum de façon à ce qu elle soit sup...

Page 17: ...oiler demonteren rep B Een annsluitstuk plaatsen van het type sproeislang met een buis incaoutchoucc ________ 4 ________ SP D F PRESENTATION ALLGEMEINES BESCHREIBUNG PRESENTACION B Le ballon CELECTIC est un système de production d eau chaude accumulée à partir des chaudières mixtes Chaffoteaux et Maury Le ballon est équipé d une pompe d un boîtier électrique de raccordement d un groupe de sécurité...

Page 18: ...ion disponible en mCE ________ 3 ________ B D2 C E2 D1 E1 3 2 1 4 6 10 5 7 9 8 6 5 3 2 1 8 4 13 7 12 ________ 18 ________ Hauteur manométrique en sortie de pompe CELECTIC 80 100 150 0 7 0 6 0 5 0 4 0 3 0 2 0 1 0 0 100 200 300 400 500 600 700 800 900 1000 1100 1200 1300 1400 1500 1600 1700 1800 1900 2000 Débit en l h UP 15 50 CY UP 15 60 CY Pression disponible en Mb 7 6 5 4 3 2 1 0 0 100 200 300 40...

Page 19: ...STAND AAN DE MUUR GB REQUIRED SPACE FOR INSTALLATION I DIMENSIONI NL AFMETINGEN ________ 19 ________ ________ 2 ________ F ENCOMBREMENT D MAßE SP DIMENSIONES A1 POSITION AU SOL A1 AUF DEM BODEN A1 COLOCADO EN EL SUELO A2 POSITION AU MUR A2 AN DER WAND A2 COLOCADO EN LA PARED A2 POSITION AU MUR A1 POSITION AU SOL A G C F D E B G C M D F H I L J K J L M 3 4 G Douilles à souder Ø18 20 Schweißhülsen Ø...

Page 20: ...CTIONS ISTRUZIONI PER L INSTALLAZIONE ISTRUZIONI PER L USO INSTALLATIEBOEKJE GEBRUIKSBOEKJE F D SP GB I NL BP 64 78403 CHATOU CEDEX Tél 33 1 34 80 59 00 Fax 33 1 34 80 59 09 http www chaffoteaux maury com Ref 1005338 k CELECTIC BALLON DURCHLAUFERHITZER ACUMULADOR HOT WATER CYLINDER SERBATOIO PER ACCUMULO BOILER 80 I 100 I 150 I NOTICE D INSTALLATION NOTICE D EMPLOI MONTAGE UND GEBRAUCHSANLEITUNG I...

Reviews: