background image


Connections 

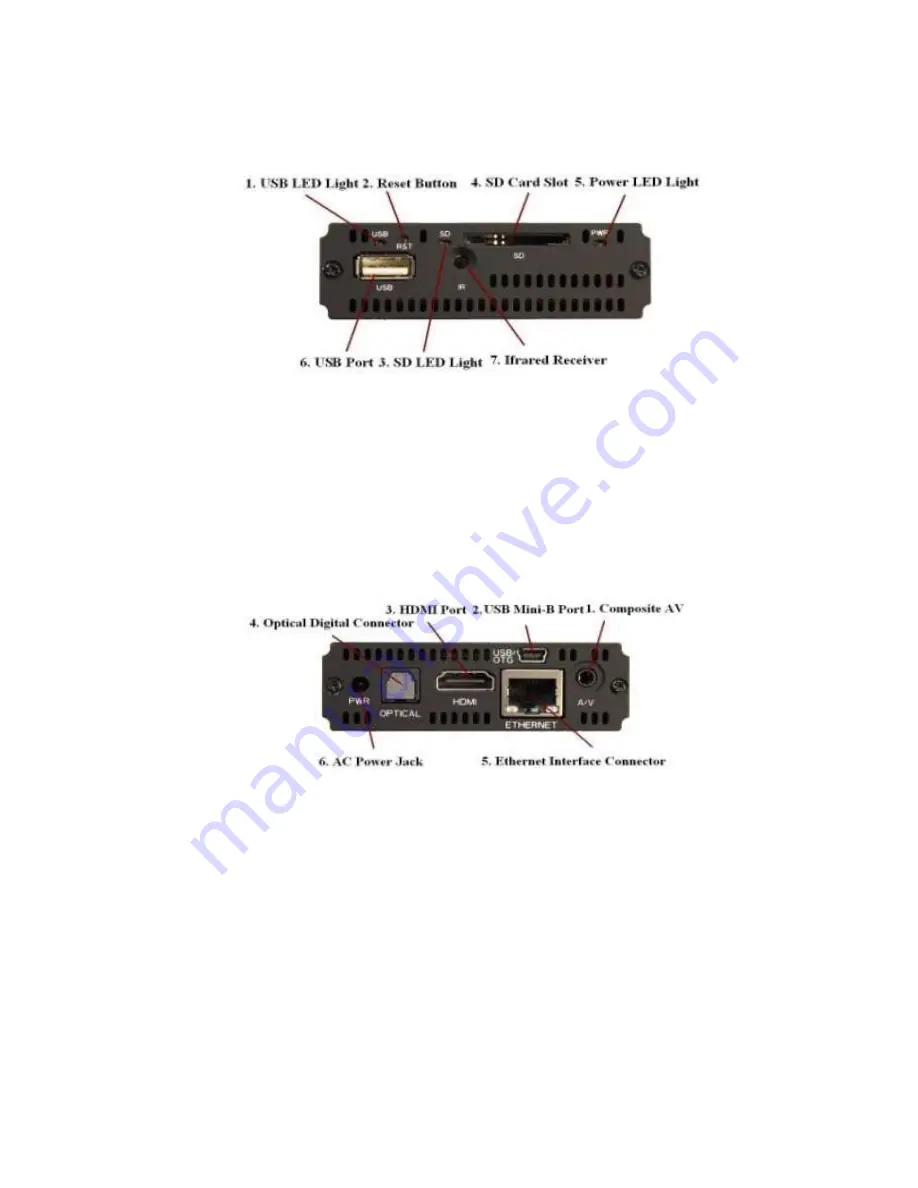
Figure 1: CeeNee eeTee Front Panel 


1.


USB LED Light 

2.


Reset Button 

3.


SD Card LED Light 

4.


SD Card Slot 

5.


Power LED Light 

6.


USB Port 

7.


Infrared Receiver 


Figure 2: CeeNee eeTee Back Panel 


1.


Composite AV 

2.


USB Mini-B Port 

3.


HDMI Port 

4.


Optical Digital Connector 

5.


Ethernet Interface Connector 

6.


AC Power Jack 

Summary of Contents for eeTee

Page 1: ...line sources With a built in hard drive I can play your movies music karaoke view photos and flash applications Let s get set up so we can start enjoying media Copyright 2013 All rights reserved CeeNe...

Page 2: ...sing out of the application or use of any product or circuit described neither does it convey any license under its patent rights of others The CeeNee consumer product line is for home use only The Ce...

Page 3: ...ayer 15 Using the Remote Control 15 Insert Remote Control Batteries 15 Usage Navigation 17 Menus 17 Home 17 Video 18 Music 20 Photo 22 Karaoke 24 Applications 28 Web browser 29 YouTube 29 Settings 30...

Page 4: ...rds Overloading an electrical outlet can result in fire electric shock or device damage Never push foreign objects into the device Hold the outer power connector when removing the power cable Pulling...

Page 5: ...model numbers of your new CeeNee eeTee product You can find this information on the label at the bottom of the device You should also note the date of purchase This information may be required when r...

Page 6: ...ts high definition video playback of up to Full HD 1080p through an HDMI connection or standard definition for TVs with lower capabilities High fidelity digital audio is supported from an optical inte...

Page 7: ...Light 2 Reset Button 3 SD Card LED Light 4 SD Card Slot 5 Power LED Light 6 USB Port 7 Infrared Receiver Figure 2 CeeNee eeTee Back Panel 1 Composite AV 2 USB Mini B Port 3 HDMI Port 4 Optical Digital...

Page 8: ...mini USB OTG cable Step 6 Insert USB Hard Drive and or SD card and or USB Flash drive not included with the package that store s your favorite movies music karaoke songs flash applications including...

Page 9: ...igh Definition TV For Standard Definition TV Step 2 Insert the network cable or USB Wi Fi dongle or USB 3G 4G dongle This step is optional and only required if networking and internet browsing is desi...

Page 10: ...the optical digital cable Optical digital cable is not included Figure 5 Connect the optical cable to CeeNee eeTee Step 4 Connect the AC adapter between the wall unit and CeeNee eeTee Figure 6 Connect...

Page 11: ...to the CeeNee eeTee s mini connector located on the back side of the player Connect USB A type connector end of the cable to the computer laptop Connect the AC adaptor to the eeTee Wait for at least...

Page 12: ...ble media files When the external device is detected respective status light turns on and the Home screen displays the new USB directory icon or the SD card icon that is applicable Removing the USB De...

Page 13: ...14 Typical connection diagram for Karaoke Figure 7 Typical connection diagram for Karaoke...

Page 14: ...r media files enable playback options and customize the system settings The infrared sensor detects infrared signals from the remote Insert Remote Control Batteries Step 1 Remove the battery cover Ste...

Page 15: ...ck to the previous screen 13 4 WAY NAVIGATION ARROWS Navigate through the menu 14 OK To choose a selection 15 INFO Display main sub screen picture source 16 TIME SEEK Play at time which is being selec...

Page 16: ...ts for the Navigation Home to display Users will be prompted to select the default langue We currently support English Vietnamese Japanese Chinese Spanish and Korean Ejecting a Disk Press the EJECT bu...

Page 17: ...shared directories from a Local Network b Searching Use the NUMBER PAD and press OK to search Press the DELETE button if you need to delete a character in the search box c Press the or button to disp...

Page 18: ...to play the next video e Press the button to play the previous video f Press the FWD button to seek forward the video g Press the REV button to seek backward in the video h Press the PLAY button to pl...

Page 19: ...utton to zoom out the frame q Press 16 9 button to switch Aspect ratio Normal Widescreen r Press the SETUP button to go to SETTINGS interface s Press the RETURN button to go back to the previous scree...

Page 20: ...Press the PHOTO GREEN button to go to PHOTO interface g Press the KARAOKE YELLOW button to go to KARAOKE interface h Press the SETUP button to go to SETTINGS interface i Press the RETURN button to ge...

Page 21: ...e STOP button opening a video applications going to Karaoke Web browser YouTube or Settings the music will be stopped Photo 1 Two methods to go to Photo interface Select the Photo tab in the CeeNee ee...

Page 22: ...KARAOKE YELLOW button to go to KARAOKE interface h Press the TV BLUE button to go to MUSIC interface i Press the SETUP button to go to SETTINGS interface j Press the RETURN button to get back to the...

Page 23: ...tton to go to SETTINGS interface l Press the RETURN button to get back to the previous screen m Press the HOME button to get back to the homepage Karaoke The CeeNee Karaoke Player is a full featured s...

Page 24: ...ter adding successfully 3 Select a song from the karaoke song list and press the OK button to play 4 Searching a Quick search Before finding a song you must turn off the main menu by pressing the MENU...

Page 25: ...Create Book a Press the MENU button and then press the DOWN ARROW button to select the Create Book tab This will enable the user to create or update a Karaoke song book which the user can print out Up...

Page 26: ...OK to add to the playlist Press the LEFT ARROW to go back to the playlist Press the UP ARROW to highlight the playlist name and press OK Select the location to save your playlist To delete a playlist...

Page 27: ...d the current song j Press the 16 9 button to switch Aspect ratio Normal Widescreen k Press the VIDEO RED button to go to VIDEO interface l Press the PHOTO GREEN button to go to PHOTO interface m Pres...

Page 28: ...e application list d Browse to the application to play and select the application by pressing the OK or RIGHT ARROW button on the remote e Press the VIDEO RED button to go to VIDEO interface f Press t...

Page 29: ...cations Web browser and YouTube The Settings menu has options to change features and settings in the CeeNee eeTee 1 Video Audio The menu and submenu can change the output of Video and Audio To access...

Page 30: ...1 b Resolution Change the size of the screen from 480i all the way to 1080p60Hz Default is Auto c Aspect Ratio Change the screen format to either 4 3 Normal or to 16 9 Widescreen Default is Widescreen...

Page 31: ...ed in the U S PAL is a default standard for Asian and European countries e Digital Audio Output includes two parts HDMI Audio change the audio format to either PCM or Bit Stream PCM is for stereo soun...

Page 32: ...tions when you select S PDIF PCM or Bit Stream PCM is for stereo sound Bit Stream is for pass through digital audio especially for DTS movies and or Dolby digital movies Default is PCM The Video Music...

Page 33: ...cy of music playback to Normal Repeat One Repeat All Shuffle Repeat All and Shuffle Default is Normal 4 Photo a Photo Sequence Adjust the frequency of photo playback to Normal Shuffle Repeat All Repea...

Page 34: ...fault setting is Fit to screen c Photo Effect Enable fade out between photos during photo slideshow playback The default setting is Normal d Interval Define the amount of time between playbacks of pho...

Page 35: ...l users want to have a separate folder for the karaoke songs other than the name mentioned above It s very simple to setup your karaoke source b Playback Option When finish a Karaoke song and don t ha...

Page 36: ...oke i Select Folder You can view the folders on your attached HDD and you can select the folder that contains karaoke songs Go to the Karaoke folder and firmware will display the songs from the select...

Page 37: ...38 ii Deselect Folder You can view the folders on your attached HDD and you can deselect the folder that contains karaoke songs...

Page 38: ...39 d MP3 Karaoke i Select the Background User has freedom to play any video or photo background while playing Mp3 karaoke Select the Background mode as Photo or Video or Keep Original Background...

Page 39: ...from the Karaoke folder It will start playing the user selected background Note If the user selected background is very big in size and contents then CeeNee will switch to its default background to g...

Page 40: ...uage Option to change the user interface languages English Spanish Vietnamese Chinese Japanese and Korean b Screensaver Delay Set the amount of time before the screensaver is turned on The default set...

Page 41: ...42 c Update firmware Download the firmware and upgrade the device to the most current firmware d Set time Display time on the Clock...

Page 42: ...method of IP addresses retrieval to either On DHCP or Off Static First select IP Mode Auto and then press the OK button on the remote to switch between On and Off To change the IP Address and other se...

Page 43: ...44 b Wi Fi In the Settings select Network press OK to turn on Wi Fi When it is on it will scan all the available Wi Fi networks automatically...

Page 44: ...ord select Connect button to connect If Wi Fi is connected successfully a tick icon will be displayed on this Wi Fi c Wi Fi Configuration To configure WiFi in the WiFi menu use the UP and DOWN arrow b...

Page 45: ...n press Connect e Time Adjust the Time Zone to match the user s local time Time Server is the location the time is updated from f Stock Information about stock index will be displayed on the Home page...

Page 46: ...twork b There are two ways to get directory from shared network Way 1 Enter location username and password directly Way 2 Browse through your network to your shared computer to share a folder Enter th...

Page 47: ...48 Step 2 Select a Computer NAS and press OK Step 3 Select a directory enter Username and Password optional and select the icon to add it...

Page 48: ...EG2 Transport Stream TS TP TRP M2T M2TS MTS AVI ASF WMV Matroska MKV MOV H 264 MP4 RMP4 FLV only support H264 MP3 G CD G MP3 XML Video Code Format XVID SD HD MPEG 1 MPEG 2 MP HL MPEG 4 2 ASP L5 720p 1...

Page 49: ...0 Audio Containers AAC M4A MPEG audio MP1 MP2 MP3 MPA WAV FLAC OGG Audio Codec Format DTS Dolby Dolby Digital Dolby Digital Plus Dolby TrueHD MPEG AAC HE AAC DRA FLAC Photo Containers JPEG BMP PNG GIF...

Page 50: ...com create new ticket so you can create a new ticket If you still need assistance please visit us at www ceenee com Your CeeNee product includes one year manufacturer s limited warranty and a free li...

Page 51: ...sure that the interface cable is properly inserted on both the TV and the CeeNee player Make sure the CeeNee player power LED is on If you are using a standard definition TV Make sure that the Compos...

Page 52: ...CeeNee Network Media Player only supports mass USB storage modes Make sure that the USB device is configured as a mass storage device Make sure that the USB device s file system supports NTFS FAT FAT...

Page 53: ...54 HISTORY Created Modified By Date Revision Comment K D 04 09 2012 1 0 First release HMHT 06 24 2013 2 0 Second release...

Reviews: