background image

EliteIQ

TM


User Manual 


35 

9M02-7100-A001-EN 

Version B 

User Input 

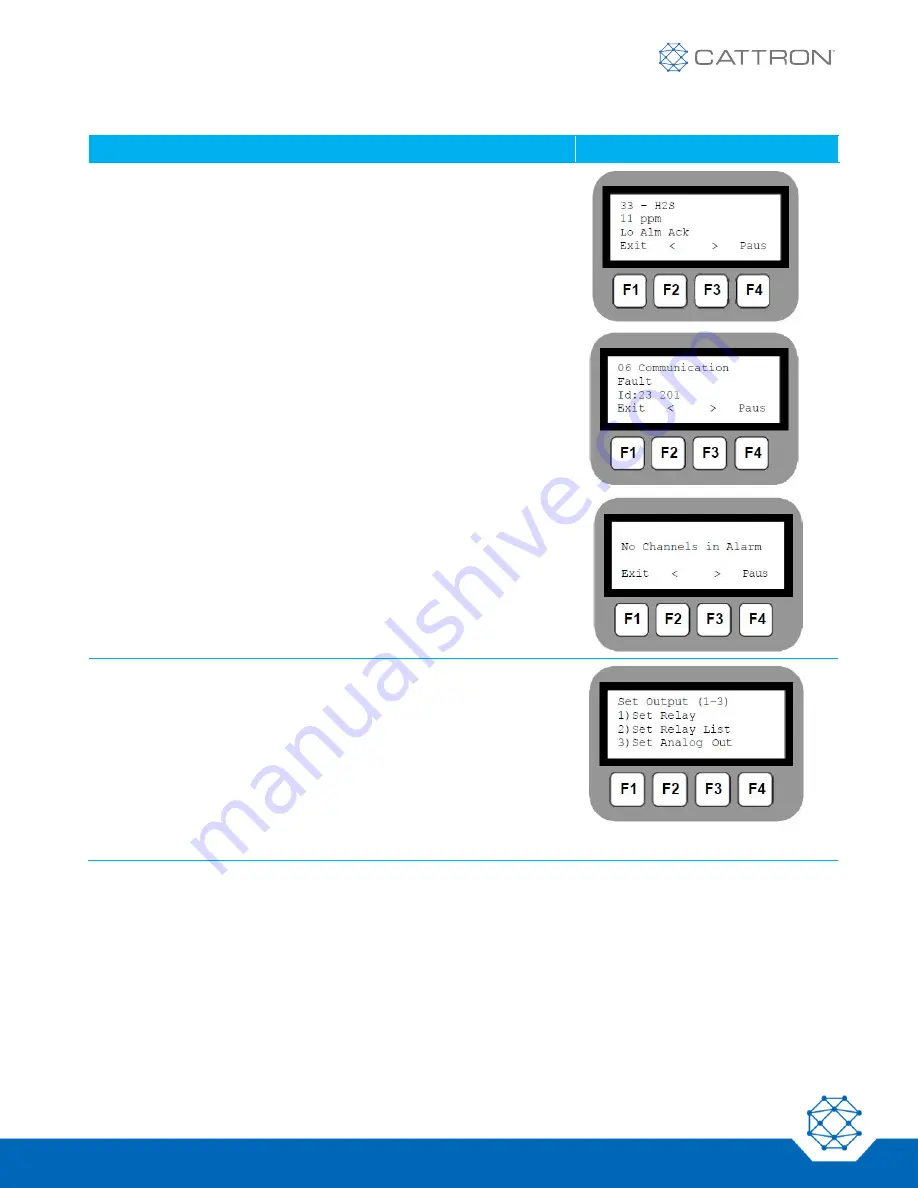
Display Shows 

 
Channels in Alarm display 
 

F1 to exit to the 

RUN MODE 

display 

F2 to display the 

previous channe

l in alarm  

F3 to display the 

next channel 

in alarm 

F4 to 

pause 

on this specific channel 


If the EliteIQ is a Modbus Master and there is a communications 

error with reading a channel, then channel 06 (Communications 

channel) goes into alarm, if the Channel Mode is Call on Alarm and 

the Alarm Delay has expired. 
The “Id:” field displays the Modbus IDs that cannot be read (for 

example, channels using IDs 23 and 201).  
 
 
If no channels are in alarm. 
 

OR 

OR 


Activate/Test Relays 


Press F1 to exit to the 

RUN MODE 

display. 

Keypad 7 to enter 

RELAY 

and 

Output 

functions  

Keypad 1 to Activate a single Relay 
Keypad 2 to Activate a Relay List 
Keypad 3 to set a Modbus Holding Register 


4.2.7  Acknowledging Alarms 

Alarms can only be acknowledged from the RUN mode. They can be acknowledged as follows: 


Locally using the keypad 


If an Ack input channel has been designated 

Summary of Contents for EliteIQ

Page 1: ...EliteIQTM User Manual 9M02 7100 A001 EN ...

Page 2: ...ringement nor as to the fitness merchantability or sustainability of any Cattron products for any specific or general uses Cattron Holdings Inc or any of its affiliates or agents shall not be liable for incidental or consequential damages of any kind All Cattron products are sold pursuant to the Terms and Conditions of Sale a copy of whichwill be furnishedupon request When used as a tradename here...

Page 3: ...Cards 11 2 2 5 Testing the System 18 3 Quick Start 22 3 1 Default Values 22 3 2 Quick Programming Steps 23 3 2 1 Step 1 Setup Digital Inputs Skip if Not Using Digital Inputs 23 3 2 2 Step 2 Setup Analog Inputs Skip if Not Using Analog Inputs 23 3 2 3 Step 3 Save Programming 23 3 3 Testing the System 24 4 Operation 25 4 1 Overview 25 4 1 1 How to Use the Keypad 26 4 1 2 Local Key Summary 26 4 1 3 H...

Page 4: ... Setting 37 5 2 System Wide Settings 38 5 3 Program Channel Settings 39 5 3 1 Analog Inputs 39 5 3 2 Relay Outputs 41 5 3 3 Digital Inputs 42 5 4 Relay List Setup 43 5 4 1 Relay Operations 43 6 Modbus RTU Master 44 6 1 Overview 44 6 2 Initializing the Modbus Master Interface 44 6 2 1 Modbus Master Channel Setup 45 6 2 2 Modbus Master Port Setup 45 6 3 Mapping EliteIQ Channels to Modbus Registers 4...

Page 5: ...eb based RemoteIQ system to deliver text voice or email notifications Setting local LEDs to alert personnel that channels are in alarm So the EliteIQ is your complete 24 hour a day 7 day a week monitoring and notification system that allows you to turn your operations into unattended operations 1 1 2 Control Capabilities The EliteIQ is a complete stand alone controller capable of turning relays on...

Page 6: ...r sensors relays or digital inputs Supports 8 48 physical input channels Relay expansion using 4 channel cards 1 1 4 Communications Capabilities The EliteIQ s communication capabilities include the following Web based monitoring service to deliver alarm notification historical charting of data and reporting Modbus Master to distributed sensors ...

Page 7: ...g the System Each step is described in detail in the remainder of this section 2 2 1 Unpacking the Equipment The EliteIQ is shipped with the following The EliteIQ in either a NEMA 4X plastic enclosure or metal enclosure A set of I O cards installed An installed backup battery User Manual and Quick Reference Guide 2 2 1 1 Operating Environment The EliteIQ should be installed in an environment that ...

Page 8: ...EliteIQTM User Manual 8 9M02 7100 A001 EN Version B Fiberglass NEMA Enclosure Figure 1 NEMA 4X Enclosure Panel Mount Enclosure Figure 2 Panel Enclosure Mounting Dimensions ...

Page 9: ...sure the hardware and the surface are strong enough to handle the weight of the unit 25 lb 2 2 3 Connecting the Main Power The EliteIQ operates on 100 to 240 VAC 50 60 Hz using 1 5 A at 115 VAC or 0 7 A at 230 VAC There are no selections required by the user to select the input power The main AC is connected to the EliteIQ using the AC terminal block located inside the unit The terminal block is l...

Page 10: ... terminal designated by the symbol Note The Ground green or green yellow wire should be at least 2 inches longer than the other wires as a safety precaution in case the line cord is pulled out of the unit Power surge protection is especially important if the equipment is located in a lightning prone area Contact Cattron at www cattron com contact for additional information on surge protection offe...

Page 11: ...ll fuse near the AC input that may blow if the input AC current or voltage exceeds specifications If no lights on the EliteIQ turn on when the power switch is put in the ON position this fuse should be checked Be sure to disconnect the EliteIQ from the primary power source prior to checking this fuse If the fuse is blown it can be replaced with a GFE 4 A 250 V fuse 2 2 4 Connecting the Input and O...

Page 12: ...t cards for the EliteIQ Digital Inputs Analog Inputs and Relay Outputs Each of these cards can be placed in any of the I O slots of the EliteIQ The slots are numbered from 10 through 60 When a card is positioned into a slot its channels are numbered by adding the channel number on the card to the slot number Example For an 8 channel digital input card in Slot 30 the channels are numbered 31 38 To ...

Page 13: ...esigned to monitor a Normally Open NO or Normally Closed NC relay or voltage input Terminals for all input channels are located on the opposite end of the card from the LEDs There are separate quick disconnect connectors for each group of four inputs The channel numbers are located on the metal housing next to each connector Note that each connector has two terminals IN and V If all of your inputs...

Page 14: ...d Input Wiring Two Wires per Channel Figure 9 Daisy Chained Direct Voltage Input and Contact to Ground Wiring The 24 VDC signal V must be daisy chained to all common points on the sensors that are being monitored to supply a power signal that can be sensed by the EliteIQ ...

Page 15: ...at is on the top of the analog card or you may connect to an external power supply The 24 VDC supply can source up to 300 mA on each analog input card however the total available in an entire system is only 500 mA Each channel of the analog input cards can accept either current or voltage inputs which are configurable through the programming There are no switches or jumpers to set Note The return ...

Page 16: ...EliteIQTM User Manual 16 9M02 7100 A001 EN Version B Cattron recommends that you use medium gauge wire 18 to 22 AWG twisted pair Figure 11 Analog 4 20 mA and Voltage Connections for Analog Input Cards ...

Page 17: ...ximum of 24 relays each of which is independently controlled either directly or under alarm conditions Each board is equipped with two quick disconnect plugs that allow for easy connection of sensor wires There are three connections for each relay Normally Open NO Common C and Normally Closed NC as labeled on the board bracket Relay outputs are typically used to control other equipment lights horn...

Page 18: ...ed on the processor board mounted on the back of the front panel To turn the power on open the front panel and move the slide switch SW1 to the ON position Figure 14 shows the EliteIQ board connections Power to the LTE modem is provided through connector J12 Figure 15 contains a system wiring diagram showing the connections between the EliteIQ box and the EliteIQ modem box The EliteIQ powers up ei...

Page 19: ...EliteIQTM User Manual 19 9M02 7100 A001 EN Version B Figure 14 EliteIQ Board Connections ...

Page 20: ...utomatically charges the battery whenever the power switch is turned on The unit also includes special circuitry to prevent the battery from being damaged in the event of an extended power outage When the battery runs down to 9 V the unit automatically disconnects it preventing deep discharge damage The battery remains disconnected until it charges back up to 12 3 V The battery provides at least t...

Page 21: ...e backup battery is properly connected is accomplished by requesting the status of the System Channel for the battery channel 02 WARNING THERE IS THE RISK OF EXPLOSION IF THE BATTERY IS REPLACED WITH THE INCORRECT TYPE DISPOSE OF USED BATTERIES ACCORDING TO THE INSTRUCTIONS ...

Page 22: ...teIQ 3 1 Default Values The EliteIQ is shipped with factory configured default settings that make it usable when it is installed as shown in the following table Parameter Default Setting Digital Inputs Channel Name DIN xx Channel State Set to Normally Open Channel Mode Set to Call on Alarm Alarm Delay 3 seconds Relay None Analog Inputs Channel Name AIN xx Input Type 4 20 mA Decimal Position 1 Engi...

Page 23: ... 4 1 3 channel name Back to top of menu HOME 3 2 2 Step 2 Setup Analog Inputs Skip if Not Using Analog Inputs Actions Keystrokes Go to Program mode HOME 1 Setup channel parameters 9 chan 0 1 1 0 5 V 3 0 10 V 5 4 20 mA type Number of digits to the right of the decimal decimal position See Engineering Units see 59 engineering units Scale Input 0 Value at 0 V or 4 mA zero scale Value at 5 V 10 V or 2...

Page 24: ...fy that the system is in RUN mode Run indicator is solid green If not press to put the EliteIQ into RUN mode 3 Check for the following The Channel 11 LED starts blinking red after 3 seconds the default Alarm Delay To acknowledge the alarm at the operator panel 1 Press Note If the EliteIQ is already making a call you must press HOME to cancel thecall 2 The Channel 11 LED indicator goes from blinkin...

Page 25: ...s several alarm limits associated with it each of which can control a separate alarm relay The EliteIQ can support 4 channel relay cards that can be connected to lights horns blowers motors or other equipment The display shows the current status of alarms input readings and all programming prompts and settings Programming is performed by pressing keys on the keypad and both listening to and viewin...

Page 26: ... functions Each of the GREEN keys is split as follows The top of the key indicates the operation performed when the system is in RUN mode The bottom of the key indicates the operation performed when the system is in PROGramming mode EXAMPLE The Disarm Bksp key allows you to disarm the system when in RUN mode and erase the previous key entry when in PROGramming mode Blue Keys The BLUE keys are Quic...

Page 27: ...ss key the specific function is displayed above the key on the display 4 1 3 How to Enter Text for Names The EliteIQ allows the user to enter names for the Site Unit and for each channel Entering names is very similar to entering names on most cell phones that are used today On the bottom of each key there are letters and numbers To select a specific letter or number press that key the designated ...

Page 28: ... Q Z 0 0 Erases previous letter 4 1 4 RUN Mode Operations The EliteIQ monitors all inputs and evaluates all alarm conditions when it is in the RUN mode While in this mode the EliteIQ automatically displays all enabled input channels Enabled channels are those that have a green LED shown on the analog or digital input card or on a Modbus Master channel ...

Page 29: ...EliteIQTM User Manual 29 9M02 7100 A001 EN Version B ...

Page 30: ... monitoring an LEL sensor in the NW section which is at 11 5 lel it has exceeded the Low LO limit and is in alarm AL Pressing the Paus F4 key will pause the screen on a channel of interest Displays all relays being controlled as well as the relay states Press the or keys to move to the previous or next channel Press the Scrl F4 key to return to the scrolling display of all channels in alarm Valid ...

Page 31: ...or Low Limit or for a digital input is in the Non Normal state and is NOT acknowledged Constant Red Channel has exceeded the High or Low Limit or for a digital input is in the Non Normal state and is acknowledged 4 2 3 System Channels There are a few channels that are always present in each system These are referred to as System Channels They behave just like other Analog and Digital channels and ...

Page 32: ...arm Note Typical causes for going into alarm are as follows wrong baud rate wrong Modbus ID or register number or disconnected cable Alarm Delay is 60 seconds No Relay List is set 07 System Fault Monitors each enabled analog current channel to confirm that there is not an open loop condition Alarm Delay is 10 seconds No Relay List is set Limit is set to 0 5 mA 4 2 4 Physical Channel Numbering The ...

Page 33: ...a Modbus Slave device do the following Configure a Slot in the EliteIQ to be a Modbus slot Configure a channel as listed below to read or write coils holding etc SLOT Modbus Channel Numbers 10 11 18 20 21 28 30 31 38 40 41 48 50 51 58 60 61 68 70 71 78 80 81 88 90 91 98 4 2 6 RUN Mode Screens Users can view Data and Alarms through the following process User Input Display Shows RUN MODE display F1 ...

Page 34: ...er a channel number to go to the View Data display View Data F1 to go to Exit this display and return to View Channel display F2 to move to the previous channel F3 to move to the next channel F4 to go to the Scrolling Channel display Scrolling Channel display F1 to exit to the View Channel display F4 to go to the View Data display Automatically scrolls through all enabled channels ...

Page 35: ...arm if the Channel Mode is Call on Alarm and the Alarm Delay has expired The Id field displays the Modbus IDs that cannot be read for example channels using IDs 23 and 201 If no channels are in alarm OR OR Activate Test Relays Press F1 to exit to the RUN MODE display Keypad 7 to enter RELAY and Output functions Keypad 1 to Activate a single Relay Keypad 2 to Activate a Relay List Keypad 3 to set a...

Page 36: ... channels that are in alarm are acknowledged at the same time The Red blinking LED channel indicator changes to Red steady On indicating that the specific channel is still in alarm but it has been acknowledged 4 2 7 2 Acknowledge Input Channel If an Acknowledge Input Channel has been specified then alarms are acknowledged when this input goes to the Non Normal condition ...

Page 37: ...mits o Scaling o Relays to control o Name of the channel o Engineering units PROGRAM mode is entered by pressing the key while on the RUN mode display RUN mode is re entered by pressing the key from the PROGRAM mode display Note If an Access Code has been entered the user is prompted to enter it before PROGramming mode is entered 5 1 1 Display Selecting a Menu Item 5 1 2 Display Changing a Setting...

Page 38: ...on but they can be modified at any time Note Press the key to do the following Move to the next program setting Move up a level in the menu Accept your entry PROGramming Mode display to enter System Setup Keypad Entry System Identification Alphanumeric ID Access Code Date and Time System Delays Program to Run mode delay Disarm to Arm delay Arm Disarm Relay List Firmware Version Reset to System Def...

Page 39: ...ess the key to do the following Move to the next program setting Move up a level in the menu Accept your entry to enter Channel Configuration Enter either a physical channel number or a Modbus channel number Note Channel numbers are two digits the first digit is the SLOT and the second digit is the CHANNEL in the slot 5 3 1 Analog Inputs Selections 0 through 6 allow you to modify the default setti...

Page 40: ...eering Units Engineering units for this input Scale Input signal yes or no Zero Scale Value in engineering units at the lowest input level Full Scale Value in engineering units at the highest input level Minimum Counts Value in counts of the minimum input e g 4 mA 786 counts count range 0 4095 Maximum Counts Value in counts of the maximum input e g 20 mA 3931 counts count range 0 4095 ...

Page 41: ...e Rate of Change 0 999999999 Negative Rate of Change 0 999999999 Rate of Change Period 0 60 minutes 3 Report Only Alarm Delay 0 as fast as the EliteIQ can issue an alarm Continue Notification if Return to Normal Relay List Relay List to activate deactivate going in out of alarm 5 3 2 Relay Outputs After you have entered a channel number that corresponds to a Relay Output you have three options as ...

Page 42: ...igital Inputs After you have entered a channel number that corresponds to a Digital Input you have six options as follows Keypad Entry Channel State 0 Normally Open 1 Normally Closed Channel Mode 0 Disabled channel is not being used 1 Status Only 2 Call on Alarm Mode 0 3 Call on Limit Totalizer Limit 0 999999999 Duration Limit 0 999999999 Limit Reset Period 0 999999 seconds Alarm Delay 0 as fast a...

Page 43: ...ay List of the same number e g physical relay 41 would be the first relay in Relay List 41 Using Relay Lists allows the user to define different relay activation combinations once and then reference the Relay List for several inputs This is particularly useful for controlling multiple relays like a light and a contact to a DCS system for all inputs Relay Lists can be set up at any time 5 4 1 Relay...

Page 44: ...eral times a second If the communications link stops functioning after repeated attempts a Communications Channel 06 alarm is initiated This alarm is treated exactly like any other system alarm allowing the system to call out drive local relay or issue reports Port 2 or Port 3 can be used as a RS 232 connection DB9 or as a RS 485 connection 5 position plug RS 232 Port 2 is J 11 RS 232 Port 3 is J ...

Page 45: ...d Coil or Read Input Status o Remainder of the configuration is exactly like a Digital Input Register Type Write Coil o Remainder of the configuration is exactly like a Relay Output Register Type Read Holding Read Input Register or Write Holding o Remainder of the configuration is exactly like an Analog Input Register Type Read Packed Bits o You must enter the specific Bit in the 16 bit word 6 2 2...

Page 46: ...Type which corresponds to the Function Code Register Number number of the register for the particular Function Code All of these items are entered in the Channel Configuration Function 9 section for each individual channel Supported Register Types EliteIQ Register Type Description Type of Channel in the EliteIQ Modbus Function Code 1 Read Coil Status Digital 01 2 Read Input Status Digital 02 3 Rea...

Page 47: ... Menu 1 Set serial port baud rate PROG 8 serial port for the port that you are going to use 2 Enable diagnostics port Set the Port Mode to 1 diagnostics 3 Connect your serial cable null modem 4 The following menu is displayed The following is the main menu and Site setup sub menu as shown from Tera Term Items in BOLD font are those that a user would most likely change EliteIQ Site Name Elite LTE M...

Page 48: ... Time Zone 4 Central Next Call Delay 5 8 secs Pump1 Cycle Chan 6 0 Pump2 Cycle Chan 7 0 Pump3 Cycle Chan 8 0 Pump4 Cycle Chan 9 0 PROG RUN Delay 11 60 mins DISARM ARM Delay 12 60 mins ARM DISARM Relay 13 0 MODBUS Slots 10 0 MODBUS Mode 14 single MODBUS Scan Rate 15 5 secs Open Loop Limit 18 0 cnts AIN Slope Offset 16 17 Slot 0 slope 10050 offset 1 Slot 1 slope 10050 offset 1 Slot 2 slope 10050 off...

Page 49: ...Cell Baud 4 115200 57600 57600 57600 Parity 11 None None None None Data Bits 9 8 8 8 8 Stop Bits 10 1 1 1 1 Max Idle chars 5 3 3 3 3 Resp Timeout secs 6 2 2 2 2 RS485 2 0 0 0 0 Slave ID 3 126 126 126 126 On Delay msecs 7 1 1 1 1 Off Delay msecs 8 1 1 1 1 Option 9 Channel Config Channel Config 9 0 1 2 3 4 5 6 7 8 9 SYS DIN8 empty empty AIN8 empty DOUT4 empty empty empty Slot 0 9 1 viewing the Digit...

Page 50: ...Scale Value 9 yes Zero Scale 10 0 0 0 Full Scale 11 100 0 3e8 Zero Scale Counts 12 786 Full Scale Counts 13 3931 Alarm Delay 3 60 secs Low Limit 18 1 ffffffff High Limit 20 1 ffffffff Pos Rate of Change 15 1 ffffffff Neg Rate of Change 16 1 ffffffff Rate of Change Intvl 14 0 mins Low Alm Relay List 23 0 High Alm Relay List 26 0 Channel Config 9 0 1 2 3 4 5 6 7 8 9 SYS DIN8 empty empty AIN8 empty D...

Page 51: ...edge Input Channel A digital input channel can be used to acknowledge alarms When this channel goes into the Non Normal condition it will acknowledge all active alarms AK Shown on the display and in reports Indicates the channel is in alarm and has been acknowledged AL Shown on the display and in reports Indicates the channel is in alarm Alarm Code The EliteIQ uses alarm codes on the display statu...

Page 52: ...Version B Item Description Alarm Mode 0 This mode defines a normal region that is above the Low Limit and below theHigh Limit Alarm Mode 2 This mode defines a normal region that is above a Low and High Limit TheLow Limit is below the High Limit ...

Page 53: ... 4 This mode defines two normal operating regions one above a High Alarm Limit and one below a Low Alarm Limit Alarm Screen When any channel goes into an alarm state the display is automatically changed to show the current conditions of those channels The user has the option to Pause on a channel of interest to view all relays which are being controlled by that channel ...

Page 54: ...oltage or current inputs that vary over a predefined range typically 4 20 mA or 1 5 V These signals are connected to Analog Input cards and programmed to provide values in engineering units EliteIQ operates on analog inputs in engineering units not counts Since you are measuring in engineering units this makes it easier to specify the alarm limits that you use You specify the conversion from curre...

Page 55: ...operator intervention or reprogramming is required The POWER STATUS indicator on the front panel changes from a steady green light to a blinking red light indicating that the system is now on battery power and the Primary Power alarm has not yet been acknowledged If the battery charge drops below a certain level the message System battery is low is delivered in the System Status report and the BAT...

Page 56: ...s active and can be energized or de energized Call on Alarm 2 Digital goes into alarm when the channel goes from the Normal setting to the Non Normal setting e g from Open to Closed on a Normally Open channel Analog goes into alarm when the value exceeds either the Low or High Limits Alarm Mode 2 4 Analog defines a normal region that is below a Low and above a High Limit Goes into alarm when the v...

Page 57: ...s for failure are baud rate mismatch incorrect Modbus Slave ID and incorrect Modbus Slave register number Date Time Specify the current date and time and the format of the date and time The valid formats for the date and time are as follows 0 mm dd yy hh mm ss default 1 yy mm dd hh mm ss 2 dd mm yy hh mm ss 3 dd mm yy hh mm ss 4 dd mm yy hh mm ss Day Specifies a day of the week or a holiday 1 Sund...

Page 58: ...including turning on off relay Disarm to Arm Delay The EliteIQ automatically returns to the Armed mode after this length of time 1 1440 minutes default is 60 minutes Dry Contact Digital input connections to the EliteIQ are typically dry contacts meaning that the device or switch that is connected to the EliteIQ is not supplying any voltage or current Duration Limit The Duration is typically used t...

Page 59: ...5 cubic feet minute 27 percent 4 degrees C C 16 cubic feet hour 28 pH 5 degrees F F 17 pounds hour 29 Hz 6 gallons 18 feet second 30 kHz 7 liters 19 inches 31 million gal 8 pounds 20 feet 32 ppb 9 kilograms 21 meters 33 vol 10 gallons minute 22 ppm 34 lel 11 gallons hour 23 watts If selected the EliteIQ will automatically compute the total flow Enter Key Enter the current entry Backup one level in...

Page 60: ... Battery power low Battery power returned to normal Alarm acknowledged Digital Input Channel Alarm Mode Status Only ON OFF Analog Input Channel Alarms Mode Call on Alarm Low limit alarm Low limit alarm cleared High limit alarm High limit alarm cleared Positive rate of change alarm Negative rate of change alarm Positive rate of change alarm cleared Negative rate of change alarm cleared Alarm acknow...

Page 61: ...he top of the Programming Menu Input Type Selections are 0 0 to 1 V 1 0 to 5 V 2 1 to 5 V 3 0 to 10 V 4 0 to 20 mA 5 4 to 20 mA IO Register Type See Register Type Limit Reset Period Specifies the amount of time in minutes from the start of the day that the duration counter is incremented and totalizer is accumulated until it is automatically reset LO Shown on the display and in reports Indicates t...

Page 62: ... a Modbus Master the EliteIQ reads writes to logical channels These channels are associated with slots just like physical I O A slot enabled for Modbus allows eight channels to be used for reading or writing to a Modbus Slave device Channels are numbered just like physical channels For example Slot 50 would be channels 51 to 58 Negative Rate of Change If the analog reading falls at a rate that exc...

Page 63: ...he EliteIQ are as follows 0 UART used for LTE modem 1 Port 2 2 Port 3 Positive Rate of Change If the analog reading rises at a rate that exceeds the Positive Rate of Change within the time specified by the Rate of Change Period then the channel goes into alarm For example if the Positive Rate of Change is set to 100 00 and the Rate of Change Period is set to 15 minutes then if the analog reading e...

Page 64: ...on acknowledgement or when the Limit Reset Period is reached The EliteIQ reports the value of the Totalizer Count either in the default value of counts or in Engineering Units In both cases you can also specify a Scaling Value by which to multiply each count An example of using a Scaling Value is to total the flow through a pipe over a given time where each pulse represents a specific amount of vo...

Page 65: ...er 100 To read a channel from the same EliteIQ the register number is based on the channel number in the EliteIQ EliteIQ Channel Register Number System Channels 01 08 1 8 Slot 10 11 18 9 16 Slot 20 21 28 17 24 Slot 30 31 38 25 32 Slot 40 41 48 33 40 Slot 50 51 58 41 48 Slot 60 61 68 49 56 Slot 70 71 78 57 64 Slot 80 81 88 65 72 Slot 90 91 98 73 80 Register Type Modbus register type of the Slave Mo...

Page 66: ...e the first relay in the List Number that matches the Physical Relay number So if you only need to control a single relay you do not need to create a Relay List as it is already configured For example If a Relay Card is in Slot 20 Relay List Number Position Physical Relay 21 1 21 22 1 22 23 1 23 24 1 24 Relay State from High Alarm Specify the relay behavior when the input transitions from the High...

Page 67: ...the EliteIQ off before returning to RUN mode Hidden underneath this function is a method to Backup and Restore a complete programmed configuration Enter 9 and then the access code 42552 to enable this function Restore See Reset to System Defaults RS 485 Port 2 or 3 can be used as either a RS 232 or RS 485 connection If RS 485 is enabled then the 6 position connector on the top back of the large pr...

Page 68: ...xample 1 count may represent 100 gallons so the Scaling Value would be set to 100 Scan Rate The EliteIQ reads all Modbus Slave devices every scan rate seconds Scrl Pressing the SCRL key cycles the display through all enabled channels Serial Port The EliteIQ has three serial ports Port 1 Port 2 and Port 3 Port 1 is reserved for the LTE cellular modem Ports 2 and 3 are on DB9 connectors if using RS ...

Page 69: ...side the EliteIQ enclosure Low and High alarm limits can be specified for alarm relay activation or call outs or disabled Totalizer Limit The totalizer is the total number of times that an input has been in the Non Normal condition from the last time that it was reset The alarm associated with the totalizer is the Totalizer Limit which is specified in counts from 0 disabled to 999 999 999 Whenever...

Page 70: ...from 20 0 to 200 0 the Zero Scale is the value at 4 mA It is entered as 200 with the Decimal Position set to 1 Relay Channels Channel Number 11 98 Pulse Duration 0 Seconds Channel Mode 2 0 disable 1 status only enabled Channel Name 4 Relay Lists Relay List Number 01 98 Position 1 Relay Channel 1 11 98 Position 2 Relay Channel 2 Position 3 Relay Channel 3 Position 4 Relay Channel 4 Position 5 Relay...

Page 71: ...M02 7100 A001 EN Version B 9 Technical Support For remote and communication control systems support parts and repair or technical support visit us online at www cattron com contact This product was formerly produced by Antx Inc ...

Page 72: ... information provided in this document is subject to change without notice Cattron Support For remote and communication control systems support parts and repair or technical support visit us online at www cattron com contact Cattron North America Inc 655 N River Rd NW Suite A Warren OH 44483 ...

Reviews: